Dub Techno Tutorial
I’m a big fan of artists like Echospace, Basic Channel, and DJ Pete. Dub production techniques in techno have seen a resurgence in the last ten years as the modern Berghain sound has boomed. For this dub techno tutorial we use sounds, instruments and effects that come with Live Suite 10 so there’s no need to download anything extra.
Here is the complete dub techno loop/section we’ll be making…. The track builds up to 0:30 when the chord and it’s derived bass come in together, (you might need headphones for this one!)
See also: my other dub techno tutorials and rack: Studio Brootle Dub Techno Chord Rack, Dub Techno Tutorial: 4 Ingredients. These are worth checking out too: Free Ableton Operator Presets: Epic Pads (and rack), Studio Brootle 909 Sample Pack, House Drum Patterns, VCV Rack Tutorial, Free Techno Kick Sample Pack, Ableton Tutorial – Drones in Operator, Free Techno Chord Arp Ableton Rack. See all our Free Operator Presets here. And Dub Techno Tips.
Buy our packs at our Shopify store, use this code for 25% off: SBCOM25STWD

Update: (Summer 2024), I made this video of the rack, there’s more detailed info below…
How to make Dub Techno…
For dub techno the effects and processing will be very important and do the bulk of the work. You can set up just four elements: one chord hit, a 909 hi hat, clap and kick, and the process them heavily with delays, drive and reverb to keeping the chord floating and moving in the mix.
We want to reproduce analogue dub mixing techniques as much as possible – driving, filtering, delaying, and delaying some more. And then the whole track comes alive with the live mixing / tweaking of these parameters to keep the track moving and building.
We’ll go into more details below….
Downloads
You can download this pack by subscribing to the mailing list here, you’ll get a link to download all the free presets, samples and racks we’ve ever made:
Lets get started making the track…..
We set the bpm to 125bpm. Then we’ll set up some simple drums.
We’ll start with the kick drum – we want to make a good dub techno kick kick that cuts through the mix, but at the same time doesn’t need to be a big overly compressed techno kick that dominates the mix.
Create a new channel with a Simpler and select the Kick-909 sample that comes with Ableton. We change the filter setting on the Simpler to OSR (which models the old OSCar filters) and add some Drive. Then add a Saturator and EQ Eight and process it to taste as in the following image…

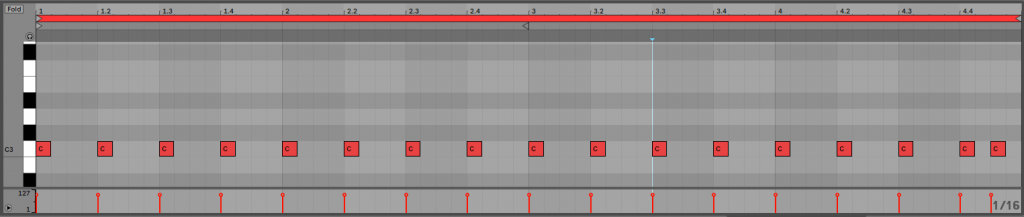
This plays a four to the floor pattern with a double kick at the end of the bar every 4 bars. You can copy this midi pattern if you like…
Then we use a 909 sample for the clap (Clap-909), we add to a Simpler in a new channel with this midi….

Pitch it down a bit with a Pitch unit (I love the sound of slightly pitched down drums tbh, especially for slower dub techno). Then filter it down slightly and drive it on the Simpler filter (with the OSR setting). We do this to make the clap low-passed and driven – I love the way a lot of dub sounds are filtered in the mix taking the top end off them and then saturated.

Then add over drive, delay and reverb as in the images below. Then add another Overdrive to drive that fx chain and bring out the reverb and delays. Like having a hardware fx units but then driving them at the mixer by red lining it for some nice warm saturation. I like a thin band on the last Overdrive Unit to give the sound more character in a small frequency band. It sounds good when you sweep it or automate it in the mix. Then add EQ with EQ Eight to taste

And lastly for the percussion we make a new channel for a Simpler and choose the sample ‘Hihat-909-Closed’ with this midi…

Then we low-pass the hat on the Simpler filter slightly and drive it with the OSR setting. This drives it and cuts the top end off it nicely as we did for the clap above.
Then overdrive it to taste.
Then add a delay unit, set it to ping pong and experiment with the filtering so the hat delays nicely in the high-end in a thin band so it does not overcrowd the mix. We move the left and right delays so they are ‘off’ and imperfect – one up 2% and one down 2%. This gives it some stereo width.
Then Overdrive it to taste, we use a thin band.

The a little bit of grain delay for some small, weird delays. Turn up the DryWet on the grain delay to hear what it is doing. You could automate this subtlety throughout the track if you like to keep the hats moving / floating in the delay/reverb chain.
Then reverb and EQ Eight.

That is a long signal chain for the a hi-hat! But the two delays and the reverb can be tweaked and automated to keep the hat constantly changing and moving – floating in the mix. Feel free to tweak and change the settings as much as you like.
Buy our preset and sample packs—> at our Shopify store , use this code for 25% off: SBCOM25STWD
Dub Techno Chords
Ok, now for the the most important part of this dub techno tutorial… how to make dub techno chords… and their fx chain!
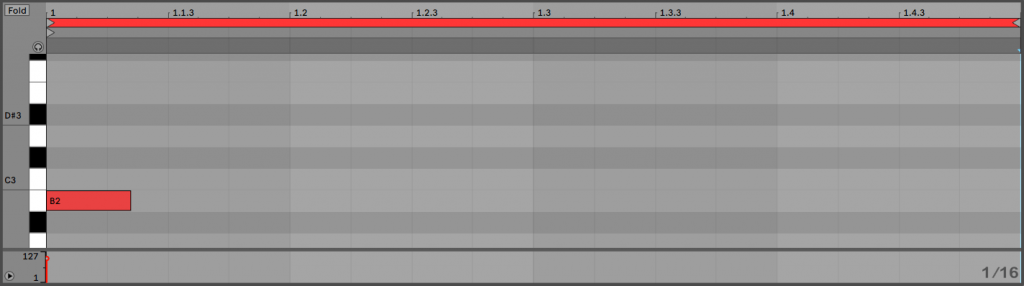
Set up the midi for just one note to play at the start of the bar….
All of this is in the Rack to download (the link is higher up in this article) – so get it and add it to your track if you want to do things the easy way! Or you can follow these instructions, here is a run down of what all the units in the chain do…
Chord Unit – I like to set up a one finger chord…. so I set up a Chord unit with +3 and +7 semi-tone settings which means that by playing one note it will be like playing three notes in a minor chord. So now by playing B (the root note) it will also play a note 3 semitones up and another 7 semitones up – B ,D ,F# – a minor chord that you would play with 3 fingers on a piano. You can play any one note and get a minor chord from it.

Operator – Lets use a detuned saw tooth here, these are the most commonly use waveforms in dub techno chords. They sound great in a filtered down chord. So we set up an Operator with two saw waves (A and B) detuned against each other by turning up the fine tuning of B slightly (this is also mapped to the Macro Controls for easy automation/tweaking). Try turning up the first macro and you will hear the effect of this – you can almost turn it into rave stab by detuning it a lot if that is the sort of sound you want to go for.
Auto Filter – Then a filter unit to low pass the chord. We also use the Envelope amount and release to control how much of the chord comes through. These small filter controls at the start of the fx chain can be tweaked live and can really change the dub chord. The Frequency of this is mapped to the Macro controls of the rack, and we automate it through the audio example above.
The I added a Grain Delay unit. You can see it at the end of the first image and start of the second. This is a weird Ableton effect that I haven’t used in many tracks to be honest, but it is perfect to add here – I’ve set the pitch to ‘-12’ so aswell as adding nice delay, it is pitched down an octave and so it adds a delayed sub bass to the chord. You can hear the system-shaking bass that comes in at 30 seconds in the sound clip, as the Grain Delay DryWet is turned up when the beat comes back in. The bass is boosted later on too, but the main weight of the bass comes from the Grain Delay unit with it’s octave down delays. Play with the DryWet (also mapped to the macro, and automated in our example) and Feedback controls and you’ll hear what it is doing.
I love dub techno bass and this pitched down delay is a great way of creating a delayed bass element to the mix.

Vinyl Distortion module – A lot of older dub techno has some noise or small artefacts in the mix from the analogue signal chain, which give it so much character. So we’ve added some here with the ‘Crack’ preset slightly modified – be careful with the volume as a little goes a long way here.
Then there is an Overdrive with a thin frequency band to distort and filter the signal. The frequency of this unit is mapped to a macro control that controls BOTH Overdrive unit’s frequencies together.
Following that, a Drum Buss. I love these units – this one has a lot of Boom to bring out the bass of the chord, and the Transients are turned up – this makes the chord a bit more punchy and also picks out some of the vinyl distortion for earlier in the chain.
Echo – this is the main dub delay in the rack. It is the closest you will get to dub delay in Ableton, I like the unit a lot.. It is set up for a fairly standard delay time – with a little bit of ‘error’ on each side but make the Left channel -0.7% and the Right 1%. Play with the feedback of this for big changes in the sound (this is mapped to a Macro).
Second Drum Buss unit – this adds Drive Boom and some more transients to pick out the delays from the Echo unit too.
Delay – This is set to ping pong to have a low Dry/Wet amount and high feedback, at a high range frequency filter band. You cannot hear it much in the mix as standard, but when you lift the Dry/Wet (also mapped to a Macro) it introduces a high end tight delay to the mix. You can hear in the audio sample we bring this occasionally in the mix – also you can see in the automation section later in this article the exact amounts.

Second Overdrive – a subtle effect at 16% wet dry. It adds some light saturation to the delays before it. This is mapped to the ‘Ovrdrive freq(s)’ Macro knob which controls the filter band for both of the Overdrive unitsthis is to mimic redlining the fx chain on an analogue mixer which adds sem warmth after the effects. This is to mimic redlining the channel on an analogue mixer which adds some warmth after the effects by overdriving them.
Reverb – set to 39% Dry/Wet for a lot of reverb in the chain. This is really important for dub techno – both the Decay Time and Dry/Wet can be tweaked for great effect (and both are mapped to Macros).
Limiter to squash the mix just slightly and tweaked correctly it has a nice effect on the reverbed sound.
Compressor – sidechained to the kick so the bass frequencies of the kick and chord don’t overcrowd each other in the mix.
EQ Eight – the chain is the EQ’d to taste.
Feel free to tweak these as you like and change to the order of them to see how it affects the final sound. Have fun with it, be warned though you can loose days sat tweaking these chords!
Automation of the dub-chord….
Here’s a screenshot of the automation of the Rack Macros used in the this dub techno tutorial so you can copy them or use them as an inspiration or a starting point for your own…

From top down – Frequency. The filter frequency is opened up over time to let out the high end of the chord and build tension.
‘Grain Sub‘ – this is the Dry/wet of the grain delay that adds a delay chord an octave lower. It is added slightly at the start of the track and then faded out a bit. Then back in at bar 17 for the big bassline swell..
Echo Fdback – the feedback of the Echo machine – we ramp it up here as a build. But you could have it coming in and out slowly to keep the delays moving and changing.
‘High PingPng‘ – we bring the ping pong delay in and out to keep the mix interesting. we also use it as a build, where it ramps up at the end of the first 16 bars.
Reverb decay – used as build – fully up it can make the whole fx chain swell to a pad-like tone.
Env Modulation – (not a macro, I automated it from the filter) this is the filter Envelope Amount. It will shorten the amount of the chord let through the filter (which will obviously have more audible effect the lower the filter is).
Env Release – (not a macro, I automated it from the filter) this controls the release of the filter envelope mentioned above. These last two controls only have a subtle effect in our mix, but if you lower the filter down to just low bass frequencies and the Env Modulation would have a much bigger effect.
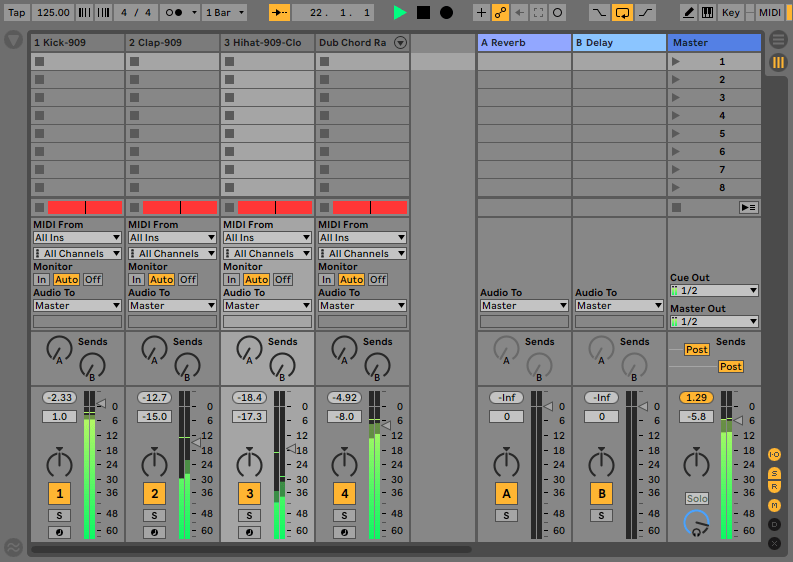
Arrangement and Mixer settings….
Here’s the arrangement outline for the small section we made in the audio example. It is just a few bars but it gives you an idea of how a whole track could pan out.
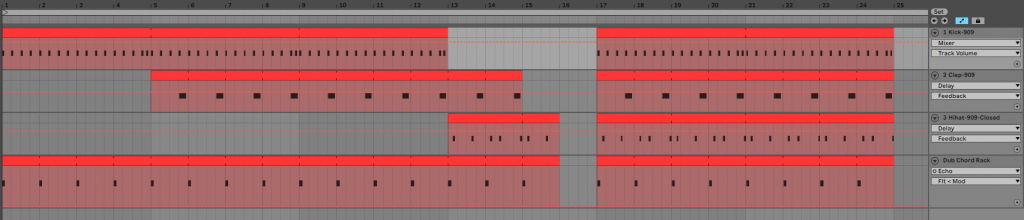
And here is how we mixed it down – the hats and clap are quite low in the mix with the kick and chord driving the whole track.
Macro Controls of the rack:
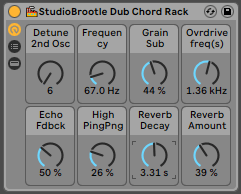
Here’s a run down of the rack controls (download link higher up the article). They are all mentioned earlier, in this dub techno tutorial, but here they are all in one place so you can refer to them and use the rack immediately….
Detune 2nd Osc – controls how detuned the initial chord is, by moving the frequency of the second oscillator away from the first.
Frequency – the filter frequency
Grain Sub – the grain delay wet dry amount (the delay is pitched an octave down, so this effectively adds a delayed sub bass to the chord). Turning it up adds a lot of bass!
Overdrive freq(s) – This controls the filter sweep of both overdrive units together.
Echo Fdbck – The feedback amount of the main dub delay, the Echo.
High PingPng – This adds a ping pong delay in the high frequency range.
Reverb Decay – the length of the reverb
Reverb Amount – the wet/dry mix of the main reverb unit.
See also: our guide to Ableton’s Echo.
Summary
Hope you enjoyed this dub techno tutorial. I really enjoyed making this. It turned out there was a lot to write about to be honest!
Again, here is what is sounds like….
Here are some more things to try…
Try other chords (non-one finger ones) and different midi. All the delay timings, wet/dry and feedback can be tweaked along side the filter frequencies for a radically different sound.
You could add the rack to a new channel playing a different note and processing it differently with different echo times maybe and make the two channels or chords compliment each other.
You can try different reverbs/delays. We made an Ableton Spring Reverb which you can try adding instead of the reverb unit. Also use an LFO tool (like the Max for Live one) to control the overdrives and filters / frequencies over time to make the whole track move organically.
I really hope you can make something great with this as a starting point, I would love to hear what you come up with.
You might like these other articles we wrote…. EBM Bassline Tutorial: Ableton, Dance Mania Influenced Beat and Rolling Techno Bassline Ableton
Buy Our Preset Packs here:
Click the image for 25% off: