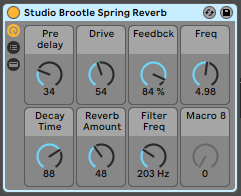
Spring Reverb is a classic studio reverb effect. I love the sound of it on snares and high-frequency percussion like hi-hats. The hardware units contain reverb tanks with springs in them. The audio signal is sent through the spring which gives it a characteristic sound. I built a rack to replicate this in Ableton, which you can download below.
We offer online Ableton lessons, get in contact to get the most out of your studio time: Ableton Lessons.
See also: Studio Brootle 909 Sample Pack, House Drum Patterns, VCV Rack Tutorial.
How to make spring verb in Ableton
For Spring Reverb like this in Ableton you need a few effects units:
- the audio goes through a tight delay and a fairly short reverb,
- distorted with overdrive and a filter
- a filter delay with a tight delay time which gives the reverb the main spring sound
- then it is followed by another reverb unit, and a filter for some more subtle drive.
If it basically lot of effects units, all either adding subtle short delays and reverbs or subtly distorting them. They are fully described below.
Here’s an audio example of the rack in action on a drum loop. The audio below starts with just the drum loop and no effects, then the send amount is turned up on the snare and hats to bring in the reverb, and towards the end of the track other rack macro controls are turned up for a reverb build. It is really good as a send on techno projects.
Download the Ableton effect rack:
How to use the Spring Verb Rack
I set this up to use as a send fx, so you need to add it to a Return track. You can send some percussion to it, especially snares and also hi-hats. And use it as a build effect by sending more channels to it and automating them (like in the audio example above).

Here’s what the macro controls do…
Pre Delay: controls the feedback and mix on the delay.
Drive: adds over drive distortion from the overdrive, and 2 filter units.
Feedbck: feedback on the filter delay.
Freq: controls the filter width of the Fitler Delay.
Decay Time: controls the reverb decay time on both reverbs simultaneously.
Reverb Amount: wet/dry control for both reverb units simultaneously
Fitler Freq: cut-off of the last filter
Try them out on a loop 🙂
Ableton Spring Reverb effects chain
Here’s how to build it yourself – or if you’re just downloading the Spring Reverb Rack above, this will act as an explanation…


I make a really short delay (feedback and wet/dry are mapped to a macro) then a fairly short reverb, then I add the possibility of adding a small amount of overdrive with an overdrive unit (wet/dry mapped to a macro)
Then a filter for some more overdrive, a filter delay with a tight delay time which gives the reverb the main spring sound, then it is followed by another reverb unit, and a filter for some more subtle drive.
The filter delay gives the main spring verb sound, and the Ableton Reverb units add different characteristics to the reverb sound before and the filter delay, whilst the filter and overdrive unit saturate the audio at various parts of the signal chain to add character.
Summary
Feel free to use this and do what you like with it, lets us hear what you make 🙂
You might like our other Ableton tutorials: Ableton Analog, Ableton Operator, and Ableton Wavetable
Also, check out our other Studio Technique articles here:
https://www.studiobrootle.com/category/studio-technique/
And our other Ableton Live tutorials here:
https://www.studiobrootle.com/category/ableton-tutorials/
Before You Go…
- Get on the email list for free kick drum samples every week, plus you get all the past ones as soon as you subscribe: you can do that HERE.
- You can find our paid packs at our Shopify store HERE ( use this code for 60% off anything or everything: SBCOM60STWD ) .
- Follow us on Youtube for hardware workouts and Ableton tutorials… Studio Brootle Youtube.
- If you’re looking for 1 to 1 online Ableton lessons get in contact to get the most out of your studio time, email: studiobrootle@gmail.com.
