Here we make a rolling techno bassline in Ableton (a.k.a. delay rumble). Its a low sub bass that pulsates with the bpm of the track used by artists like Klangkuenstler, SNTS, Sara Landry. It is very similar to the rumble kick process we touched on before, but in this case we use a delay instead of reverb to process the kick, which gives the low sub bass s a rhythmic character. This example uses all native sounds and fx from Ableton Standard.
You can hear the loop we’ll be making here… The rolling bassline comes in at 7 seconds in with the hi-hats….
See also: Studio Brootle 909 Sample Pack, House Drum Patterns, VCV Rack Tutorial, Free Techno Kick Sample Pack.
Video: Techno Technique: Delay Rumble
Here’s a quick video tutorial explaining the technique…. you can download the rack for this on the new article: here.
Overview – Rolling Techno Bassline Ableton
For a rolling techno bassline like this in Ableton you need process a kick, copy the kick and add delay and filter it down in a pulsating sub bass, then add hats, clap and industrial snare to fill out the loop. All swung with the same groove template. Read on for more detail…
Settings and arrangement
BPM 138.
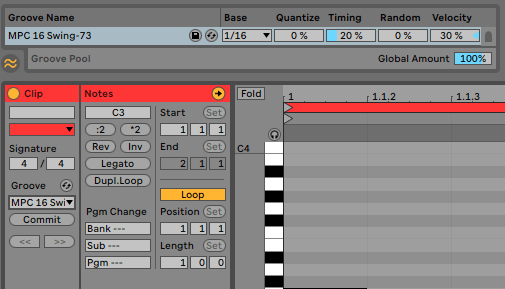
swing: MPC 16 Swing-73 (20%)
samples/instruments/fx: all built in fx and instruments from Ableton Standard.
all notes play on C3 unless otherwise stated
The arrangement looks like this….

Step 1: set bpm and groove
First off, set the bpm to 138bpm and shuffle to “MPC 16 Swing-73.agr” from the Ableton groove pool. Set the timing to 20%

Step 2: Kick
We want a punchy kick that will double up as our sub bass too. Let’s make the kick first. Load up a Simpler and add to it the sample Kick-909.aif (click on ‘Samples’ in the Ableton browser and search for Kick-909.aif, it is included with Ableton).
Set a 4/4 kick pattern as in the image below and play it. Also set the clip to have the groove setting we mentioned above.

Set the Release on the Simpler amp envelope to max to hear the whole kick play each time.
Set the filter type to OSR and turn up the drive to about 4 to give the kick some grunt! Then process the kick with saturation, and and EQ it with an EQ Eight.

It should sound like this….
For the sake of this tutorial you don’t have to add this, but for a bit of variation I added this every 4th bar of the kick….

Step 3: the rolling techno bassline
Copy/duplicate the kick channel to a new channel to make the sub bass. Using the same midi and Simpler, and EQ. Delete the Saturator from the channel.
Add a delay right after the Simpler and filter it down. I add drive on the filter too for some nice distortion to bring out the kick. All this can be seen in the image below.

Then add a drum buss which we use to boost the bass – turn the Boom to 57%. This increases the bass hit of the sub considerably so be careful!
Then side chain it to the kick with a compressor so that the sub bass dips in volume when the kick plays for a cleaner bass mix. If both the kick and sub play at the same time one of them may get lost in the mix, especially on a big system, so we use a compressor which dips the sub bass in volume when a kick drum plays. Select the original Kick as the trigger for the side chain.
Then we EQ it, I want to boost the sub bass, but also make a ‘hole’ for the kick, in other words I want to make the sub bass lower in volume where the kick is punchy, so that the sub bass does not detract from the punch of the kick. This is to help with the mixdown of the sub and kick, and the same reason we did the sidechaining above. To do this we use the EQ from the kick channel, and take the peak where the bass is boosted and then turn the gain down at exactly that frequency. This makes a hole in the frequency range where the kick is boosted/punchy. I turn the resonance (Q) down a bit so the cut is a thin frequency cut. And boost the sub bass below the cut.

Adjust the volume of the channel to taste. Now we have a nice sub bass and kick that are both clear in the mix.
Here’s what the bassline sounds like with the kick. You might need decent headphones / speakers to hear it as it is very low! It’s a reverberating pulsating low-end sub which will shake a club system.
Step 4: the hi-hats
Next we add some hi hats to the loop: add a new channel, and add a Simpler. Load up the sample “Hihat 808 Short Castle”.
Add an off beat hat midi pattern. Select the same MPC groove as the kick.

Process it with 2 overdrives and saturation and EQ it as in the image below.
Also add some reverb send to taste. The reverb send we use is the default one when you start a new Ableton project (see the mixer view at the bottom of this article for the send amount).

Step 5: the clap
In a new channel, we’ll add a pitched down clap. Add a Simpler and as the sample “Clap 707”. I love a pitched down clap, the 707 clap is crisp and works well. Set up this midi clip…

We pitched the sample down 5 semitones with the midi Pitch tool, and process it with drive on the Simpler filter, Overdrive, Delay (to give it that bouncing effect), Saturator and EQ Eights units then sent to a reverb send (see the mixer view at the bottom of this article for the send amount). Add the same mpc groove as the other channels.

Step 6: Industrial Snare
Lastly we add an industrial snare hit in a new channel. Set up a midi clip like this:

We add the sample ‘A-Snare Leedy 1 A’ to a Simpler and process it by adding drive at the filter on the Simpler, Overdrive, and Saturator, then EQ’d and send it to reverb and delay sends (see the mixer view at the bottom of this article for the send amount). Add the same MPC groove as the other channels.

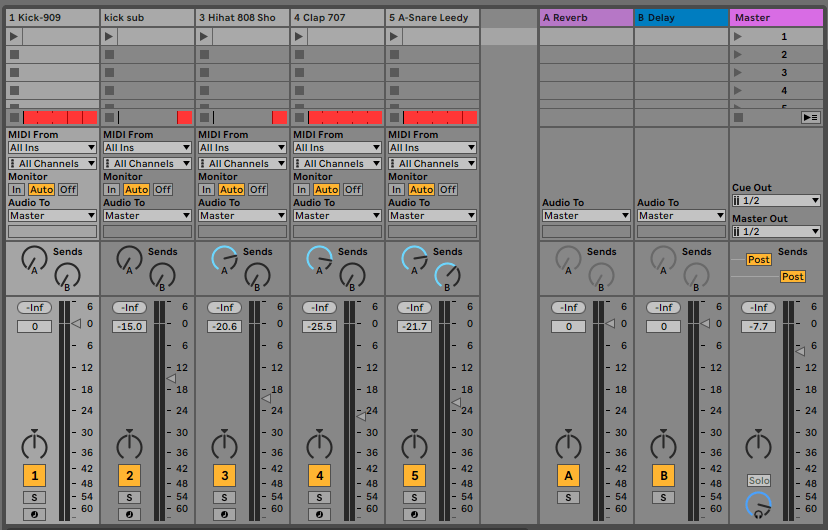
The mixer volume and send settings we use….

There you have it, a rolling techno bassline with Ableton built in samples. Here’s the complete loop we made:
And this is the full loop once sequenced out as in the arrangement image above (in ‘Overview’).
More things to try…..
Change the processing of the bassline – slight changes to the filtering and distortion will give a big difference. As well as changes to the midi note placement and delay settings will give it a totally different feel.
Obviously changing the kick drum sample will also have a big impact on the sounds of the bassline too. Try it with different samples.
You might like these other articles we wrote…. Dub Techno Tutorial Ableton, EBM Bassline Tutorial: Ableton, and Dance Mania Influenced Beat
Before You Go…
- Get on the email list for free kick drum samples every week, plus you get all the past ones as soon as you subscribe: you can do that HERE.
- You can find our paid packs at our Shopify store HERE ( use this code for 60% off anything or everything: SBCOM60STWD ) .
- Follow us on Youtube for hardware workouts and Ableton tutorials… Studio Brootle Youtube.
- If you’re looking for 1 to 1 online Ableton lessons get in contact to get the most out of your studio time, email: studiobrootle@gmail.com.
