Welcome to the Studio Brootle Convolution Reverb Ableton guide, covering the main Max For Live Device, as well as the Pro version and the IR Measurement Device to make your own reverbs…
We offer online Ableton lessons, get in contact to get the most out of your studio time: Ableton Lessons.
See also: Studio Brootle 909 Sample Pack, House Drum Patterns, VCV Rack Tutorial, Ableton Sampler.
What Is Convolution Reverb?
Convolution Reverb is a method of digital reverb that uses a recording (called an impulse response) from a space. The convolution reverb then analyses it and uses it to recreate the reverb from that space.
How Does Convolution Reverb Work?
An example of convolution reverb is taking an impulse response from a church and then putting it into Convolution Reverb to mimic the reverb from the church in Ableton.
A recording is taking of a short, sharp , loud sound (like starter pistol or loud clap) in the space, and the reverb tail is captured. Then this is loaded into the digital convolution reverb, which then reproduces the reverb. For example recording a loud snare in a church would allow the sound of the response.
Here’s an example, we ran a 909 tom through Convolution Reverb preset York Minster Cathedral, which was taken from an impulse response recorded in the Cathedral itself…
Where can I get it?
You can get Convolution Reverb for free here. You’ll need Max For Live. There are 3 devices – Convolution Reverb, Convolution Reverb Pro, and the ‘IR measurement Device’. The latter is for making your own impulse responses in a space to reproduce it’s reverb.
It also comes with over 400 presets!
How Do You Use Convolution Reverb?
The Convolution Reverb comes with a lot of presets and built in Impulse Responses (called IR in the user interface). These IR’s are like a map of a reverb from a real place. So these settings are really important, as they contain all this data to reproduce the reverb.
Here’s a screen shot of the Convolution Reverb, we’ll run through it’s features below…
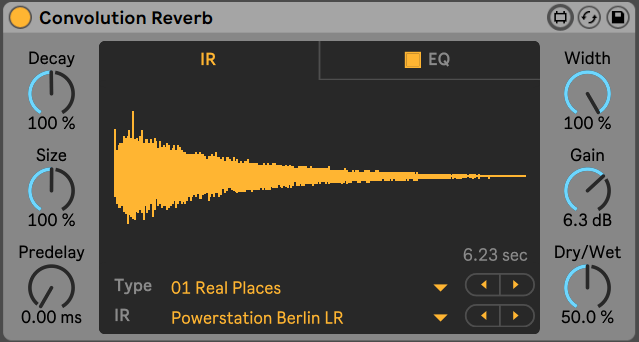
On the left you have Decay and Size which is set to 100% by default. Which mean they reproduce the reverb of the space the IR was recorded in exactly. You can then boost or lower these settings to edit the decay and size of the original reverb settings to tweak it to taste.
Also on the left is Predelay, which adds a delay in milliseconds to the start o the reverb .
The column on the right has Width, which can be used to reduce the stereo width of the reverb to taste. Underneath that is Gain, to boost the output volume of the reverb, as well as a Dry/Wet amount control.
In the center of the unit is the main screen which shows the Impulse Response in the IR tab. At the bottom of this tab is the Type and IR selectors to browse through the Impulse Responses. There are IRs recorded in real places from cathedrals and nuclear power plants, also some nice hall reverbs and smaller spaces. Aswell as this there are IRs that have been run through classic 80s and 90s hardware reverb units, including some really nice spring and plate verbs. There are plenty of really good spaces and reverbs here! Some are great for atmosphere, and others for drum processing etc.
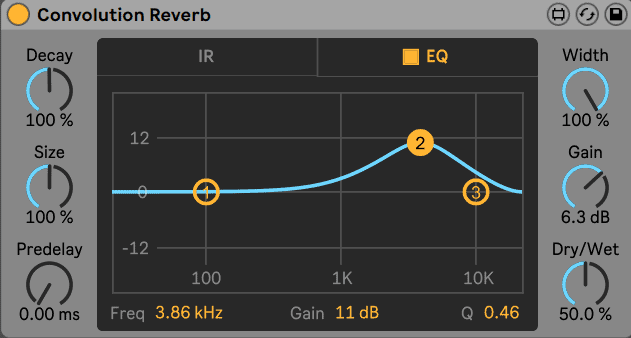
Then in the next tab you have a 3 band EQ to boost and cut the reverb. You can change the resonance (Q) setting at the bottom.
How to use Convolution Reverb Pro
The Convolution Reverb pack also some with Convolution Reverb Pro, which is the same as the normal one, but with a few added extras…
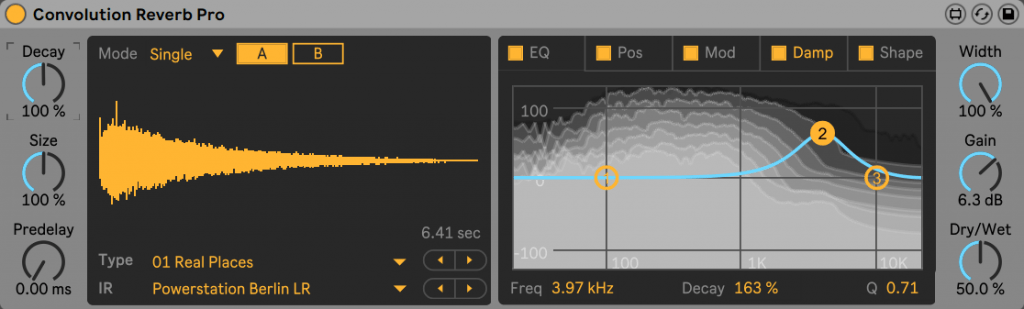
The pro has the ability to load two different reverbs – one for early and another for the late part of the reverb tail. This is access above the screen you can change the Mode from Single to Split. In Single you can load 2 IRs and switch between them using the A/B buttons in Split the buttons change to Early and Late and the 2 IRs work together.
The Pos tab lets you move the reverb across the stereo field, but also from front to back to give the impression of a deeper reverb.
The Mod tab adds a slightly LFO wobble to modulate the reverb. Two algorithms Mod I and Mod II. You can change frequency and amount.
The Damp tab gives you control over the reverbs dampening with a spectral EQ-like control over Freq, Decay and Q/resonance. 3 different points for each. This is a really nice sound design feature.
The Shape tab allows you add Fade In and Fade Out. It has some other controls too like Shape, Early (reflections), Length, and Cascade. It a great feature Reverse which outputs a reverse reverb effect.
These tabs, especially the Damp and Shape tabs are a really good sound design feature, especially for detailing reverb which can get muddy. This unit is great for sculpting reverb on a techno reverb rumble kick for example.
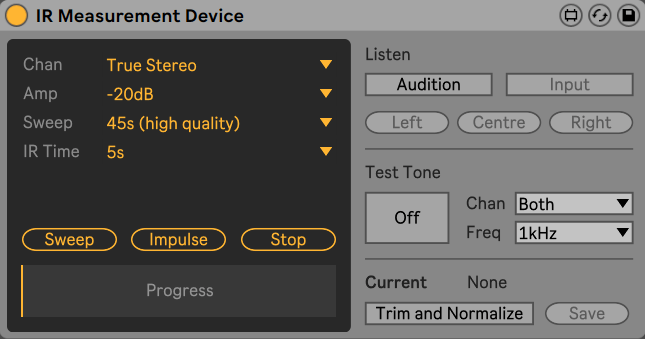
IR Measurement Device
The Max for Live pack comes with an IR Measurement device to record your own Impulse Responses and make your own recording of spaces to use in the CR units.
There is an excellent video by Hainbach on how this can be used in a real space, here.
Summary
Convolution Reverb is a great sound effects unit that primarily brings the reverb of static spaces to Ableton, but then goes a lot further into sound design applications with the functions of Pro.
If you make, or have any IRs, please send us them and we’ll share them. Thanks.
Some more articles you might like…. Ableton Dub Techno Tutorial, Spring Reverb Ableton, Ableton Echo, Techno Rumble Kick
Please follow us for more updates here… https://www.instagram.com/studiobrootle/
We offer online Ableton lessons, get in contact to get the most out of your studio time: Ableton Lessons.