Hello and welcome to this techno tom sub bass guide and Ableton rack. Its a quick run down of how I make toms in operator with sine waves, pitch envelopes and various processing with distortion. Percussive tom samples can be great, but I want to generate my own so I have complete control over the envelopes and pitch, plus the ability to make them bassier and longer and use them as percussive sub bass.
You can hear the rack in action here with a kick drum (the first bar is just the kick, then the toms come in and I tweak some of the macro controls):
See also: Ableton Operator Tutorial, Ableton Operator Presets, and our other Ableton Racks, including the Free Ableton Operator Presets: Sub Basses, Ableton Operator Sub Bass Rack, Techno Rumble Kick Ableton Rack mk2, Techno Kick Ableton Rack, and Studio Brootle Dub Techno Chord Rack. And our Best Free Ableton Packs guide.
Techno Tom Sub Bass Ableton Rack
What The Rack Does
The first thing in the rack is a pitch unit that pitches the notes down 2 octaves, so you can just draw in notes at the default C3 and it should sound good. I designed it to work best around C3.

Next in the chain is an Operator, which is the main sound source. It generates a sine wave then it adds frequency modulation with two oscillators: Osc B is low and makes the bass darker and emphasizes the low end, while Osc C adds some high-end punch with a higher frequency and a short envelope. There is also a pitch envelope added that gives the tom its distinctive pop. I added some drive distortion at Operators filter section too.
There is then a Utility unit to tame the volume, followed by a Pedal unit that distorts and boosts the low end of the bass.

Then there’s another Utility unit to lower the volume as it can get too much with all the distortion. Following that there is an Overdrive unit to add some hard drive distortion.
There’s a compressor too which you can use to sidechain to the kick to mix the bass frequencies better. Following that there’s an EQ8 unit to boost the bass.
Macro Controls

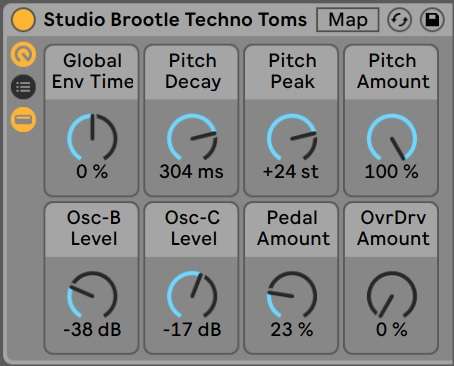
Global Env Time – This adjusts every envelope a little bit tighter or looser. Turn it up and you can hear the effect, especially on the pitch envelope.
Pitch Decay – This is the decay time of the pitch envelope and turning it up makes the slope longer, you can hear the effect as you turn it.
Pitch Peak – This is highest peak that the pitch envelope hits. A really good feature of Operator is that this is in semitones so you can tune it.
Pitch Amount – The amount the pitch envelope affects pitch. Turn it down for more rounded, less punchier kick.
Osc-B Level – This brings in frequency modulation that makes the sound bassier and gnarlier.
Osc-C Level – Makes the sound punchier by bringing in higher frequency modulation. It is set up to effect operator B, so the higher Osc-B Level is the more it will effect the main Osc A (if Osc-B Level is at 0, Osc-C Level will have no effect).
Pedal Amount – Adds low end grunt distortion using the Pedal unit in Overdrive Mode
OvrDrv Amount – Adds drive distortion that really distorts the final tom sound.
Download The Techno Tom Rack:
You can download the Ableton rack by subscribing to the email list here, you’ll get an email with the download link:

