Here’s our guide to Ableton Granulator and Ableton Granulator 2, covering all features in this full tutorial, and some use cases for getting some great sounds out of it.
See also: our updated guide to the latest Ableton Granulator III.
So, Granular Synthesis – wtf is that I hear you say!? Well the practical application of Granulator II is that is can make really awesome drones, pads and atmospheres from almost any sample.
It is a sampler, but it splits the original sample into really small slices called grains. It can then play them back in various ways, scanning through the original grains and making new evolving sounds. The time, pitch and other parameters of the grains can be tweaked using envelopes and more.
Granulator II is a Max For Live device made by Robert Henke (Monolake) who has also been closely linked with the development of Ableton Live.
You can get Granulator II as a Max For Live Patch here.
Buy our packs at our Shopify store, use this code for 25% off: SBCOM25STWD

Tips for using Granulator
Here’s some tips for using Ableton’s Granulator:
- Add a midi Chord effect in from of it so you can experiment playing different chords into it for lush pads or drones out of almost any sample.
- Load up organic samples into it and layer under pads for texture
- Use Freeze Mode to record in audio on the fly.
- Find a sweet spot in a sample, and then use granulator to move across the sweet spot.
- Use the LFO tool and Shaper to keep parameters moving.
- Smooth out the sound afterwards with reverb.
- Add a Tuner after Granulator to check the key and pitch as it can move out of the original key.
Ableton Granulator Examples
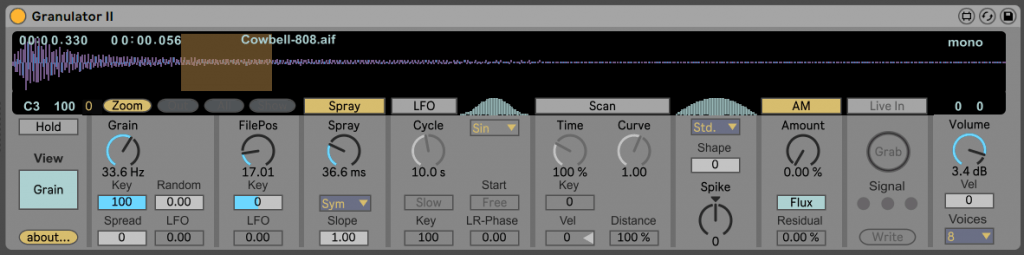
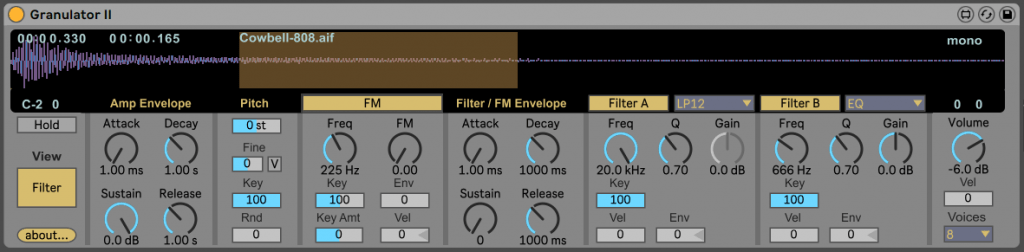
Granulator 2 Example: Cowbell Chord Pad
It’s really easy to make a long droning pads, even from percussion just by holding a chord. Here’s one made from an 808 cowbell. I’ve put the cowbell sample at the start, before the drone begins so you can hear the original sample.
This is just playing one note at C3 with an 808 cowbell and the settings in the picture, with no extra processing at all.

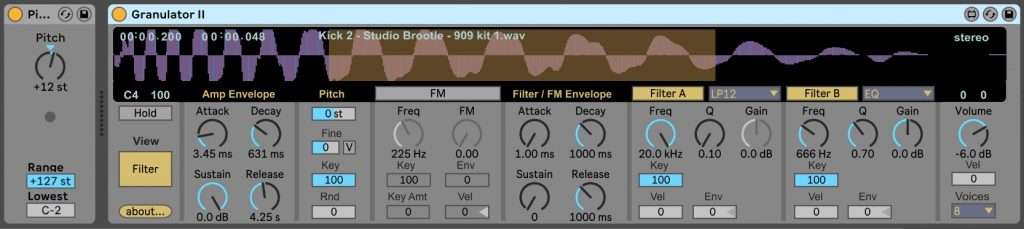
Granulator 2 Example: 909 Kick Drum Drone
Here’s a bassy drone tone made from a 909 kick drum sample, you can hear the dry kick just before the drone starts.
Again this is just a Roland tr909 kick, with one held c3 note, with the settings in the screen shot, and no extra processing.
See also: Studio Brootle 909 Sample Pack, House Drum Patterns, VCV Rack Tutorial, Ableton Sampler.
How To Use Ableton’s Granulator 2
Here’s a run down of Granulator’s features and functions, and what each thing does.
Main Display…
There are a lot of controls in the Main Display Screen on Granulator that you can access with your mouse…
Drag a sample into it from the file browser to load a sound into it.
You can also click in the display to change the position.
There are two views Grain and Filter…
Granulator Grain View:
The Grain control, this controls the amount of grains in a time period, the faster it is the more you get and the shorter they get. Below the Grain knob there are modulation options so you can modulate Grain with the Key (pitch of the incoming note), by Random amount, by Spread (add stereo width) and modulate it by LFO.
FilePos This is the position (like start time in a sampler). This can be modulated with Key (keyboard/midi pitch) and LFO in the buttons below. This is a key feature of granular synthesis, because by moving the start point through the sample/grains you can get long evolving textures even out of a fairly short sample.
Spray… This is how much the start point of each grain varies by a random amount with Slope controls under it.
You can hear an example of Spray this in the audio below…
LFO
This column has all the LFO settings including shape and stereo-phasing.
Scan
This scans through the sample. The Time settings at 100% are normal playback – you can make the playback much faster or much slower (slower is great for those IDM time stretch effects).
The Curve setting means the time difference can increase or decrease while the sample is playing.
Here’s an example of Scan in action – you can see in the image the Scan settings, also note that I turned the Spray down so you can hear the time stretching effect better.
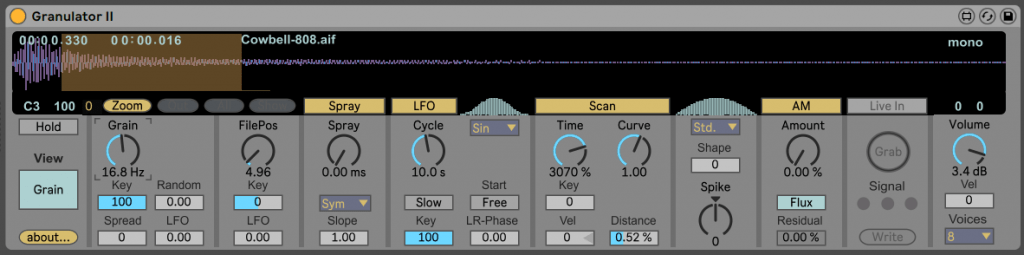
It sounds like this, you can hear it scan through the grains slower for time-stretching-esque sounds:
Shape
The Shape setting allows you to change the envelopes for each grain. The envelope settings decide how smooth the crossfade is between each grain, so they can control the smoothness of transitions, or go the other way and make it nasty and noisy. Change the settings and you can hear what it does and also see it – the little waveform above it changes as you tweak the settings.
AM
Amplitude modulation – turning the Amount up will mean some grains are louder than others, turning the Residual up – will mute random grains.
Live In
These settings are for using the Max For Live device Granulator Input (which comes with Granulator II) – and you can Grab audio from the track with that device on it. A really good feature tbh!
At the end on the right are standard Volume and Voice settings.
Granulator Filter View:
In the Filter view you get an Amp Envelope first. A standard ADSR envelope.
The next column in the Filter view is the Pitch section, with tuning at the top and Fine tuning. V will make velocity modulate pitch.
Key is key scaling – changing this will change how the pitch is mapped – it will no longer be the same as piano keyboard tuning.
Rnd will make pitches of grains change randomly.
FM – yes! You can frequency modulate grains with the Freq knob and the FM (amount) knob. This can be modulated below with incoming midi notes (Key), and Env allows the envelope in the next section to be used as the mod source. You can also use Velocity (Vel) as a mod source, we will show and example of this later on.
Filter/Fm Envelope
Another standard ADSR envelope – for use as modulation sources for FM and the filters.
Filter Sections Filter A and Filter B have standard controls: Freq (cut-off frequency), Q (resonance), and Gain on each. Plus modulation sources Key, Velocity and Env, for each.
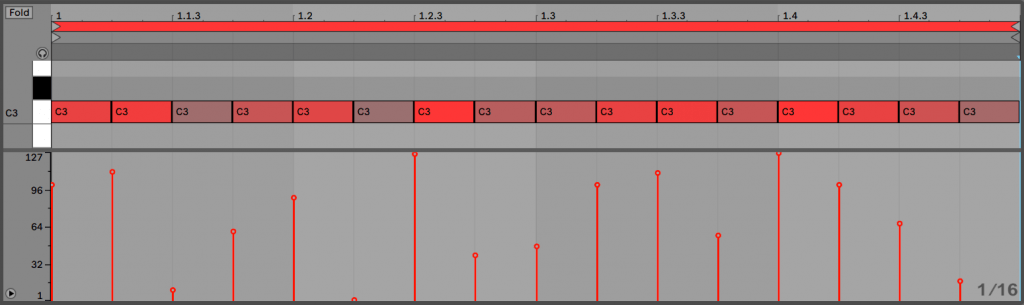
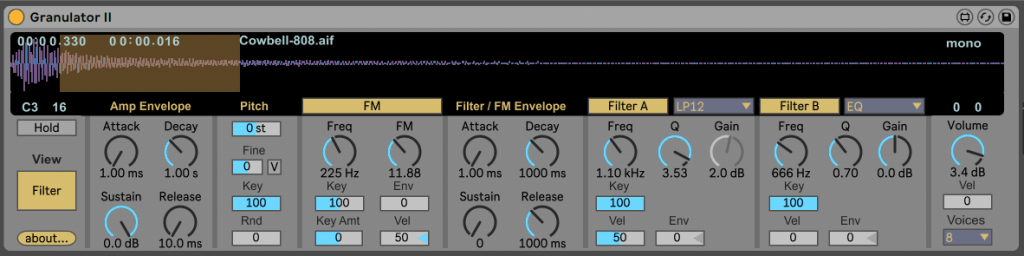
Here´s an example of using velocity as mentioned above. Firstly I set up a simple cowbell pattern with different velocities across the bar.
It sounds like this:
And now, in the FM column and Filter A column I set Velocity to Modulate FM and Filter A, so it looks like this both Vel settings are set to 50 now):
And it sounds like this:
This is the same cowbell pattern as above, you can hear the FM and filter modulating as the velocity changes.
Summary
Hope you found this Ableton Granulator guide helpful. As always feedback is appreciated and please send us what you
You might also like…
You might also like our articles on the Best Max For Live Devices as well as all our Ableton Tutorials.
Buy Our Preset Packs here:
Click the image for 25% off: