Welcome to the Studio Brootle Ableton Granulator III tutorial and guide. I’ll run down all the features in Granulator III in this tutorial and cover how to get the best out of them with use a case and example.
You can get the free Granular III patch in the downloads section below (or if you’re already subscribed to the email list it will go out in the next weekly email).
Granulator III is similar to it’s predecessor Granulator II, but this is not an upgrade, it is a rebuild with some improvements, but also a lot of simplification. I really like it, but fear not if you feel like you’ve lost some things, you can use both.
Granulator III was developed by Robert Henke (a.k.a. Monolake) and Ableton Live and is included in Ableton Live 12. It comes with Ableton Live 12 Suite, and requires Max For Live too.
For more on it’s predecessor Granulator II see our full guide here.
See also: our other Ableton 12 guides including a tutorial on Roar and our full Operator Tutorial. You can find all the free Ableton presets here.
Buy our packs at our Shopify store, use this code for 25% off: SBCOM25STWD

What Is Granular Synthesis?
Granular Synthesis is the technique of breaking down a sample into small pieces (or grains) and rearranging them into something different. So it is closer to sampling than it is to synthesis, it works by sampling small snippets (called grains) from a sample, and playing them back at different rates, times and lengths to produce intricate textures. Granular synthesis is great for making drones and textures form almost any sound source.

Granulator III – what the controls do…
How to load a sample… to load a sample into Granulator III just drag a sample on to it’s display and it will load it ready to use.
The display settings… the three buttons to the left of the display control what is shown on it, click the top button to see the sample’s waveform or to see the the envelopes and modulations click the bottom button. The Auto button in the middle will switch the displays automatically depending on the knobs at the bottom: if you change the sample controls to the left, like ‘Position’ the display will switch to the Sample Waveform Display. But if you tweak the modulation controls on the right side of the bottom row it will switch automatically to the modulation display so you can see what you’re modulating/adjusting/tweaking.
In the bottom right of the Waveform Display you can use the + and – buttons to zoom in and out of the sample and the ‘ALL‘ button will reset the display to show the entire sample. There’s a help button too to which brings up Henke’s own guide to the instrument.
Under the display there is the I/O button which lets you record into Granulator III. Including resampling, which is a great feature, you can just record in audio. It is fairly self explanatory – you select the source and then ‘Capture’ to record in some audio.
Buy our preset and sample packs—> at our Shopify store , use this code for 25% off: SBCOM25STWD
Granulator’s main controls:
The bottom row of Granulator III contains the main controls.
Firstly you have the main playback type drop down menu which has 3 types:
- Classic with is the standard granular synthesis engine. I use this one the most. It is best for creating long textured pads and drones in my opinion.
- Loop is more like using a tight loop on a standard sampler.
- Cloud mode samples lots more grains. It can be good for making drones and pads from any sound source.
The best thing to do with all these controls is try them out on a sound, as they can have drastically different outcomes depending on the characteristics of the sound – so make a midi pattern and press play and tweak them to find something that sounds good.
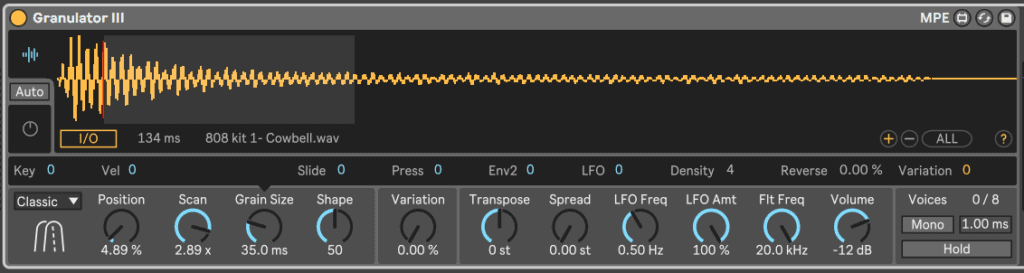
Note that for each knob, you get the modulation options pop up in the row directly under the Display. The modulations are fairly standard – Key, Velocity, Envelopes etc.. Slide and Press are for use with an MPE controller – if you don’t know what an MPE controller is, it is one of like those keyboards you can wobble your finger on and get vibrato – the ones you see on Youtube (!) – now you can modulate Granulator III with your finger wobbles!.
Position – this is just sample start. Except it’s measured in percent, not time, but other than that it’s the same as what you get on normal samplers. All the Modulations come up for it in the row above when you select it.
Scan – this controls how fast the grains will be played, a setting of 1x is normal playback speed.
Grain Size – the length of the grain. This is pivotal to the sound too, the shorter the grain the tighter sound. You can reverse the grains too in the modulations bar, with a percentage chance of each grain reversing. Using Variation with Grain size is a good modulation to keep the sound moving.
Shape – this controls how smooth the sound is as it is the amount of crossfade between each grain. Turn it down for a harsher looped sound and up for a smoother sound with each transition crossfading.
Variation – this adds randomness to each grain. Most parameters have a Variation setting where you can set how much this overall Variation know add randomness to the sound. This can be a really effective tool at getting evolving textures and not just one monotonous sound.

Transpose – you can add tuning modulation here and change the overall turning
Spread – adds stereo spread by detuning the grains.
LFO Freq – the frequency / ratio / speed of the LFO
LFO Amt – how much the LFO can modulate the other parameters.
Filter Freq – the cut off frequency of the filter.
Volume – the overall volume and you can modulate it here.
The envelopes in the modulation screen are fairly self explanatory, they are standard ADSR envelopes. You just send a parameter to them to modulate using the small black bar that comes up when you turn a knob.
The LFO can be set to be in Hz, Synched to the bar, or Ratio mode. It has loads of shapes to choose from, and can be split across the stereo field with the Stereo effect for a wide stereo sound.
The Filter has loads of filter types where it combines 2 different filters in series with each other. The icon below the Type selector shows how they filter the sound. The Width control is how much the 2nd filter’s cutoff is different from the first, it is important to realize it is relative..
Buy our preset and sample packs—> at our Shopify store , use this code for 25% off: SBCOM25STWD
Ableton Granulator III Tutorial Video:
Here’s a video tutorial and run down of the rack on our Youtube channel….
Please subscribe to the youtube if you haven’t yet: youtube.com/@studiobrootle
Downloads
You can download this pack by subscribing to the mailing list here, you’ll get a link to download all the free presets, samples and racks we’ve ever made:
Buy Our Preset Packs here:
Click the image for 25% off: