Ableton Sampler
Ableton Sampler is a great sound design tool, with it’s multi-sample abilities, advanced modulations and FM features, it is a brilliant instrument and sampler. You can turn almost any sound into an instrument with Sampler’s packed feature list. We’ll go into every feature and they’ll be some preset examples along the way. Also for no real reason we’ll be featuring gifs of producer’s showcasing their studio-faces and head-nods.
See also: Ableton Simpler, Studio Brootle 909 Sample Pack, House Drum Patterns, VCV Rack Tutorial.
You can find our paid packs at our Shopify store, use this code for 60% off: SBCOM60STWD
Subscribe / Free Kick Drums
Subscribe to our email list to get a pack of kick drum samples now, and 5 new kicks each week, every week. All made in our studio. Plus other free samples from time to time…

Ableton Sampler Tutorial
Here’s I’ll run down the main tabs and what they do to shape the sound.
The Six Sections…
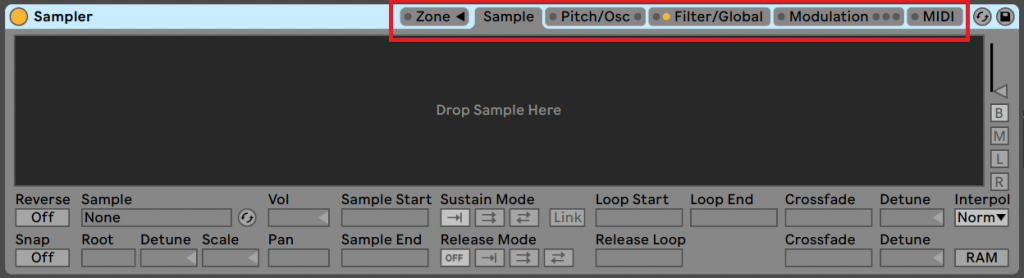
Ableton Sampler has 6 main sections – all of which are accessible from the tabs at the top of the instrument. We’ll look at each below….
Zone tab
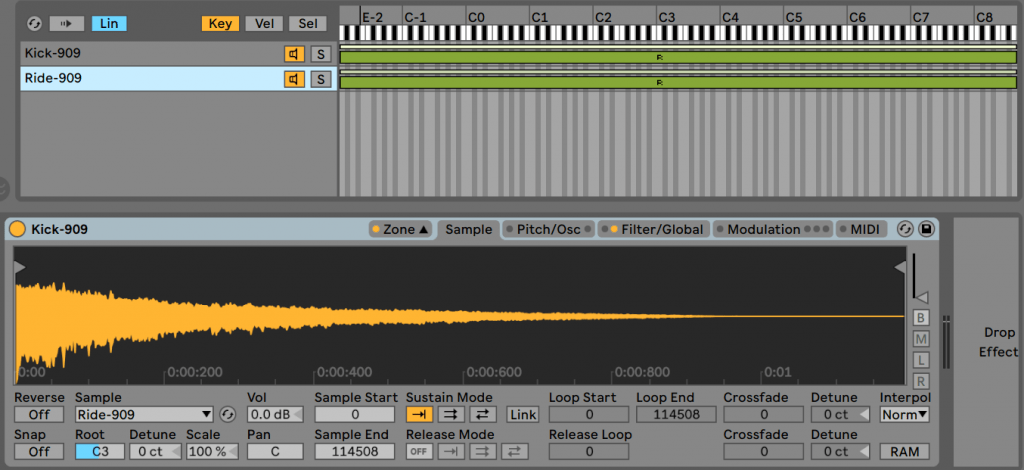
The Zone section is a pop up that opens above the instrument where you can drop more than one sample in and set up how they are assigned to the keyboard or velocity.
In the screenshot above both the green bars for both the Kick and Ride samples stretch over the entire keyboard – so both samples play on all keys – meaning that whatever key you play you get a kick and a ride play at the same time.
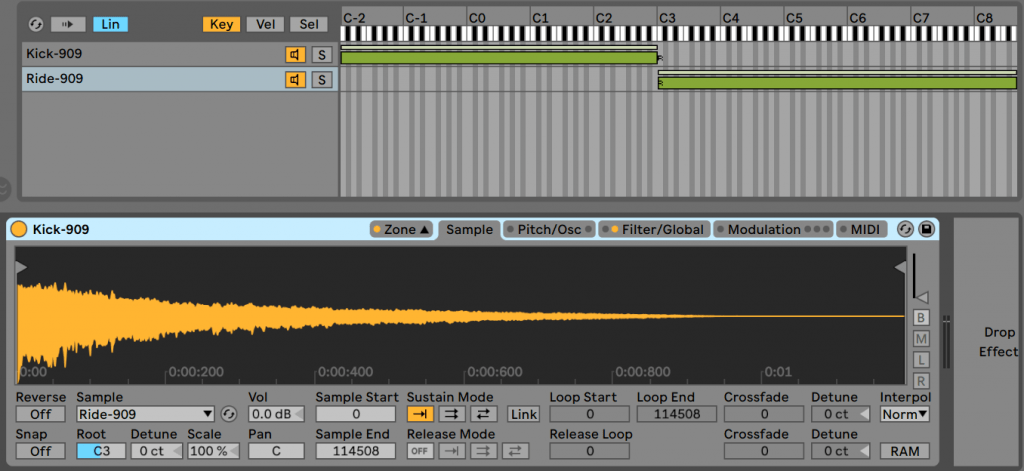
But you can change it so that some samples play on different keys like in the screenshot below where any key below C3 will play a kick and any key above will play a ride. You can see this by looking at the green bars for each sample.
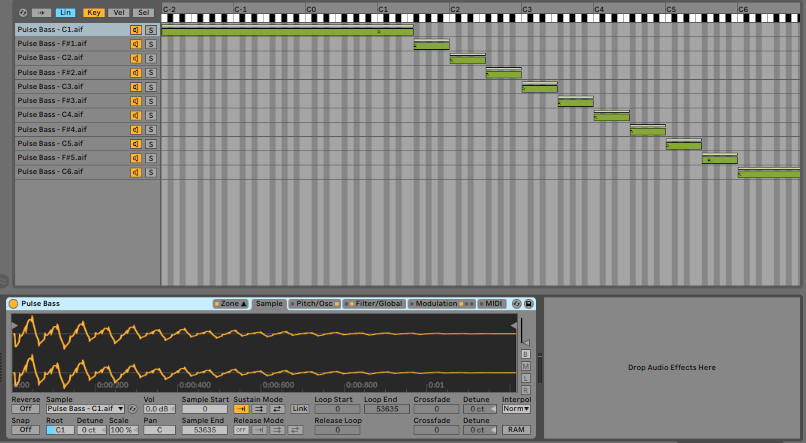
This is not a feature I use a lot, but it can be really useful if for example you sample a keyboard and record yourself playing a few different keys. Then add all different samples into a Sampler on the right keys, as opposed to having just one sample and pitching it up and down (like in Simpler). It will look like the image below, this is the Pulse Bass preset that comes with Sampler – you can see there are 11 samples spread out across the range….
The Key, Vel, Sel buttons change the zones – you can assign different samples to different velocities too – i.e. you can make sampler play a kick drum, but if you hit the key harder you get kick drum and a ride.
If multiple samples are dragged into sampler then you can see the yellow light show next to ‘Zone‘ on the tab name.
Sample tab
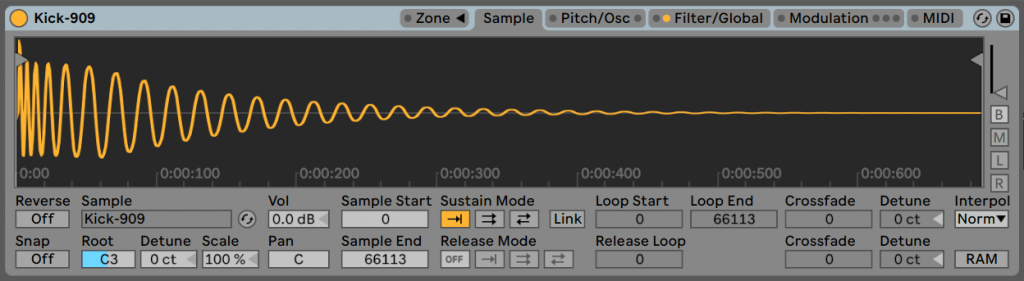
This is the main control tab for the Sample play back. While you’re reading this, try dropping a sample in Sampler (like ‘Kick-909’ that comes with Ableton Live Suite), which will enable the features in this tab.
How do you reverse a sample in Sampler? Reverse will flip the sample backwards.
Snap makes sure the end points/loop points are at zero crossing (at a point where there is momentarily zero volume – this prevents that clicking you can get if the sound stops on a peak of a waveform.
In the next column, Sample is the sample name with Hot Swap button to quickly access the browser for new sounds. Root is note of the sample – use this to make sure your samples are in key. Detune is similar but changes pitch by cents. Scale is how mapped to the keyboard the notes are – by default it is set at 100 which is probably how you will use it for 99% of patches. At 100% the notes will spread over the keyboard tuning as normal like a piano tuning, but set at 0 and you can play any key and it will only play the root note – the sample will not change pitch. You can change Scale from -200 to +200 but I would always leave it at 100% except for sometimes for percussion I might set it to zero as you don’t need to play a melody with a snare.

The loop controls…..
we will look at now can be easily be controlled by clicking on sample in the display and dragging the start/loop points with your mouse. You can also control them in the text dials at the bottom of the tab, i.e. the Sample Start and Sample End controls. These are relatively self explanatory controls.
Sustain Mode…. these are really useful settings that loop part of the sample while it is sustaining. I.e. while you hold a key down the loop will keep restarting. So obviously the main Amp envelope settings will also have an affect here. This main amp envelope is the one in the Filter/Global Tab over to the right by the way. The longer the sustain in this envelope, the longer the loop.
The first button under Sustain Mode is a one shot – the sample just plays as normal. The second (with two forward arrows) – the sample plays from a start point and then loops. The third is the same as the second, except the loop plays forwards then backwards.
Link makes the loop point and start point of the sample the same, linking them.
Preset Example: Kick Sustain
I’ll demonstrate the sustain looping now by extending a kick drum into a bass tone just for a simple example, this is what is sounds like (it’s a bass tone, so you might need decent headphones/speakers)….
This is just a simple 909 kick, but it will play as long as a note is held down.
In this audio example, there are 2 short notes, then a long one.

Take the Kick-909 sample that comes with Live 10 Suite (or any 909 kick sample) and put Sampler in the second Sustain Mode (with 2 forward arrows). And set a short loop. I put Snap on so it loops cleanly (if you take Snap off you can hear it click). This is what it should look like…..
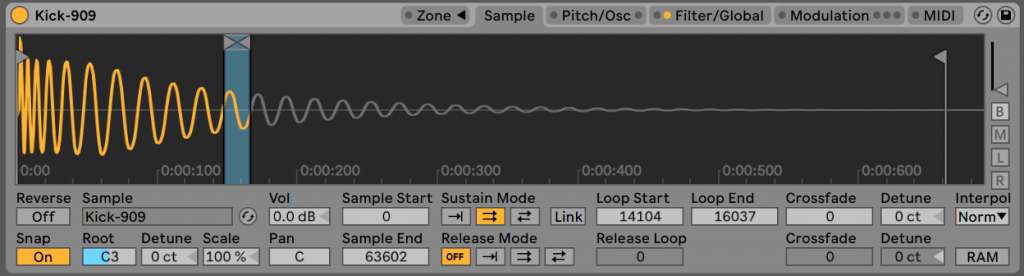
You can download the Ableton Sampler patch here and have a play with it…
More Sample Tab Features…
Release Mode is a second loop… it controls how the sample will loop for the release part of the envelope. For example you can loop the end of a pad to keep it going indefinitely if needed. When looking at this make sure the release is quite high in the main amp envelope in the Filter/Global Tab.
The first button OFF is normal play with no release loop. But the last 3 work like the sustain loops – there is a one shot, normal loop and reverse loop. When you switch these on you can get a loop at the release part of the notes.
The Crossfade amounts are for crossfading at the loop points to make them smoother and avoid clicking. These are a great feature of Sampler for better, more natural sounding loops. The Detune tunings are to change the tuning of the loop, this is helpful if using a small section as a loop and that section is out of tune with the rest of the sample – you can correct that here.
RAM – enabling this loads the samples into the RAM for quicker editing.
Over to the right of the display there is a fader that zooms in vertically to the sample. Which is good for quiet samples. Also the B M L R controls are for ‘Both, Mono, Left, Right’ and are to select which stereo channels of the sample are displayed.
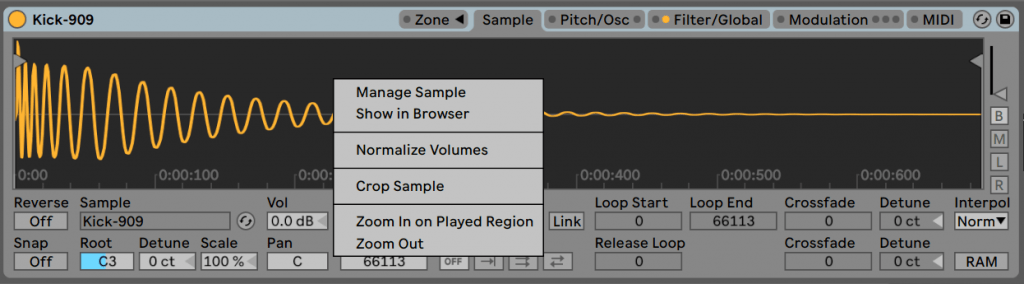
Also the right-click menu is worth mentioning…. Right-click (on a pc, or ctrl-click on a mac) on the sample and you get this menu shown below… Manage Sample is for replacing the sample(s), Show in Browser opens the browser which is useful for quick access to add or replace samples. You can then Crop Sample which cuts off anything unseen. It also has the possibility to Zoom In and Zoom Out on the display.
Pitch/Osc Tab
This is global (it effects every sample if you have more than one).
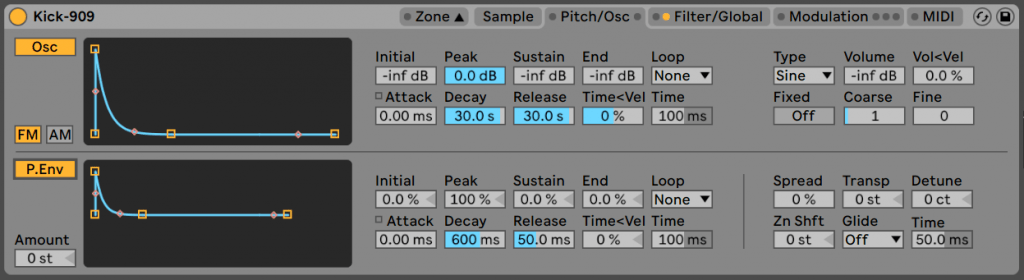
There are 2 sections, both with envelopes. – Osc and P.Env – an Oscillator and a pitch envelope. With fairly standard Ableton envelopes.
Osc – this is not a standard sampler feature and it really set’s Ableton’s Sampler apart from others. Osc can add FM (frequency modulation) or AM (amplitude modulation) to the sample. Try them on a sample and you’ll hear what they do. The envelopes can be looped under the Loop dropdown – with free-running, and sync-able loop features to retrigger the envelope almost like an LFO. The Time setting underneath sets the frequency of this, and will be in musical time intervals for the synced loops, so it can retrigger with the beat, which is really nice tbh! We’ll show this in an example in a bit. Over the to the right you can select the waveform under Type, and set the Volume of the Osc as well as make volume modulated by velocity with the Vol<Vel control. Fixed sets the pitch to be always the same and not change with the key played, plus there are Coarse and Fine tuning knobs.
Here is an example of the Osc in action. I took the Kick Sustain Example (which you can hear in the above section) and I added these settings…
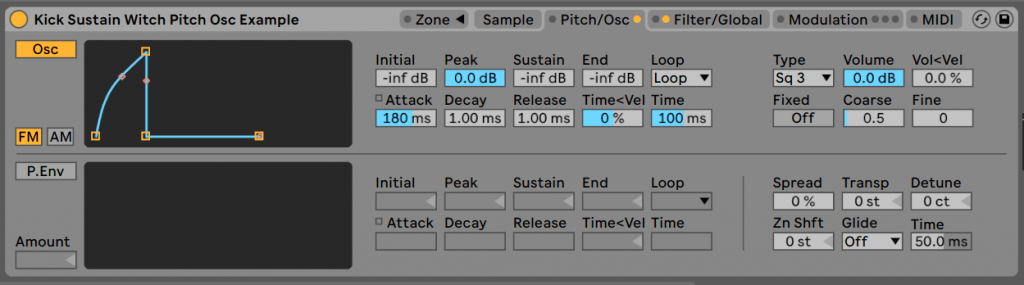
Note the looped envelope that acts like an LFO. And it now sounds like this….
This Osc section can be really useful to add subtle harmonics to any sample, or even some noise, as well as over the top pitch effects as in my example.
Sampler’s Pitch Envelope
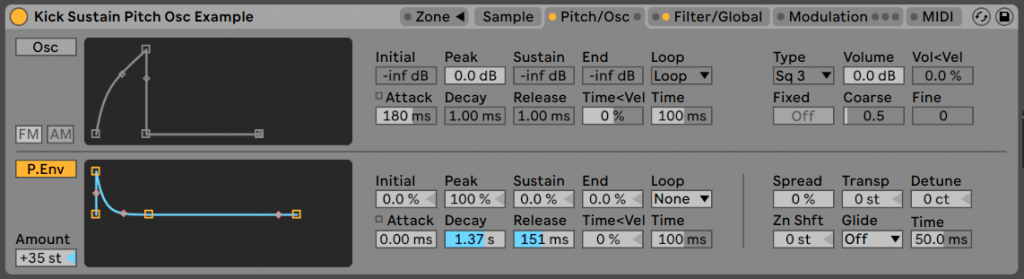
The bottom half section, P.Env, is the pitch envelope, we’ll set up a patch to show it very soon.
Before that let’s cover the basics…. over to the left of the display is the Amount – which sets the modulation amount of the pitch envelope. It has a similar loopable envelope as described above in the Osc section. Spread is like a detuned unison effect, Transpose and Detune are tuning in semitones and cents. Zn Shft – this shifts the zone (as set out on in the Zone tab) – which can get interesting when you have multisamples. There are 2 Glide modes with Time to select the length of the glide.
Tip: click the little square next to ‘Attack’ to edit the amounts for slopes.
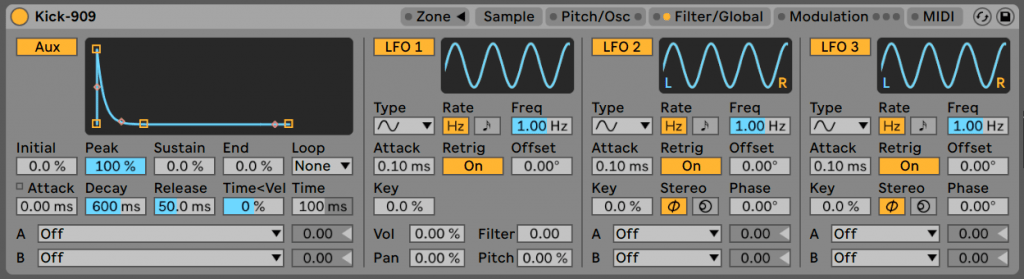
Here is a simple pitch envelope to add a nice accent to the sustained kick we made earlier…
You can hear the pitch of the kick increase rapidly at the start of the kick before dropping away. And here are the settings…
Filter/Global tab
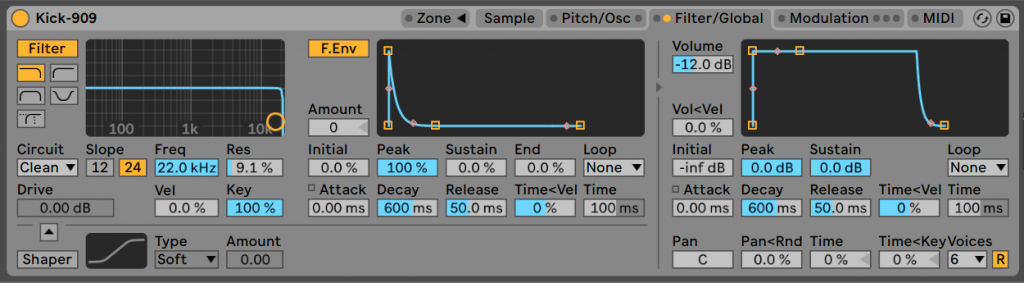
This is global (effects every sample if you have more than one). It comprises of 3 sections a Filter, filter envelope (F.Env) and an amp envelope on the right.
The Filter has the standard filter types, plus the bottom one which morphs between the other filter types (so it is great for modulation for mental filter sounds) on this filter type the Drive knob turns into Morph and can be modulated. The Circuit drop down allows you to add Drive amount that is modelled on the warm distortion effects of some analogue synths.
Underneath that there is the Shaper that does waveshaping, with various distortion types available from the Type dropdown. Above the Shaper label there is an arrow… this changes the signal – if it is down, the signal goes to the filter first then the shaper, if it is up the audio goes to the shaper first then the filter.
The Filter Envelope (F.Env) works similarly to the other envelopes, with Amount to the bottom left of the display and ability to change all the points and slopes, as well as some nice loop modes including beat sync-able.
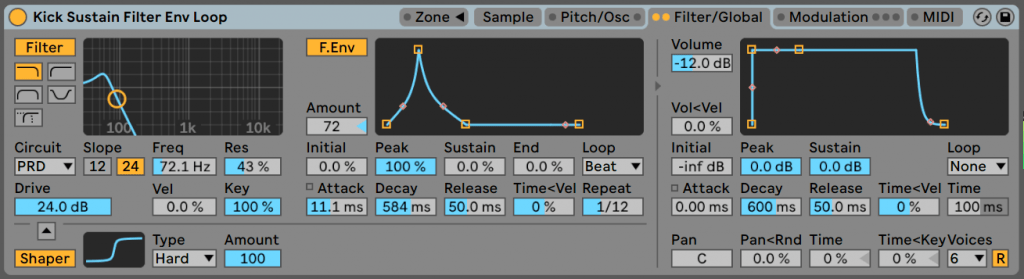
Filter Effects Preset Example
To show off the filter envelope and it’s distortion settings I took the ‘Kick Sustain patch’ we made and I added Drive (PRD circuit), Hard Shaper (at max amount) and a filter envelope that is looped to the Beat with 1/12 timing (sort of like a dubstep filter LFO effect). And you get this rhythmic effect…
And to the right is a the global Amp/volume envelope which is loop-able like the others. It has some global controls like Pan (which can be set to random with Pan<Rnd) Also Time which changes all of Sampler’s envelopes times globally. Time<Key means that these can be set to be modulated by key – i.e. the higher the note you play the tighter the envelopes for example. You can also set the Voices here – setting it to 1 will make it act like a monosynth.
Modulation Tab
Here’s where you can do some complex modulating of the audio…
Aux envelope is a separate modulation envelope that can be assigned to 2 sources in the drop downs at the bottom (with ‘amount’ controls to the right of the selectors which also go negative).
Sampler’s 3 LFOs…
LFO1 is set to route to Vol, Filter, Pan, Pitch, at the bottom, the the other 2 are freely assignable like the Aux envelope. They all have fairly standard waveforms, selectable by Type. The rate is sync-able to the beat, or in Hz. They all have Attack to fade the LFO in. Retrig means the LFO restarts on each note played, and Offset move the wave along. Higher Key values cause the LFO rate to increase the higher the note played.
Also the second 2 LFOs have Stereo effects. Put your headphones on and try these out…. Phase means the LFO is split into 2 different channels – left and right with different phases – i.e. if you assign it to pitch then in one ear it could be increasing in pitch and the other might to decreasing in pitch at the same time. Spin splits the LFO into left and right, but makes one channel slightly faster to give a stereo effect. Also you can assign the LFOs to loads of different parameters at the bottom (and two at a time, per LFO).
Ableton Sampler Time Stretch
You can make the Sampler do a sort of of time stretching effect….
Modulation example….
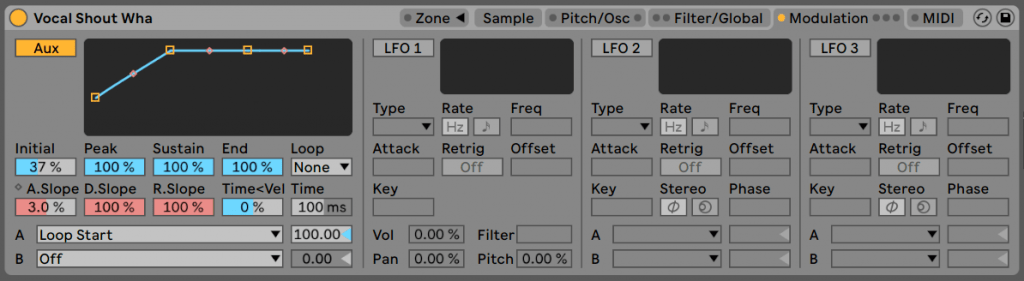
Here we’ll apply modulation to a sample with the Aux Env Loop Start for some granular synthesis time stretching effect…. .
Here’s how I did it…. load up the sample ‘Vocal Shout Wha’ that comes with Live Suite (or any sort of vocal sample will do).
Use the second sustain mode and make quite a tight loop, so it sounds like a tone. Play a long note the length of a bar. Then in the Modulation tab set the Aux envelope to modulate Loop Start.
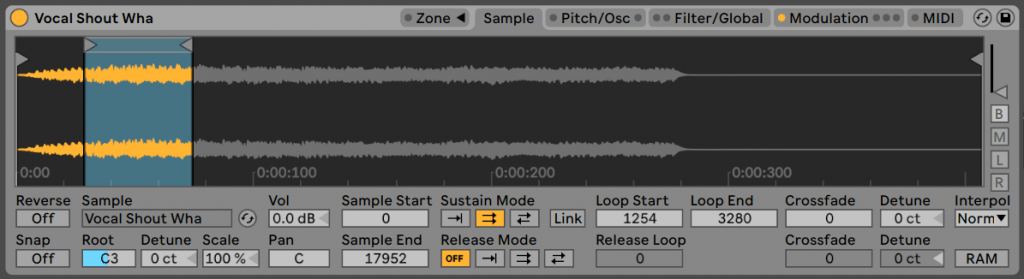
Give the envelope some attack and put the amount up. This means that as the loop plays the start point of the loop will change slowly forward. Which gives a time stretching effect as it replays.
This can be really useful for making samples your own, or you can make pad sounds from chords this way (use the Crossfade settings to keep it smooth).
You can try it on bass sounds too like a 303 hit for some bass drones.
Okay, here is another modulation example to show off making a sample your own in Sampler…
- Load up a fresh instance of Sampler and a 4 bar midi clip playing a note (like C3) for the whole 4 bars.
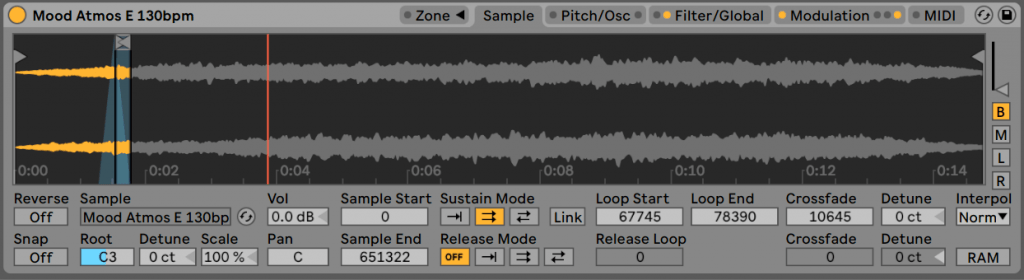
- Add the Sample (included with Live 10 Suite) ‘Mood Atmos E 130bpm’.
- Play it and it should sound like this….
Now we’re going to make the sample our own by adding granular modulation…
- Set Sustain Mode to the second one (with 2 forward arrows) and then make a short loop. And set crossfade quite high to make it smooth.
- The settings in the Sample Tab should look like this….
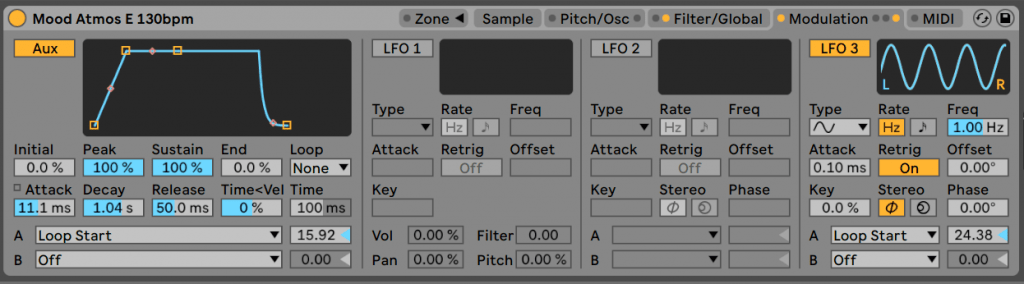
- Go to the Modulation Tab and set an envelope to modulate loop start. Make the envelope have a slow-ish attack. Also We’ll make an LFO modulate the same parameter to make the Start jump around the sample too, so it is playing grains back like a granular synthesizer. See below for the settings..
If you play the sample and look at the Sample Tab you can hear and see the loop start point jumping around the sample…
Here is the same patch with Crossfade turned down to zero so it is the same effect, but much less smooth and more pronounced for the sake of this tutorial, so you can really hear the granular effect of the loop point jumping around as it is modulated. You can get some really nice glitchy effects this way if you like.
Here is the Ableton Sampler preset too….
MIDI tab
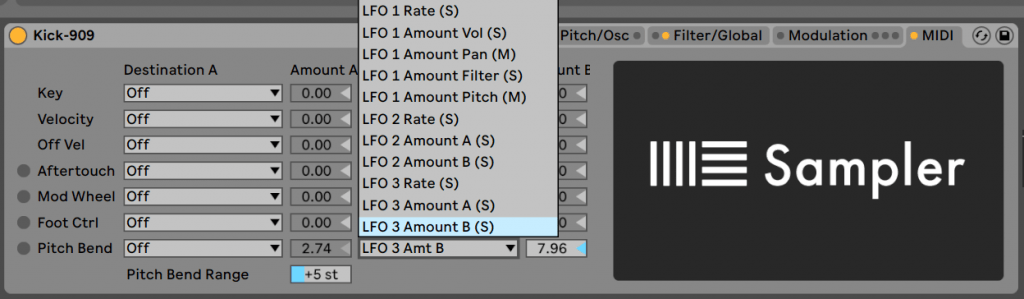
Here you can assign various midi parameters (like Velocity, Key or the Mod Wheel of your MIDI keyboard) to control parts of the Sampler.
Ableton Sampler Tips
You can easily make risers or builds using reverb and then reversing the sample in Sampler…
In this example I send a 909 kick through some reverb (fully wet so you don’t hear the dry kick). Freeze it and the flatten it and drag it to sampler so the reverb freeze is in a new Sampler. Then click REV, trim the tail down shorter, add some distortion, and maybe high pass slightly it to take off some of the bass, and pitch it up an octave.
This way you get a riser in key with the kick. You can use any element, like a vocal or chord stab too so you get a riser that’s in key, this is really good for introducing a sound, so before a vocal comes in you can use a riser made from the vocal.
Ableton Sampler Trigger Mode
The Sampler doesn’t have a ‘1-Shot’ for drums mode like in Simpler, but you can open up the amp envelope release so the full sample plays and make sure the Voices is set to about 6 so the sample still plays even when a new one plays.
Ableton Sampler Choke
Drum choking is what happens when you play hi hats on a real drum kit – if an open hat is playing and you play a closed hat, you close the hat cymbals with the pedal and so the open hat immediately stops and is ‘choked’. Some drum machines replicate this by making it so that playing a closed hat stops the open one playing, and vice versa. The tr909 does this and it makes for some nice hi-hat grooves.
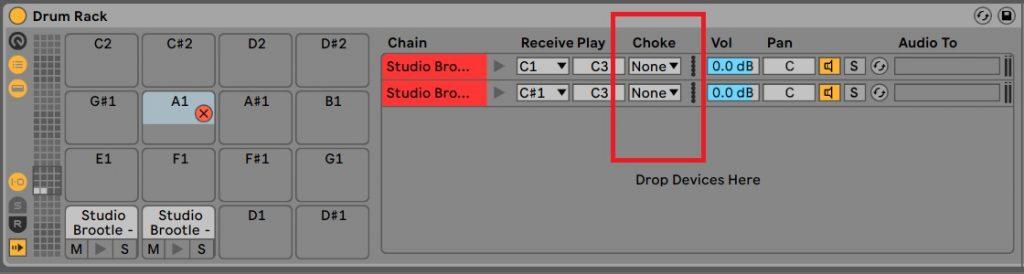
You can do this in Sampler (or Simpler) by grouping the drums in a drum rack and setting up a choke group which mains all Samples in that group will choke each other (cause the sound playing before it to stop).
Click the Small ‘io’ button on the Drum Rack to show the Chains, and there is a small drop down to select the choke group. You can put open and closed hats in a group together so they to choke each other like a 909 / real drummer.
How To Tune A Sample In Ableton
You can tune a sample in Sampler by using the Tuner and then adjusting Samplers Root and Detune until it’s in key…
Play a note C, a long note, looped in midi, so you can hear it and it displays a constant note. Add the Tuner unit. It will splay the key that is playing. It should be at C (the note we’re playing), but in the example is A…

Change the Root on the Sampler to the main note on the tuner (in this case ‘A’). hen Adjust the Detune until the tuner reads out C (the note you are playing). It’s ok if it is a tiny bit off you may struggle to get it exact, but as long as it is close and the color is green you should be in tune enough…

Where’s Glide?
This is a common question I get in my Ableton lessons as it is hard to find – the glide can be found in the Pitch/Osc tab: The bottom right, second one in, experiment with both Glide and Portamento and Time settings next to it.
Ableton Sampler Packs
For all our sample packs click here, including: Studio Brootle 808 Sample Pack and the Studio Brootle 909 Sample Pack.
What Is The Difference Between Sampler And Simpler?
Sampler is basically Simpler’s big brother. Sampler can do multi-sampling and has a lot of modulation options including FM. It comes with Suite, the most expensive version of Ableton. While Simpler comes with all versions.
Sampler definitely has the most options to tweak a sample. The only thing is Simpler can warp samples, which Sampler cannot.
By the way you can easily switch between Simpler and Sampler. You can right-click (on a pc, ctrl-click if you’re on a mac) on the top bar of Sampler and select Sampler -> Simpler and the instrument will change. You can do the reverse too if you have a Simpler patch open and want to convert it to a Sampler. So you can just switch between the two.
Summary
Ableton Sampler is such powerful instrument in it’s own right, I hope this help you get the best out of it. Please let us know any questions or suggestions that you have on the topic.
Before You Go…
- Get on the email list for free kick drum samples every week, plus you get all the past ones as soon as you subscribe: you can do that HERE.
- You can find our paid packs at our Shopify store HERE ( use this code for 60% off anything or everything: SBCOM60STWD ) .
- Follow us on Youtube for hardware workouts and Ableton tutorials… Studio Brootle Youtube.
- If you’re looking for 1 to 1 online Ableton lessons get in contact to get the most out of your studio time, email: studiobrootle@gmail.com.