Welcome to our Electro Drum Pattern guide. Here I’ll set up an 808 beat, sub bass, pad and sequence. There’s a free rack of the sequence for Ableton 12 to download in the Downloads section below. If you’re on the weekly mailing list this preset will be going out this week.
See also: all our other Drum Patterns. You can find all the free Ableton presets here. Check out our guide to making your own 808 Sub Bass in Ableton Live.
Electro Drum Pattern set up – Summary
Here’s a quick summary of how we’re going to set up this electro beat:
- set the bpm to 136
- set up a tough, distorted 808 kick
- set up a clap and snare on 2 and 4
- add 808 closed hats
- add 808 open hats
- add a sub bass
- add a step sequenced saw wave
- add a pad
- mix it down
We’ll go into more details below…
Buy our packs at our Shopify store, use this code for 25% off: SBCOM25STWD

Slamming Electro Drum Pattern – Step By Step…
Here I’m setting up an 808 kick, snare and hi hats for a tough breaking electro beat. Then making a sub bass, pad and a detuned, driving techno-like sequence to complement it. For the drum samples I use my own 808 sample pack, and I’m using the Drum Samplers as samplers as they have great built in effects.
Here’s a preview of the loop we’ll be making….
Step 1 – set the bpm to 136
I set the bpm to 136bpm, I normally start about here, sometimes faster. You can always change it later on to suit the beat and feel of the track.
Step 2 – set up a tough, distorted 808 kick
The kick drum is a big Roland tr-808 sample from my own 808 sample pack. I distort it in Roar using the Single routing with just a bit of ‘Soft’ shaper and plenty of initial Drive. I EQ it to taste with the EQ Eight.
I set up a sparse kick pattern on the first bar and double up some hits on the second, you can see the midi pattern below. The percussion part of this electro drum pattern is going to be all 808 samples – they’re ubiquitous for a reason – they smack hard on a big system!
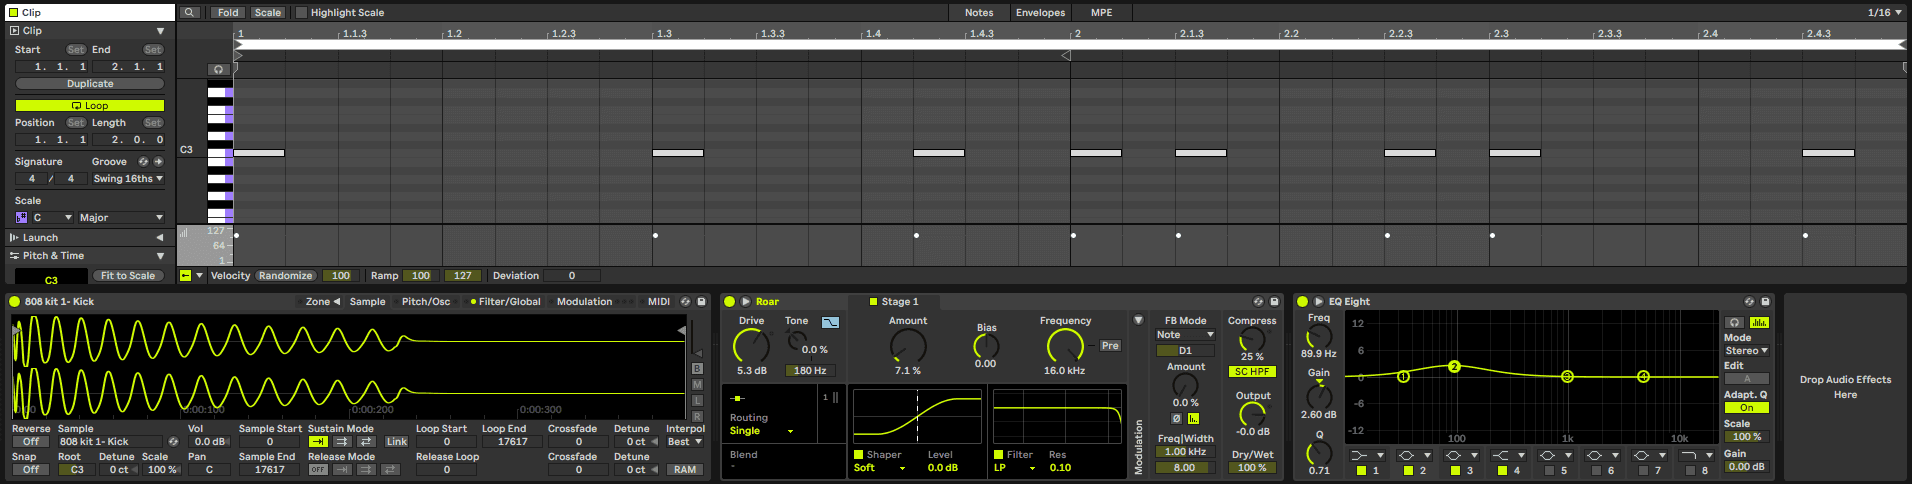
The kick should sound like this:
Step 3 – set up a clap and snare on 2 and 4
A lot of 1980s electro used both the snare and clap together on the 808 for a huge sounding mega-snare, which is what I’m going to do here. I set up a snare on beats 2 and 4, and pitch it down 2 semitones. Then with the clap I use the same midi.
I then add them both to a group to process them both together.
On this group I use Roar to distort them together and I added Feedback tuned to the key of the track (D) which gives a ringing electronic sound to the drums. Then some Overdrive. Then an Echo unit with a 2 16th note delay which works really well rhythmically with electro broken beats.
I then use EQ8 to push the mids and highs and then Reverb with just under 2 second Decay time. This results in a massive snare that compliments the kick.
The clap and snare group processing:

The clap midi and drum sampler looks like this:
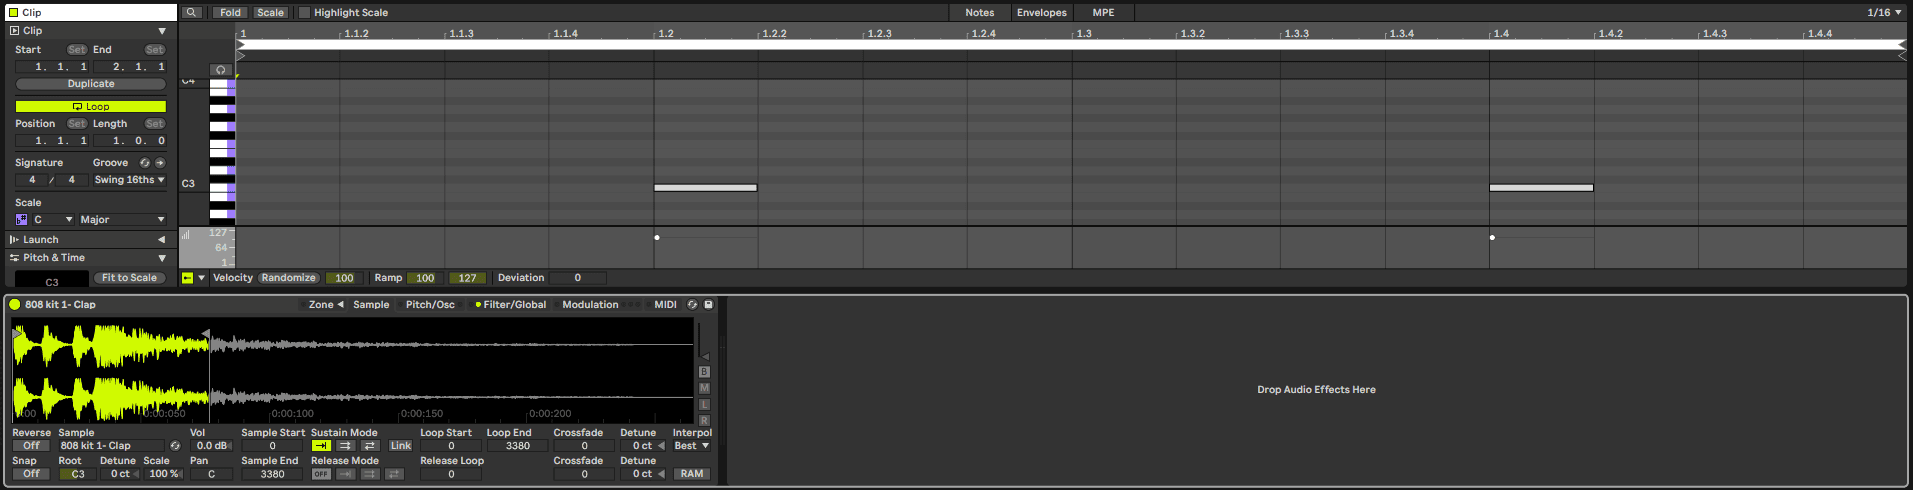
And sounds like this:
The snare midi and drum sampler channel looks like this:
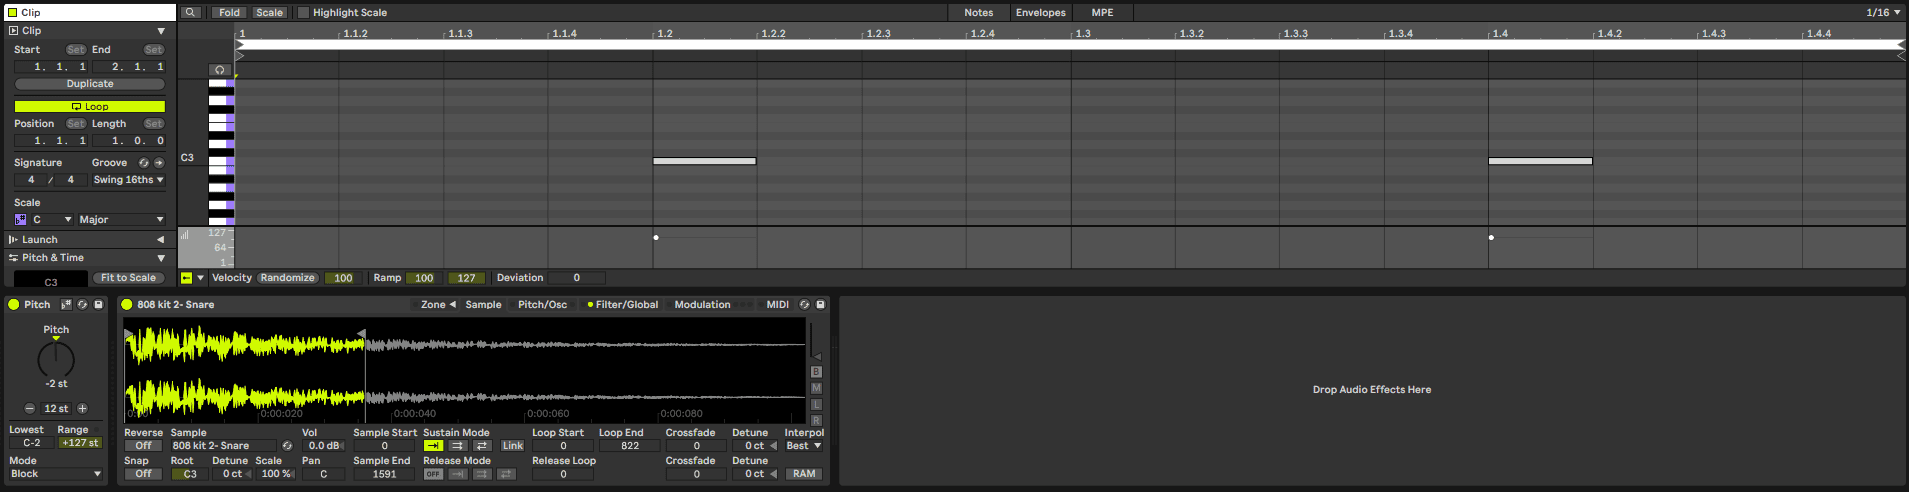
And sounds like this:
Step 4 – add 808 closed hats
For the closed hats I use my own 808 kit again. With a pattern that accentuates the kicks too. I press play and set them by ear, the pattern looks like midi in the image below.
I use the Drum Sampler as it has great built in effects, and I use the Stretch effect for a metallic quality to the hats, plus a slight delay, EQ boost in EQ8 and the same Reverb as the snare (I copy the unit over) but less wet – at 16%..
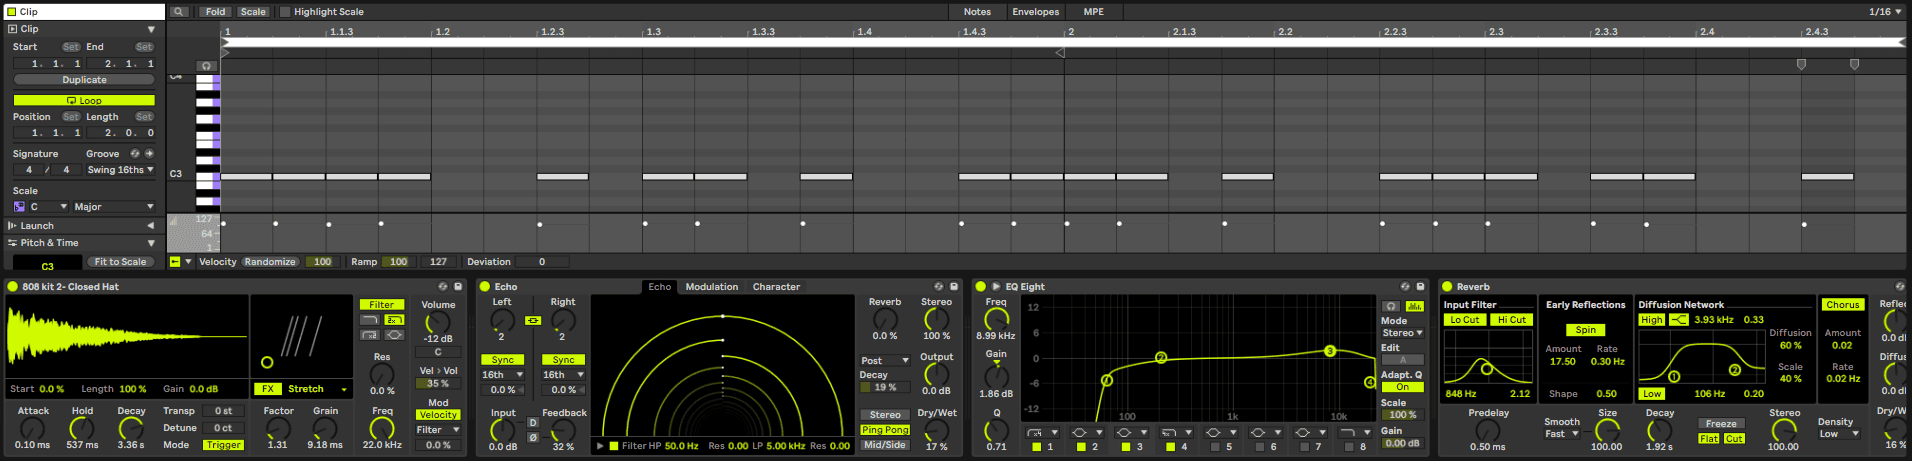
The closed hats sound like this:
Step 5 – add 808 open hats
For the open hats I copy the closed hat channel above so I have the same processing settings, and add an open hat from my own 808 pack. I make it more metallic by turning the Factor up on the Drum Sampler. I then add Overdrive and Roar distortion directly after the Drum Sampler for added grit.
The midi pattern I use is below.

The open hats sound like this:
Step 6 – add a sub bass
For the sub bass I use a pitched down low Operator with two Oscillators both on low sinewaves, neither doing FM, but one is detuned for a thick sub. I add a pitch envelope too for that diving pitch sound, and I add 3.19dB of Filter Drive in Operator, then I distort it more with Drum Buss to bring out some harmonics and then filter it down with Auto Filter, and add a bit more Filter Drive here too.

The sub bass sounds like this you can hear the punch added by the pitch envelope:
Step 7 – add a sequence
This is the heart of the track – I set up an SQ Sequencer with a 6 step loop for a rolling feel, as it’s loop length is much less than 1 bar. I set up some random notes and velocities on the sequencer I can tweak them later. You can see the settings below or download this rack in the Downloads section below.
I use a Chord unit set to 0 and +6 to make every note a 2 note detuned chord. I use Operator for the synth with 3 detuned Oscillators and oscillator D doing the FM to A, B and C.
I set a tight filter envelope with short decay. Then I go back and make some parameters modulated by velocity so the sequence moves with the Velocity row of the sequencer. On Oscillators C and D, I set the Osc<Vel values so they go out of tune for each different Velocity value. And I set Time<Vel and Freq<Vel so the filter and filter envelope move with velocity too. This way you get a really moving sequence.
I distort the sequence with 9dB of Filter Drive in Operator, then I add a Drum Buss afterwards for more distortion.
I add a Phaser-Flanger with loads of Feedback for that moving alien flanging effect. Then an Echo unit with the same 2 16th delays as before, and some Reverb. Then an EQ8 to boost some frequencies.
At this point you want to tweak the sequencer and synth settings and get them sounding good together.
The channel looks like this (the reverb and EQ are cut off the end, as the chain is so long):

It sounds like this:
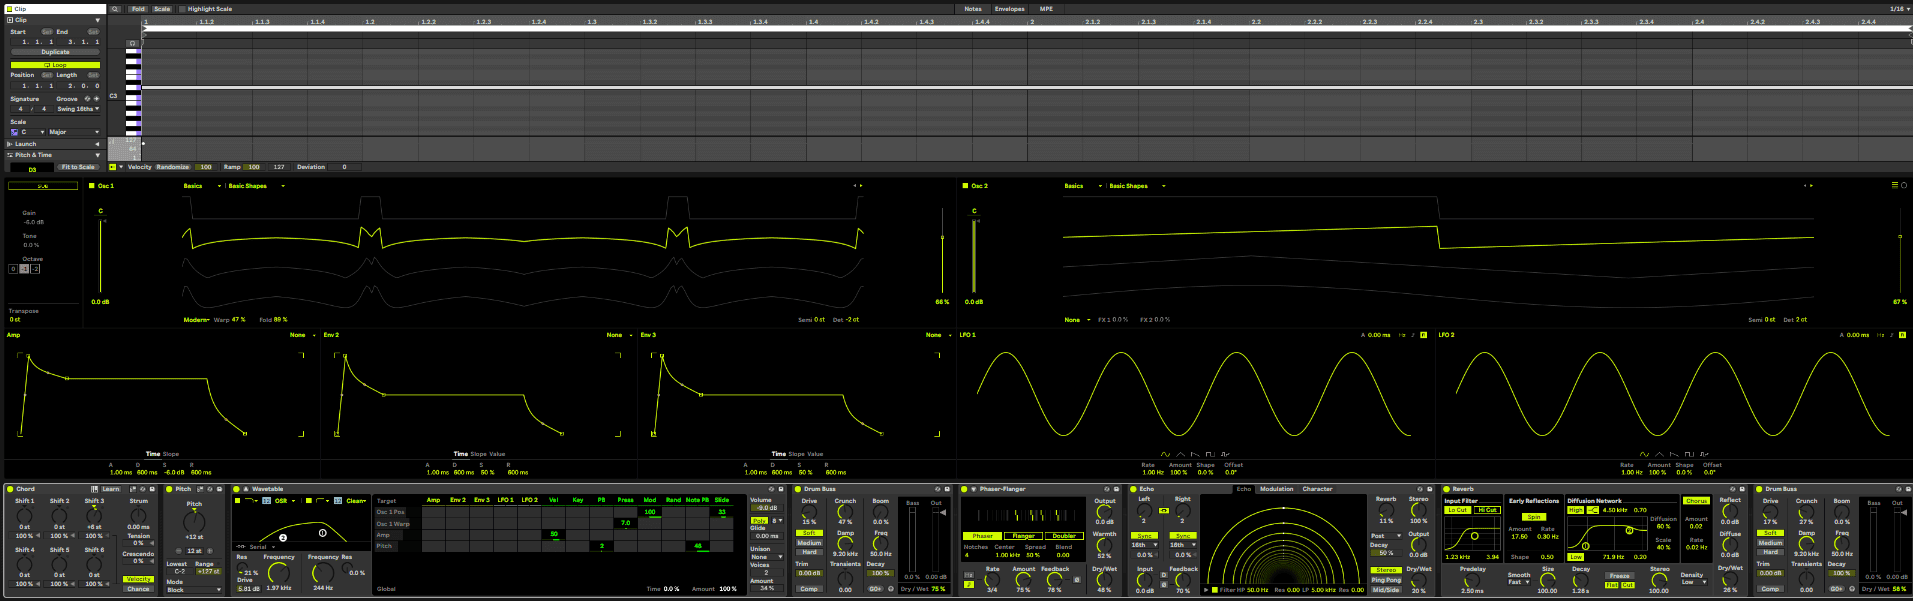
Step 8 – add a pad
I want a pad for some background moodiness (!). So I set up a detuned pad in Wavetable I set it to one long note D2 the length of one bar, on loop. I add a Chord unit to play a detuned Chord (0, +6). I use the Basic Shapes Saw waves in Wavetable, detune both oscillators one up 2ct and one down 2ct. I add Modern Oscillator effects to the first oscillator at Warp 47% and Fold 89%, this makes it more harmonically interesting. I distort it at the filter.
I distort it with Drum Buss too. At this point it is a sustained detuned chord, I add movement to it with the Phaser-Flanger and plenty of feedback for a stereo wub.
Then I add a 2 16th note rhythmic Echo, some Reverb, then a Drum Buss at end of the chain to distort it do it cuts through the mix.
You can see the Wavetable pad patch in the image below:
It sounds like this:
Step 9 – mix it all down
You then want to go back and make sure the levels and EQ are good for each channel so they sit well in the mix together.
Here’s the final loop again:
Buy our preset and sample packs—> at our Shopify store , use this code for 25% off: SBCOM25STWD
The Macro Controls For The Electro Sequence Rack

You can download this rack in the Downloads section below…
Time – this increases or decreases the time of all envelopes on Operator so it is great to automate
Filter Freq – lifts up the filter cut off to remove more of the sound.
Osc-D Level – This add in the FM oscillator to frequency modulate oscillators a,b and c.
Phaser Fdbck – This adds feedback to the phaser and results in really nice phaser sweeps which are synched to the beat.
Echo Fdbck – adds in feedback to the delay chain and can be used as a build up.
Echo Mix – the wet/dry mix of the Echo’s delays.
Reverb Decay – the decay time of the reverb unit – automate it upwards for a build up.
Reverb Mix – the wet/dry mix of reverb.
You can download this rack in the Downloads section below…
Electro Drum Pattern Video:
Here’s a video tutorial and run down of the rack on our Youtube channel….
(video coming soon)
Please subscribe to the youtube if you haven’t yet: youtube.com/@studiobrootle
Downloads
You can download this pack by subscribing to the mailing list here, you’ll get a link to download all the free presets, samples and racks we’ve ever made:
Buy Our Preset Packs here:
Click the image for 25% off: