Compression can be a tough subject for some to grasp, but fear not! You can learn it in no time. Here’-s our guide on how to sidechain in Ableton. We delve in here with a crystal clear example of one of the most common uses of compression: sidechaining. Commonly used to mix the kick and bass, sidechaining is where a compressor is set up lower the volume of the bass for a split second every time a kick plays, so that they do not cancel each other out in the mix by playing at the same time, but instead they compliment each other.
Tip: if you don’t want to get to grips with a compressor, there is an easy workaround where you can sidchain without a compressor, where you just automate a Utility unit, we go into detail below.
You can find our paid packs at our Shopify store, use this code for 60% off: SBCOM60STWD
Subscribe / Free Kick Drums
Subscribe to our email list to get a pack of kick drum samples now, and 5 new kicks each week, every week. All made in our studio. Plus other free samples from time to time…
See also: Mastering In Ableton, Ableton Sampler.
What is audio compression?
Compressors are used to reduce dynamic range. They were made to automatically reduce the volume of louder parts of the track. The settings on the compressor controls how the louder parts are selected and how much they are turned down. In basic terms they turn down peaks automatically. You set the threshold, and anything louder gets turned down.
It is important in mastering as once the loudest peaks in the track are turned down, you can then turn the whole track up, which makes the track sound louder and fuller in general, as everything other than the peaks is now a bit higher in volume.
Ableton Sidechain Compression
What is sidechaining?
Sidechaining is where there is audio going into the compressor like normal but another audio source triggers the compressor to work. So the peaks from another track make the compressor lower it’s volume.
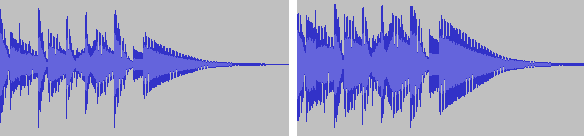
Here’s a picture of the same drum beat, they are both at the same volume (normalized). But the one on the right has been run through Ableton´s compressor. This turned down the largest peaks. Then when it is normalized you get a fuller and louder drum beat.
This can be really helpful in the studio….
Why sidechain?
One of the main uses of sidechaining is on kick drum and bass. It is a mixing technique to make them sound better together. The bassline is processed by a compressor in sidechain mode, but the kick is set as the sidechain signal. This means the bassline will drop in volume momentarily when there is a kick drum.
It is really helpful as often mixing a kick and bassline causes problems and one gets a bit lost in the mix as they are both in the bass frequencies. But setting them up with a compressor to sidechain them means they both sound better in the mix as the bassline lowers in volume for a split second to make room for the kick, and you get one at a time. So they both sound better as you don’t lose the punch of kick in the mix.
How To Sidechain In Ableton
There’s a few things we’re going to cover in this article. But first off we’re going to show an example of sidechain compression
In a new project load up a Wavetable into Channel 1 and play a long note C3. Set BPM to 120. Loop it 1 bar in length, with the note plying the whole bar.
Load up the Prehistoric VHS patch and then add a Compressor after it.
Then in a new channel (2) add A Drum Rack with a kick playing a pattern. We loaded the 606 Core Kit and added a standard kick on each count.
It should sound like this
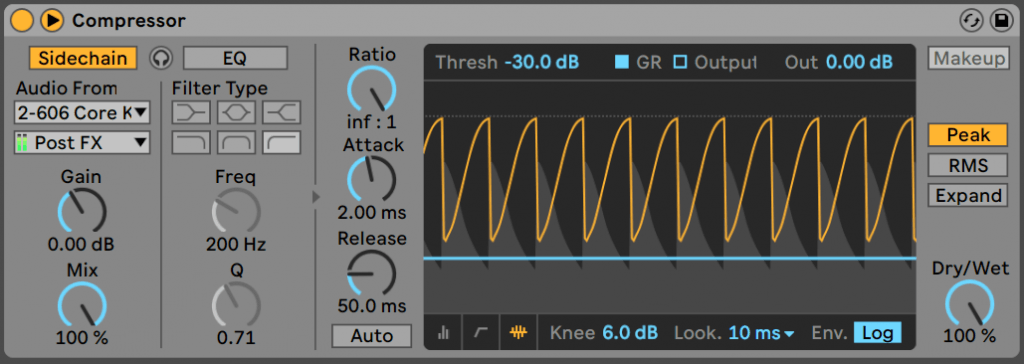
Now lets set up the sidechain… Click on channel one (with Wavetable and the Compressor). And click on the small arrow on the Compressor next to the On/Off Switch. This brings up the sidechain settings.
Click on the Sidechain button (top left), and select ‘Audio From’ 606 Core Kick. This mean the compressor is now triggered by the kick from the 606.
Now bring down the Thresh (threshold) on the Compressor. As you turn it down you can hear it start to cut the volume of the tone at the same time of the kick. Turn it down to about -30db.
Then turn the Ratio up. This is the amount of the compression. Turn it all the way up and you will hear the pumping effect exaggerated. It now sounds like this:
Mute the drum channel on the Ableton mixer and you ‘ll hear it soloed, you can hear the tone ‘ducking’ where the kick is:
It is sidechaining nicely! It dips in volume where the kicks are.
You can start to imagine how this would be good for mixing bass so the bassline and kick drum automatically give each other some room in the mix. It´s also great for techno drones like this to make them pump with the beat.
Ableton Compressor
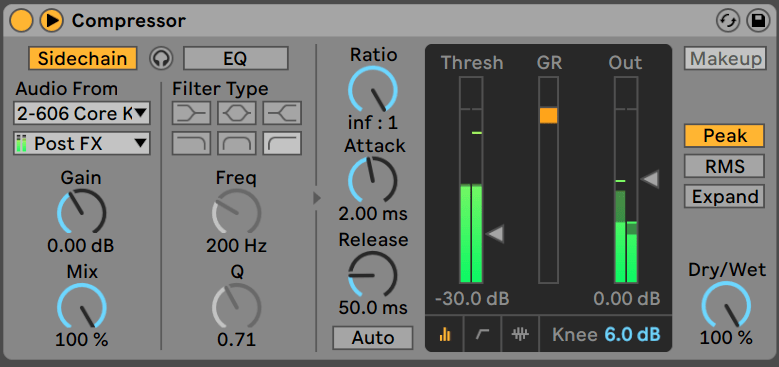
Here’s a run down of what the controls do on the compressor, it is one of the few effects you really need to learn, as ‘tweaking knobs till it sounds good’ doesn’t work well…
The small arrow at the top right next to the on/off button toggles the Sidechain view.
The Sidechain button toggles the sidechain part on and off. And the headphone button next to it allows you hear the sidechain signal soloed, it is sometimes useful to monitor it alone.
The Audio From drop-down selectors select the signal that will trigger the sidechaining, with option to include fx below it. By the way if you select a drum rack as your sidechain source, you can select individual parts of it in the drop down selector underneath – i.e. you can just use just the kick and not the whole drum kit’s audio output. Which is really useful for kick/bass sidechaining.
Gain is used to boost or turn down the sidechain signal.
Mix is the mix between the sidechain signal and the original audio source. So you can add some of the audio you are compressing to the sidechain signal so that triggers the compressor too if you want.
The next column is to EQ or filter (using standard Ableton filter types) the sidechain signal to make it work better, let me explain… For example if you are using a kick and snare to sidechain a pad, sometimes the kick is so loud the snare does not trigger the compressor, it is just the kick…. So you can use the filter/eq here to filter out some of the low end, so the snare triggers the sidechain too. This is where the headphone button can be useful to hear the input as you EQ it.
In the main compressor section…
Ratio is the amount the signal over the threshold is reduced. Attack and release settings on a compressor are how long it takes for the compressors effect to fade in and fade out. There is an Auto button under the release to automatically adjust the release based on the incoming audio (or sidechain signal).
In the main screen there are 3 bars…. The threshold is the level that audio has to hit before the compressor works. i.e. if threshold is set at -30db, then anything over that will be compressed. You can change it with the arrow on the side of it. The middle bar GR is gain reduction – it shows how much the compressor is working. Out is the output signal and you can adjust the output gain with the arrow on the side of it, it is used to turn the compressed audio back up to a level you want it at.
The knee how smooth the transition is from compressed to non-compressed audio – normally compressors will have a hard and soft knee option at least.
There are 2 other screen modes which you can access using the 3 icons to the bottom right of the screen. They also give you access to more settings, as well as some helpful display info.
This one shows the knee settings:
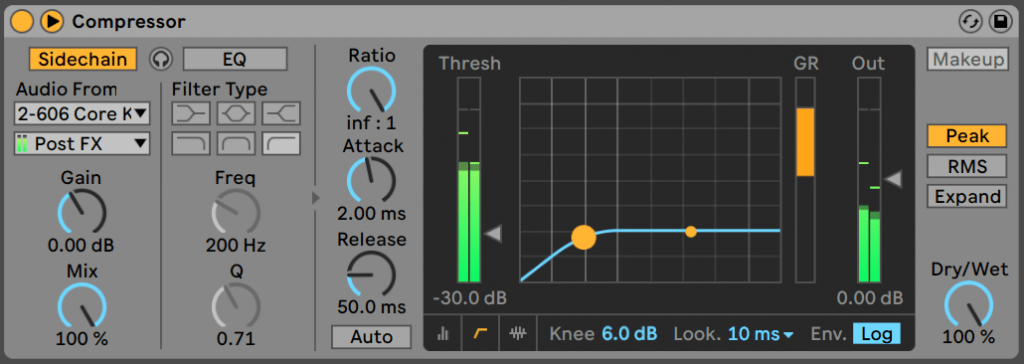
And it gives you access to the Lookahead… The way compressors word is they react to an incoming signal and the reaction can be a millisecond late. But late none-the-less. Lookahead is there to remedy this – Ableton’s Compressor has 0, 1, and 10 millisecond lookahead time settings if you need them.
You can also switch the envelope settings to Log mode (as opposed to the normal linear mode where attack and release settings function normally). In Log mode the shorter the peaks the shorter the release time.
The third view is really handy for sidechain compression as you can see the compressor working on the kick visually….
Now to the settings on the right hand side….
With Makeup on the compressor will automatically compensate for the gain loss. i.e. it will turn the audio up. This cannot be used in Sidechain mode.
The Peak / RMS / Expand settings… There are 3 modes the compressor can run in… Peak – the compressor will be more sensitive to short peaks. RMS – the compressor reacts to the average loudness of a signal so will mostly be slightly less reactive and less aggressive than Peak mode. Expand – this mode allows you to set the Ratio increase the volume (set it to less than 1) and do the opposite of compression. If you switch on Expand mode you can see the Ratio settings change, and you should see the GR in the negative. It has some creative uses.
Sidechaining With Utility
You can sidechain in Ableton Live using Utility. You can automate the Gain dial and get the volume to dip where ever you like.
You can see below highlighted in yellow how easy it is to draw in automation for a Utility.
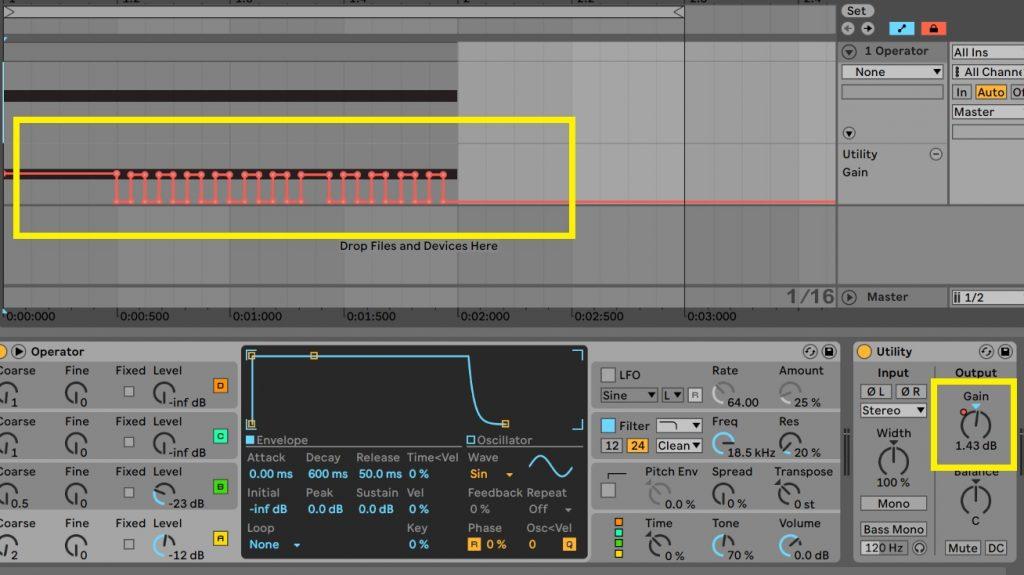
You can hear what that sounds like on a tone from Operator here:
You can see in the image and hear in the audio that the tone is allowed to play for a second then then the ducking cuts in.
The great thing about this method is how easy it is to get detailed – you can draw in the automation exactly how you want. And you don’t need a compressor.
If you are using it to duck a bassline with a kick you can get it exactly how you want on one kick on a short one beat loop, then copy it out to the whole track. I’ll show that in the next example…
How To Sidechain WITHOUT A Compressor – The Easy (Utility) Method
I’m going to use a techno rumble kick as an example here to show how to mix kick and bass with utility sidechaining. This technique involves making a big sub bass rumble from a kick drum, then sidechain it. It can get messy in the low end if the reverb is not tamed. This is what it sounds like with a pumping sub bass after each kick:
Firstly I make a big low-passed reverb sub bass from the kick that sounds like this:
Then I add a Utility unit and Automate the gain so the bass pumps and does not hit at the same time as the kick:
The Automation looks like this:
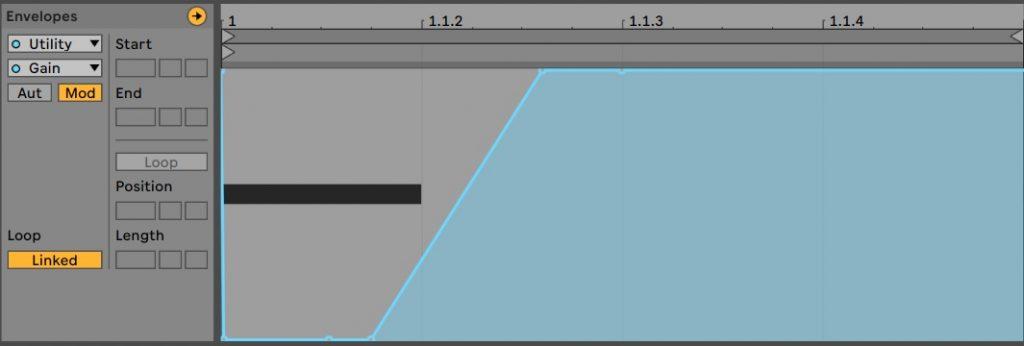
It’s as simple as that! Then adding the kick back in you have the finished kick and rumble:
For more on making this type of bass see our article: Techno Rumble Kick Ableton Rack mk2. You can get a rack too. It include a compressor to pump the bass but you can delete that and add a Utility, then draw in the automation to get a feel for how it works. You have complete control over how the bass pumps as you can draw it in however you like.
Ableton Compression
Compression in Ableton is really easy with the simple Compressor. There is also the Glue Compressor which is modelled on a classic 1980s SSL bus compressor. It’s main use is for adding to a drum track – or all drum tracks in a group to glue them together (hence the name). When you have a lot of separate drum parts they can sound a bit disparate, but adding them to group and compressing them all together can make the drum track sound more whole. Try it on your drum tracks.
There a plenty of other uses for compression. Radio DJs use it for ducking vocals so that when they talk the volume drops – similar to the kick/bass sidechaining we showed earlier in this article, but with different release settings.
Obviously there are also mastering applications with compression, see our article Mastering in Ableton.
Summary
Hope you this helps you on your way to mastering sidechaining in Ableton, get in contact with any questions or feedback or any music you make.
You may also like…
See our guide to Mastering in Ableton for more compression applications For more help with Live, see our Ableton Tutorials.
Before You Go…
- Get on the email list for free kick drum samples every week, plus you get all the past ones as soon as you subscribe: you can do that HERE.
- You can find our paid packs at our Shopify store HERE ( use this code for 60% off anything or everything: SBCOM60STWD ) .
- Follow us on Youtube for hardware workouts and Ableton tutorials… Studio Brootle Youtube.
- If you’re looking for 1 to 1 online Ableton lessons get in contact to get the most out of your studio time, email: studiobrootle@gmail.com.