Welcome to our free Serum 2 dub techno preset and tutorial on making dub techno chords in Serum 2.
You can buy our Serum 2 Dub Techno presets here. Use this code for 25% off: SBCOM25STWD.
You can download the free rack here.
Below is a video and tutorial on how to make a dub techno chord in Serum 2, you can download the free preset too. Essentially it uses the Arp section in Serum 2 to make a minor chord from any note you press, then all oscillator on with loads of modulation and a full effects rack too. There’s tons of dub techno tips below as well.
Video on the free Serum 2 Dub Techno Chord Preset:
Free Serum 2 Dub Techno Preset
You can download the free rack here.
YOU CAN GET our SERUM2 PRESET PACKS HERE… 25% off WITH CODE: SBCOM25STWD
How To Set Up A Dub Techno Chord In Serum 2
Firstly set up Simple Dub Techno Chord, then we’ll add effects after…
- Start by playing a note on D3 (or anywhere around C3) and looping it for a bar. This way we can design the sound without playing notes or touching the keyboard.
- Load an initial/default patch into Serum 2.
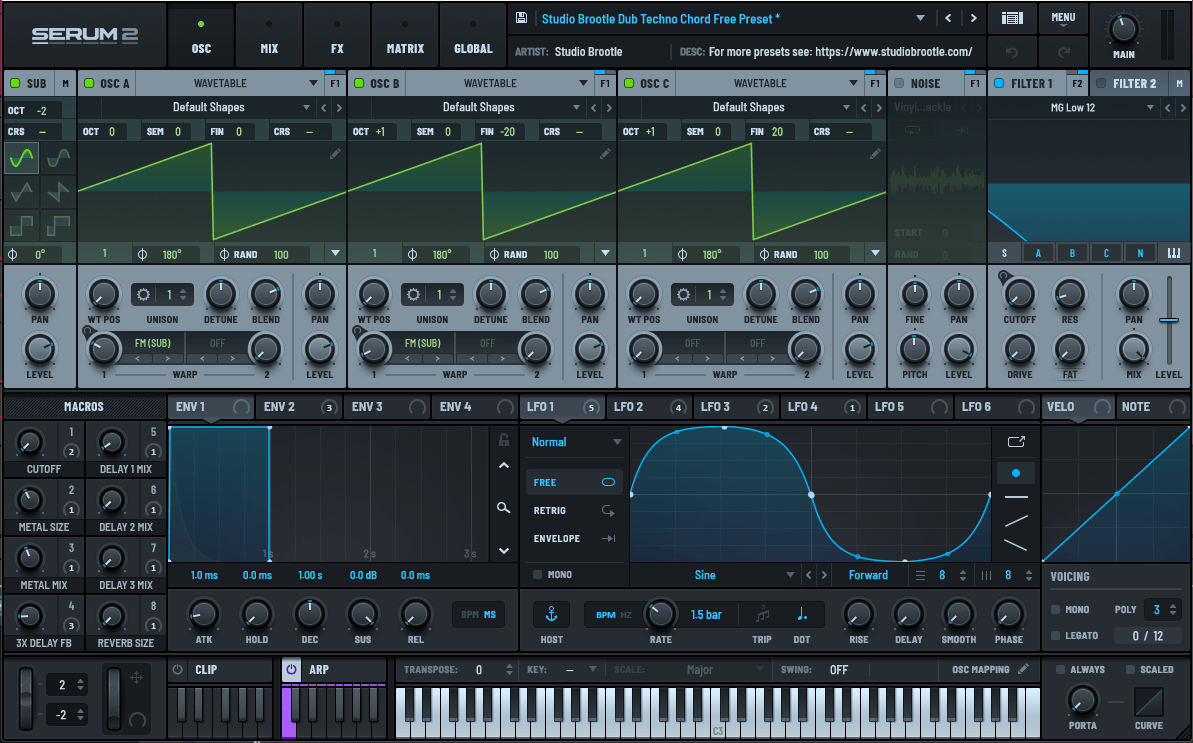
- Dub techno chords are normally made from saw waves.. so we’ll start with making OSC A into a Saw Wave.
- Then set up the Mix tab. You want to make sure the all the routing in your synth is correct as some initial patches route everything to the main output. You want to route all oscillators to the filters first. So I make sure all Oscillators route to Fitler1 (not main) so they all get filtered. Then make Filter1 route to Filter2. I then turn up Filter2’s cutoff so the sound is not not filtered there yet.
- Turn Filter1’s cutoff right down. You’ll hear this hide the sound as you turn it down. Turn it all the way down until you get silence. We’ll modulate it up in the next step…
- Add Env2 as a modulation source for this cutoff by dragging it on the cutoff knob. And make sure it modulates as much as it can – to 100%.
- Then make the Decay on ENV2 really short to 550ms and you’ll hear the note is now short and plucky as the filter is being forced to open and close quickly for each note. You can adjust this to taste.
- Switch on all oscillators and the Sub oscillator and Noise. Make sure OSC B and OSC C are saw waves just like OSC A (we’ll tweak everything later).
- Drop the Sub oscillator to -2 octaves and make it a sinewave for a nice low end bass under the chord.
- Set up a chord so you only need to press one key and a minor chord is automatically generated – we want a melancholy souning chord… Do to the Arp section and switch it on, then go to the Pattern Section (change the Pattern to ‘Pattern’),m then click the pencil icon to edit the Arp/Chord, and change the settings to Mode: Normal, Step Mode: Chord, Wrap: Normal, Pitch: 1 and Range: 12, then draw in a minor chord with 3 notes at the semitones: 0,3,7. This will now play the minor chord and whatever key you play will be like you’reº playing a 3 finger minor chord.
- Set up Noise so it makes some vinyl crackle or analog hum to emulate the noise from old dub techno record. There’s some vinyl noise to choose from and various hums and hisses. The Cicadas insect noise seems to work well too. You just want this to be subtle and in the background.
- Now to detune the 3 main sawtooth oscillators for character…. Make OSCB and OSCC play up one octave (make the OCT setting +1), then detune each for a thicker chord… Turn the fine tune (FIN) on OSCB up 20 cents OSCC down 20 cents. You can hear the chord is much thicker and phatter now.
Then set up the all important Dub Techno Effects Chain:
Now for the dub effects… head to the FX tab….
- Add 2 Delays and a Reverb to start with for a basic chain.
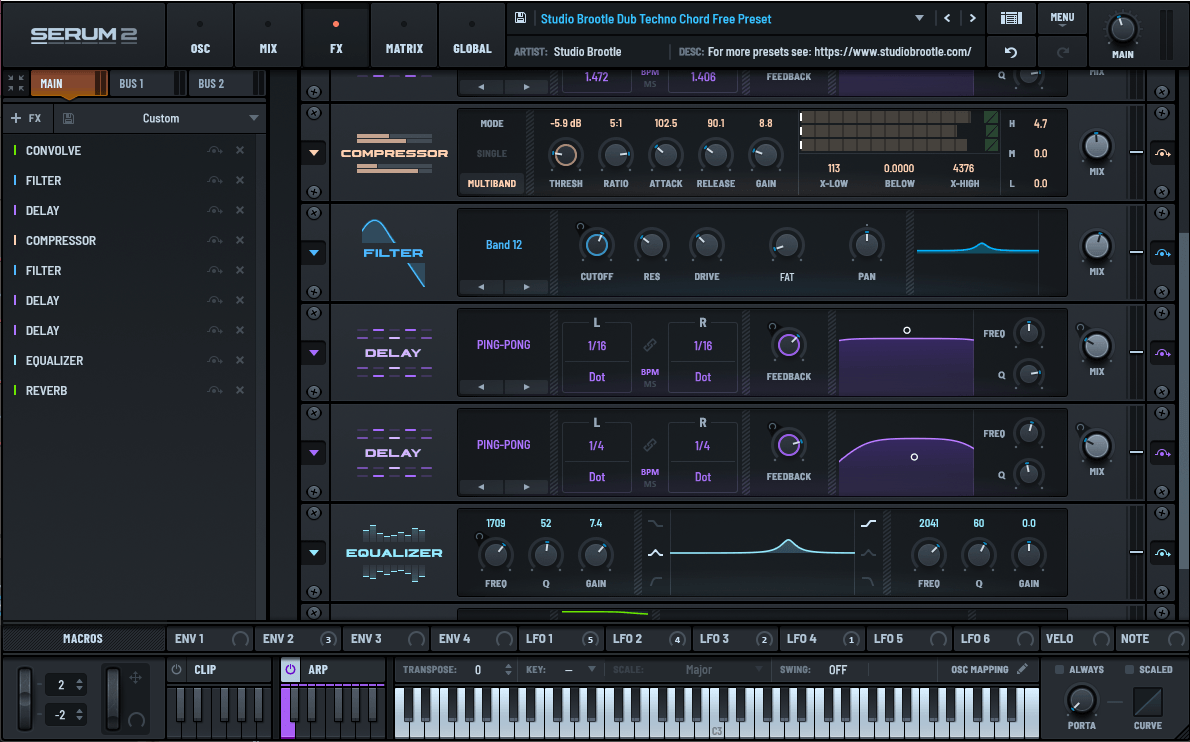
- You want to change the delays off a bit to add character and a longer hall reverb at the end. I set the first Delay to TAP->DELAY with a delay setting of 1/2 Dot on the left and 1/8 Dot on the right.
- The second Delay I set to to PING PONG (for stereo width) with a setting of 1/8 Dot for left and right.
- Tweak the Feedback and Mix settings to taste for both delays units.
- The Reverb at the end wants plenty of decay.
- You can duplicate these and add more delays as you like. You can also add compressors, filters and more reverb…. In the next section we’ll cover more dub techno effects processing….
More Dub Techno Chord Tips Serum 2
There are a lot more techniques that you can try that are either from the 90s hardware era, or new and due to modern software, and some are a mixture of both, a new way to do classic processing…
More advanced dub techno techniques:
- Add in some frequency modulation to the oscillators. Don’t add too much as it can turn into white noise if you add too much FM because there’s a lot of oscillators in play and multiple notes due to the chord. You can add FM in the Warp section under the oscillators to FM OSC A and B – try using the Sub bass as the modulator as it’s already a nice pitched down sinewave that will work well for FM. You can tweak the levels until it sounds good. I like to turn the amount down a bit too much, then make an LFO very slightly modulate it up and down over a few bars for movement. You can use different LFOs for both oscillators so their movement isn’t the same and you get a rolling, evolving effect.
- Mimic the Roland Space Echo unit by adding a short reverb early on in the effects chain. The Space Echo 201 has Spring Reverb that was built into the tape delay unit and used in hundreds of dub techno records. In Serum 2, you can use a Convolve Unit as the first effect and The Metallic Bloom setting with Decay and Size both set to halfway, set the Mix to taste. This will give the chord that metallic feel.
- Add modulating Bandpass Filters to the effects chain. And modulate them to move… Add a Filter after the first reverb, set it to Band 12, make it resonant and tweak it and the cutoff. Then get an LFO, set it to sinewave and make it modulate the cutoff, tweak the amount and LFO length to taste. 1.5 basr is a good length. If the effect is too much you can turn the mix down so the filtering is more subtle.
- You can easily duplicate these Filters by clicking on the down arrows to the left of their panel, and move them throughout the effect chain. Change the LFO time by copying the LFO and editing the length time. TIP: to copy an LFO or Envelope, Click on it’s name and hold ALT, then drag to another LFO and it will copy it. Then you can change the timing and have different length LFO.
- You can also add the main filter envelope (as a second modulation source as well as the LFO) to these Bandpass filters if you like so they move with the main filter.
- Modulate the Mix (wet/dry) of one of the first Delay in the effects, and make sure it goes over 50%. I get an LFO and make it modulate a delay’s mix from 40% to 60%. And then back, slowly. This changes the feel of the rhythmic delays, as when you go over 50% the emphasis on the first dry note changes. And as they are rhythmic delays it give the impression of a changing rhythm. Do the same for Delay feedback – occasional bursts of extra feedback.
- Add a multiband compressor in the middle of the effect chain to bring out and emphasize the delays and reverb before it in the chain. Tweak it to taste. Be careful of volume increases. Tweak the bands to change what sounds it emphasizes.
- Add in an Equalizer to boost certain frequencies, this is useful as sounds can get muddied and you can emphasize them with EQ. You can also modulate the frequency on the EQ with an LFO, like a filter LFO.
You can download the free rack here.
YOU CAN GET our SERUM2 PRESET PACKS HERE… 25% off WITH CODE: SBCOM25STWD