VCV Rack is a great piece of software, modelling a modular synth set up with an infinite amount of routing and module combinations. And better still it is free. The purpose of this VCV Rack Tutorial is to learn by setting up a basic patch. Then making a few more patch examples to show off some of it’s features and to get started making some noise!
See also: VCV Rack Patches, Best VCV Rack Modules, VCV Rack.
Subscribe
Subscribe to our email list to get a pack of kick drum samples now, and 5 new kicks each week, every week. All made in our studio. Plus other free samples from time to time…
Sample Packs..
We have a Shopify store of samples and presets with custom packs all made by Studio Brootle, here:
Basic VCV Rack Patch
This is the main part of this VCV Rack tutorial – we we will set up a basic patch and along the way and cover making modular music with Oscillators, Sequencers, Envelopes, Filters, Mixers, Effects, and routing audio and cv signals. To make this as easy as possible, all of these will be modules that are native to VCV Rack.
We’ll make this sequenced sound:
With modular synthesis each module has a different function, an Oscillator (VCO-1 in VCV Rack for example) will make a tone, a sequencer will tell it what pitches to play over a time period, a filter will shape the sound, and can be made to open and close with an envelope. When you put these together you have a sequence of pitched notes like the one above.
N.B. The routings for modulations are called CV on a Eurorack Modular. This stands for control voltages. As far as we are concerned with VCV Rack, the cables either carry audio from audio sources or CV (modulation sources).
Step1: Lets make some noise!
You can make this patch yourself (right-click in blank space in VCV Rack to bring up the library). Or you can download this patch here:
It sounds like this:
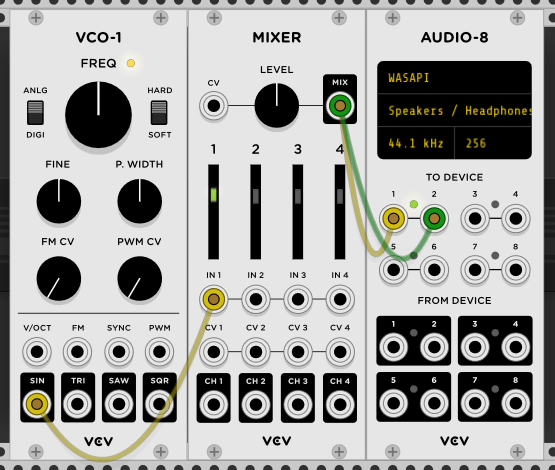
This is a really basic patch with just an Oscillator (which is the sound source), the VCO-1 module. It will just output a continuous tone at the same pitch (for ever and ever into eternity if you let it!).
So here the oscillator VCO-1 generates a continuous tone and the mixer controls the volume, before it is output to the soundcard.
You can see that the sinewave output (called SIN) from the VCO-1 is plugged into the IN of channel 1 of the mixer. Then the mixer is plugged into the Audio-8 which goes to the soundcard.
The cable sockets are black for outputs and white for inputs – i.e. SIN on the VCO-1 outputs a sinewave, and the V/OCT socket above it is for plugging in a modulation source (more on that later!)
Step 2:
Here we start to shape the sound by adding a filter. A low pass filter will filter the top frequencies off progressively. You can download the patch in the link and tweak it yourself…
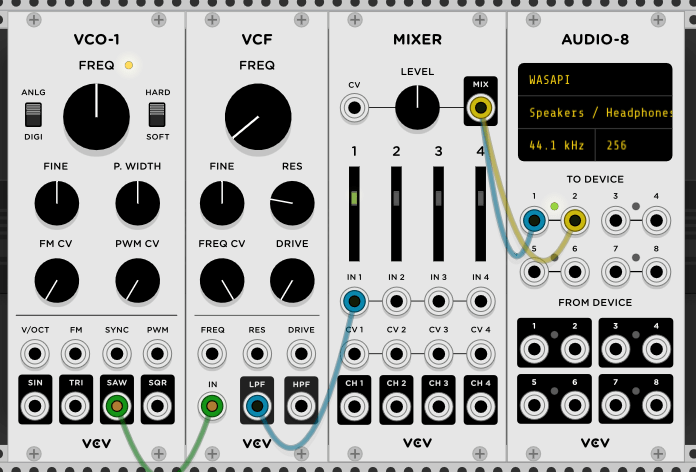
We add a VCF filter unit after the sound source (VCO-1) and before the Mixer. I want it to act as a Low Pass Filter so I route the LFP output to the IN of the mixer. If you want High Pass, then you can use the HPF output.
Turn up the FREQ knob. you can hear the filter filtering the tone in and out. In this audio clip I am turning up the VCR Freq (frequency) and then back down to let the sound through the filter momentarily.
You can start to see how we use modules to sculpt the sound. In the next step we’ll control this with an envelope so it is done automatically for each note.
If you are used to making music on a DAW and VCV Rack seems like a long process, please bear with us! It gets easier later on and you can make rows and racks of sounds fairly quickly this way. I promise!
Step 3
Now were’ going to make a patch very close to the default patch that comes with VCV Rack. You can load up the default patch as the starting point if you like (or the one above – they are very similar). It is the same as the patch we made in step 2 but with an added ADSR unit.
What is an ADSR envelope I hear you say?! I appreciate that a lot of people will know this and some won’t so skip past this section if you want! An ADSR envelope controls how long something happens when you play a note. Let’s say the envelope controls volume then when Attack is turned up the note will fade in once you press a key. Decay is how long the note will play for. Sustain is how long the note will play for but depending on how long you hold the key, and release is how long the note will continue after you let go of the key.
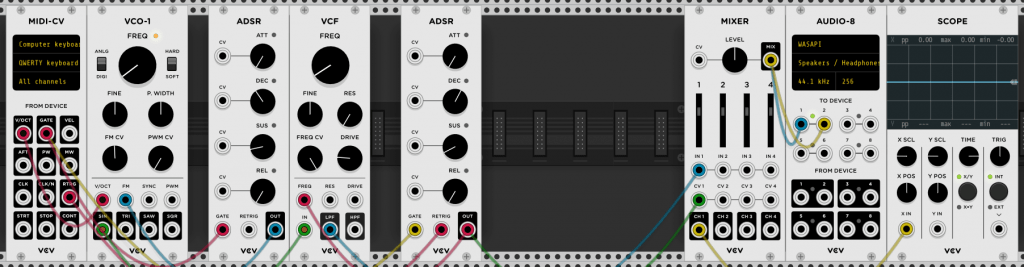
Back to the patch!…. Here there is an envelope (ADSR) unit that will open and close the filter. What we’ve done in the example above is to use the ADSR to control the filter so the filter will open and close for each note, like in step 2, but automatically. This is a very common patching example. The ADSR unit is set up to be triggered by the gate from the MIDI-CV unit (which is a signal that emits as long as you hold down a key on the keyboard).
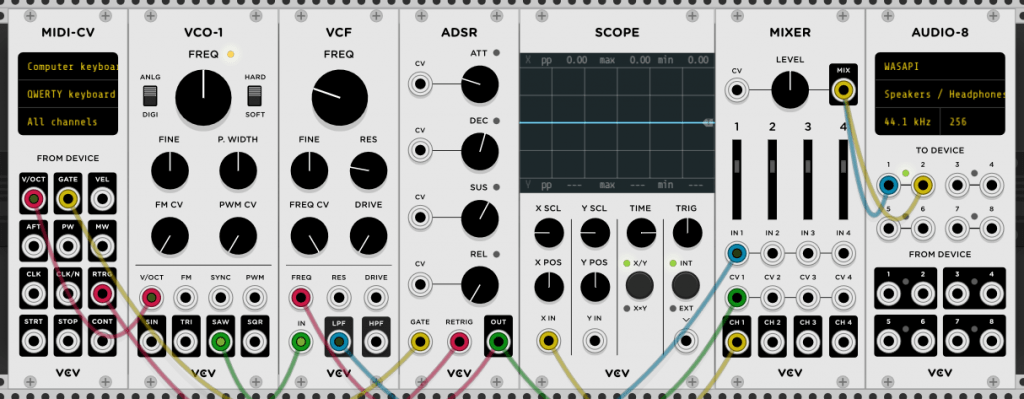
The MIDI-CV unit also takes the notes from the keyboard and tells the VCO-1 unit what pitch to play. It does this by connecting the V/Oct to V/Oct – this is like volt per octave – a modular eurorack style format. It is just telling it was notes to play based on what is played on the keyboard.
We then take the ADSR’s output and route it to the filter FREQ (frequency). So the when you press a key on the keyboard, the gate triggers the ADSR to open and close, and that triggers the filter to open. You can control how much the filter is open with the ADSR settings. Press Q on your keyboard and you can hear the oscillator playing as the filter opens and shuts while the key is pressed.
Now turn up the ADSR’s attack to just over halfway (the top knob) and press and hold the Q key again and you will hear the note fade in more.
Turn all the ADSR knobs down except turn up DEC slightly and play a note, you will get a tight blip of the sound – this is because the filter is opening and shutting really quickly with very little decay. Using a filter and envelope like this is a key part of subtractive synthesis.
The ADSR is also routed to the mixer to make the mixer channel volume change too in the same way the filter frequency changes.
Step 4 lets add a sequencer…
In this patch we’ll add sequencer so it will play a sequence of notes instead of the keyboard.
We make the sequencer trigger the ADSR’s gate (instead of the keyboard doing it) by taking the GATE output from the SEQ-3 and plugging it into the GATE of the ADSR. So we don’t have to play notes on the keyboard anymore the sequencer will do it all.
We route the output of the sequencer’s ROW1 to the V/OCT input of VCO-1. This is the pitch modulation input. Now the sequencer will play notes on the VCO-1.
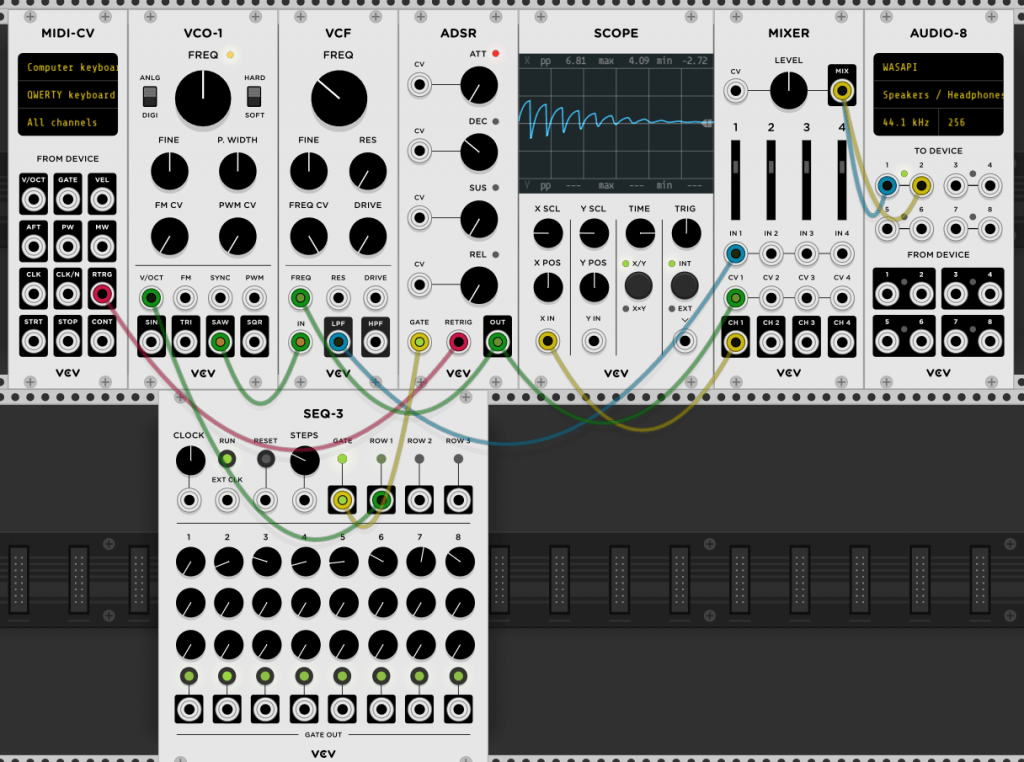
So by setting these 2 routings from the sequencer of pitch and gate the sequencer can now play notes.
Click Run on the SEQ-3 to make the sequencer start. Set the pitch by changing some some of ROW 1’s knobs to taste. I also changed the STEPS knob on SEQ-3 to 3 for a loop of 3 notes. You can set it at what you like. If it is set at 3 for example, then then only the first three notes/knobs will work and they will loop.
It sounds like this:
Notice how all the notes are the same length, we’ll change that in the next step…
Step 5 – adding variation to the loop
Lets spice up the loop a bit by making some notes different volumes/filter amounts so that all the steps don’t sound the same length or volume. We use the second row to do this… Set the output of Row 2 to control the CV input of SUS on the ADSR. And turn some of the knobs in row 2.
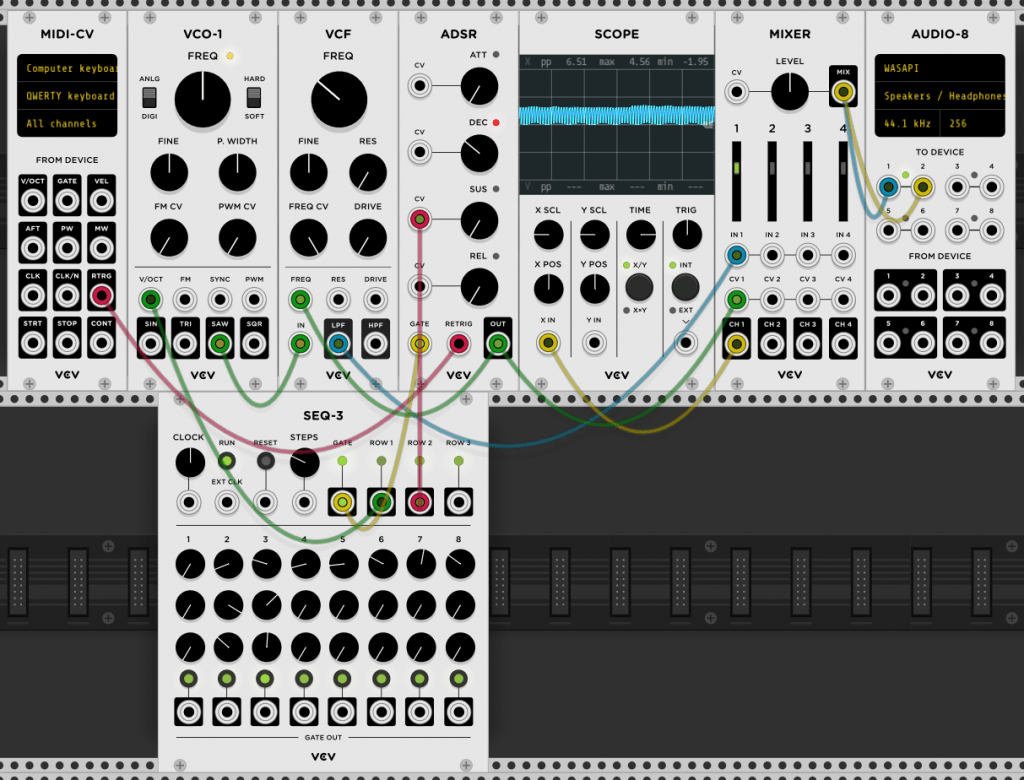
Press RUN on the SEQ-3 and tweak the first 3 knobs in SEQ-3 and you’ll hear the effect. It should sound like this:
Congratulations! You’ve now got the filter to open up differently for different notes. And the mixer volume changes as well it is also modulated by the ADSR (you can see this as the ADSR out cable is plugged into the CV1 input of the mixer).
You can control almost any parameter this way for those really nice ‘modular’ sequences.
Step 6 – adding more sound sources
Lets add another oscillator to phatten up the sound…
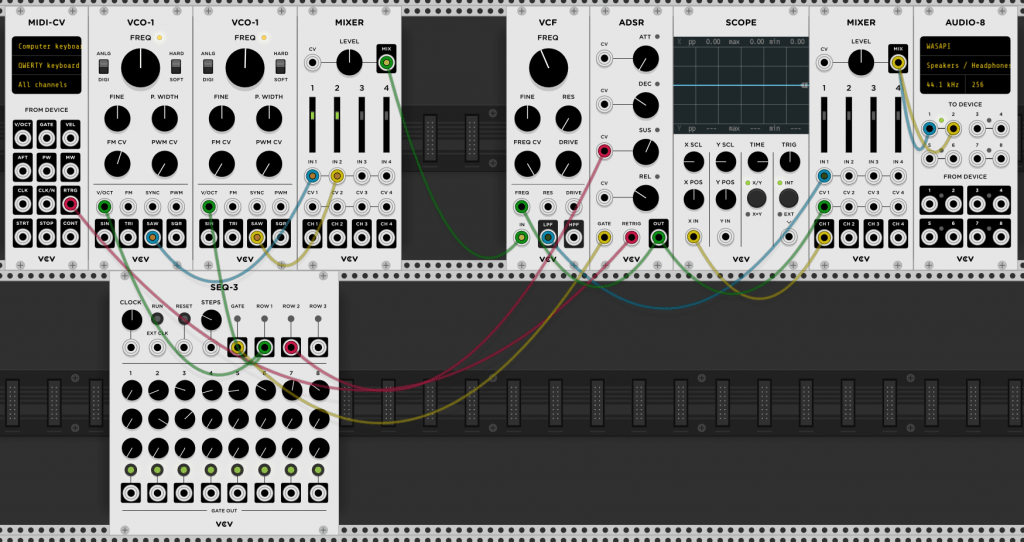
We add a second VCO-1 unit and another mixer too to mix the signals of both VCO-1 units. This way we combine 2 sound sources for a thicker sound.
We make the second VCO-1 wired up the same way and mix them both together before routing them to the filter. As you can see in the image.
Change the FREQ really slightly of the second VCO-1 unit you just added so that they are slightly out of tune with each other for that nasty but nice techno detuned sound…
It will now sound like this:
Step 7: Adding FX (and modulating it!)
In this step we add a delay at the end of the row before the mixer. But of course this is modular so we may as well modulate it too with a cable or two…
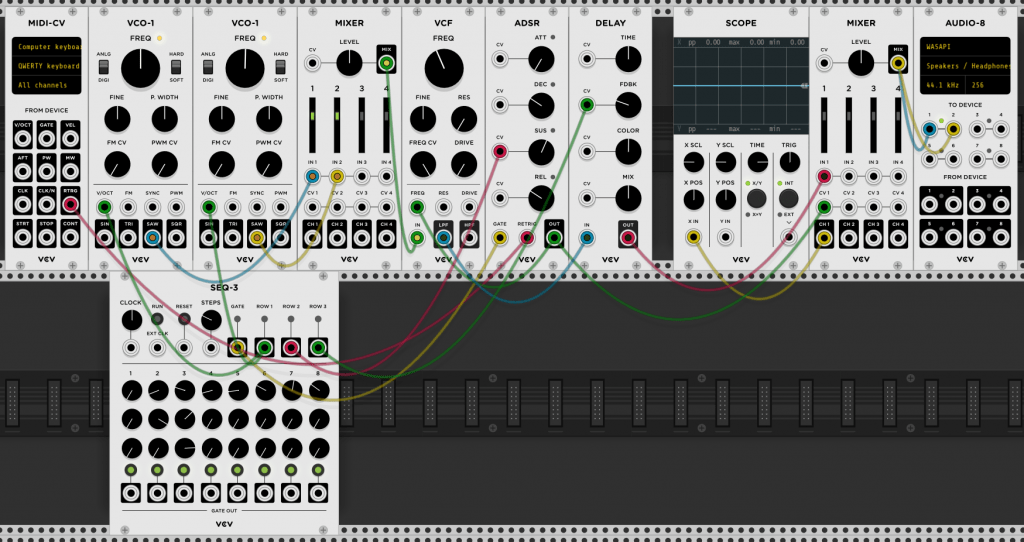
We make ROW 3 of the sequencer control the feedback amount of the delay (by routing ROW 3 to the CV input of the DELAY’s FDBK). Then we turn it up on only one note (note 3) by turning just that knob up. This means the delay will feedback more on just that one note.
Try experimenting with the settings on row 3 so that only some notes delay.
The finished sequence sounds like this……
You can modulate almost anything like this, and this is the beauty of the VCV Rack modular environment. Try modulating some other parameters with the sequencer and see what you can come up with.
Learn VCV Rack
The best way to learn is to make patches and make music. So for the rest of this VCV Rack tutorial we’ll look at a few more patch and routing examples that are used commonly in modular synthesis…
VCV Rack LFO and Pulse Width Modulation
Here’s a patch that shows an LFO module as a modulation source. and we make a nice rave bass with it, it sounds like this….
Pulse width modulation is a a feature on square wave where the waves’ pulse width can be changed so it is not a square wave but is a rectangular wave. It was made famous in the old-skool rave scene by modulating the PW with an LFO for some really thick bass sounds, so the wave moves very quickly from square to rectangle and make a thicker sound, which is great for basslines.
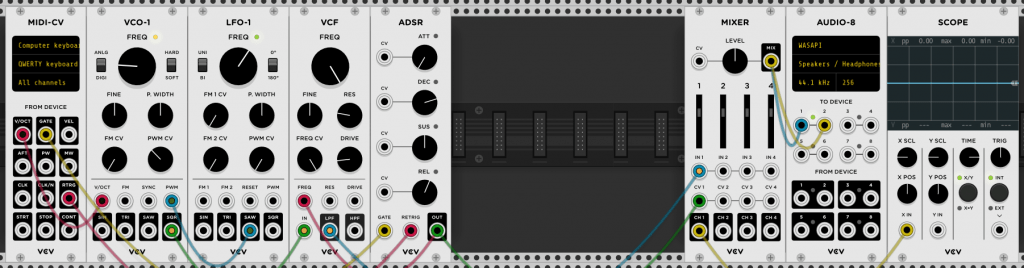
The LFO is connected to the PWM input of VCO-1. Then the amount of the modulation is controlled by the PWM CV knob – which needs to be turned up. as it mixes in the effect.
Try changing the amount of the PWM CV knob and the LFO FREQ for different affects.
Try controlling the filter frequency with the LFO instead, for those dubstep style wub sounds. OR the pitch of an oscillator using the FM input.
Kick
This is a really simple patch where a sinewave’s pitch is modulated. It sounds like this:
VCO-1 is outputting a low sine wave, with an envelope on the pitch (FM input) for a punchy kick.
Then it is sent to a filter, with an envelope on it too to cut the kick short. And some drive distortion is added with the VCF. The drive on the VCV Rack VCF units sounds pretty good to be honest.
By changing the ADSR settings you can make the kick and the pitch dive different lengths and quickly change it from more like 909 kick to an 808 for example.
Snare
Here is an example of a simple snare sound using a sinewave with an envelope controlling pitch, and some white noise… a fairly standard way of synthesizing a snare.
Here we have a VCO-1 unit outputting a sine wave and an ADSR that modulates it’s FM for a sharp pitch increase for a plucky sound.
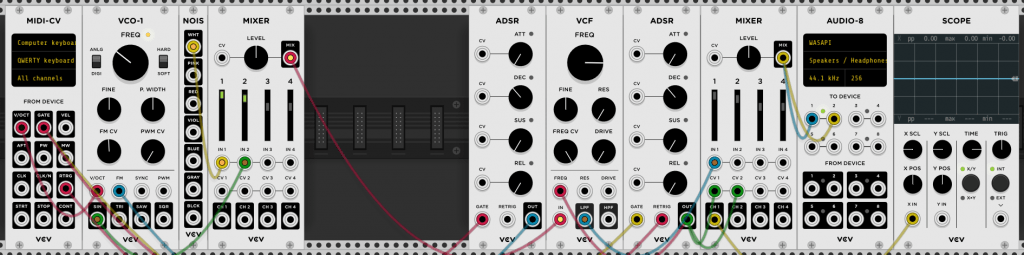
There there is a a NOIS unit that emits some white noise. We then combine the sine and noise at the first mixer.
Then they’re sent through a filter which has a tight envelope so that the filter opens quickly but shuts soon for short, simple, rounded snare sound.
VCV Rack FM Synthesis
How to do FM in VCV Rack? For frequency modulation, an oscillator’s output modulates the frequency of another. Here’s a basic example of this and the modulation is controlled by an envelope so the effect changes over the duration of a note, which is a standard feature of FM synths.
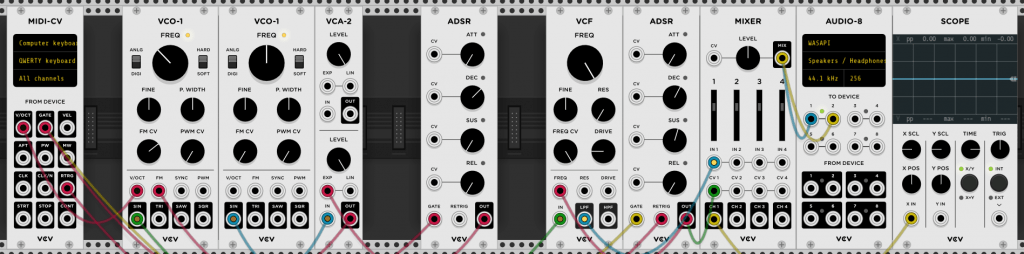
Here a VCO-1 unit Frequency Modulates another VCO-1 unit. The modulator goes through a VCA which is controlled by an envelope, this way the envelope shapes the Frequency Modulation.
You can change the amount of FM with CV FM knob. Try tweaking the frequencies (FREQ) buttons of both VCO-1 units in turn and you’ll hear the different it works.
More VCV Rack Patches
For more VCV rack files to download see our VCV Rack Patches section. Some of them are relatively simple like How to Sidechain in VCV Rack to whole loops like our Detuned Techno article. They all have files to download so you can tweak them and make them your own.
Summary
Hope you found this VCV Rack tutorial useful. Any feedback please let us know. We’d love to hear what you make too – hit us up on instagram…. https://www.instagram.com/studiobrootle/
Before You Go…
- Get on the email list for free kick drum samples every week, plus you get all the past ones as soon as you subscribe: you can do that HERE.
- Follow us on Youtube for hardware workouts and Ableton tutorials —> Studio Brootle Youtube.
- If you’re looking for 1 to 1 online Ableton lessons get in contact to get the most out of your studio time, email: studiobrootle@gmail.com.