Ableton Wavetable Tutorial
Welcome to the Studio Brootle Ableton Wavetable Tutorial. This guide covers all features of Wavetable, and a run down of how to use them. Plus I includes from patches and descriptions of how they are made to give an insight into sound design with this tool.
Firstly and we’ll make a quick patch to show some basic features of the plugin, then a description of each part of the synth, then some free presets with full info on how they were made, including drones, pads and wobbling basses….
See also: Ableton Wavetable Presets, House Drum Patterns, VCV Rack Tutorial, Ableton Sampler, Ableton Operator Tutorial, and UK Garage Drum Pattern.
You can also find our paid packs at our Shopify store —> here.
You can find our paid packs at our Shopify store, use this code for 60% off: SBCOM60STWD
Subscribe / Free Kick Drums
Subscribe to our email list to get a pack of kick drum samples now, and 5 new kicks each week, every week. All made in our studio. Plus other free samples from time to time…
Wavetable Synthesis
So what is wavetable synthesis?… Wavetable synths have been around since at least 1978 when the Wavecomputer 360 keyboard was released. Since then there have been many incarnations of this type of synthesis in hardware and software format.
Wavetable synthesis is a type of digital synthesis, but is very different from FM synths (like Ableton’s Operator, or the Yamaha DX7), wavetable synths play a digital waveform and use it like an oscillator. And you can change the waveform by scrolling through a ‘wavetable’ with some different waveforms on it.
More recently wavetable synths became popular in the last 20 years with the release of Native Instruments Massive becoming one of the most popular VSTs of it’s time. This was helped with the rise in popularity of the dubstep genre…
The wavetable synthesis and assignable LFOs at the heart of Massive made it a really important tool in dubstep production. The growling wubs in many dubstep tracks are made from scrolling a wavetable to find a nasty metallic sweet spot in the wavetable, then scrolling just away from that sweet spot, then assigning an LFO to wub in and out of that sound. It also had the ability to draw your own modulation or combine envelopes, and LFOs (along with drag and drop modulation assignment) to really easily design modulating growling basses.
More recently Xfer’s Serum has become a hugely successful wave table synth tool which is based on a very similar idea to the original Native Instruments Massive, but a more modern incarnation and with different features and wavetables.
Ableton’s Wavetable is Ableton’s take on a modern Wavetable plug-in to rival Serum and Massive. Wavetable has less modulation options than Serum, but is a really easy to use and never-the-less powerful synth, with it’s modulation matrix and complex wavetables as well as distortion and FM modulation of the table, it is capable of some great sounds, particularly those growling basses and drones.
What is Ableton’s Wavetable Synth?
Wavetable is capable of some really impressive sounds, it uses a different kind of synthesis to Ableton’s other synths… It uses wave tables, which are cycles of sounds stored in a table which the synth scans and plays back. It can cycle through the samples in various ways and speeds (which can be modulated) – and this is what gives wavetable synths their characteristic sound. Wavetable is sort of like Serum for Ableton… the popular VST Serum as well as Native Instrument’s Massive use a similar type of technology…
You can make some really interesting sounds this way that are not possible with an FM synth (like Operator) or a Subtractive Synth (like Ableton’s Analog) for example.
Tip: pop up the synth for a better view by clicking the little arrow on the top left of it…. you can then see more of it. You can also grab the top of it with the mouse and pull it up to full screen like this….
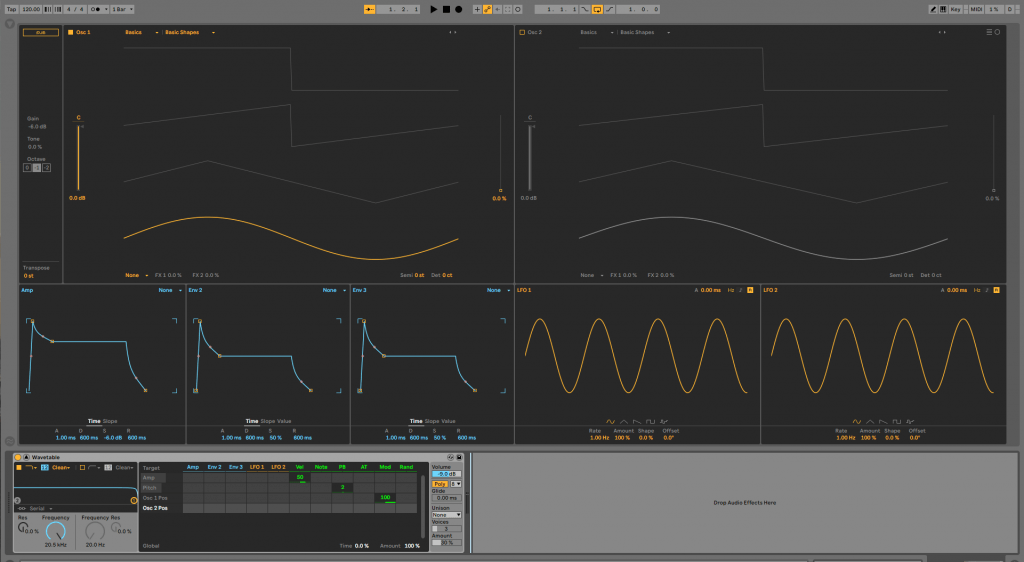
Now you can see both Oscillators, The Envelopes, LFOs, the Filter and the Matrix all in one screen. We’ll use this mode in this Abelton Wavetable Tutorial as it is a much clearer view.
Our First Wavetable Patch….
Before we dive in to the details of this wavetable tutorial, lets make a quick patch to show the basics of what Wavetable does……..
- Make a new channel with a fresh, new instance of Wavetable in it.
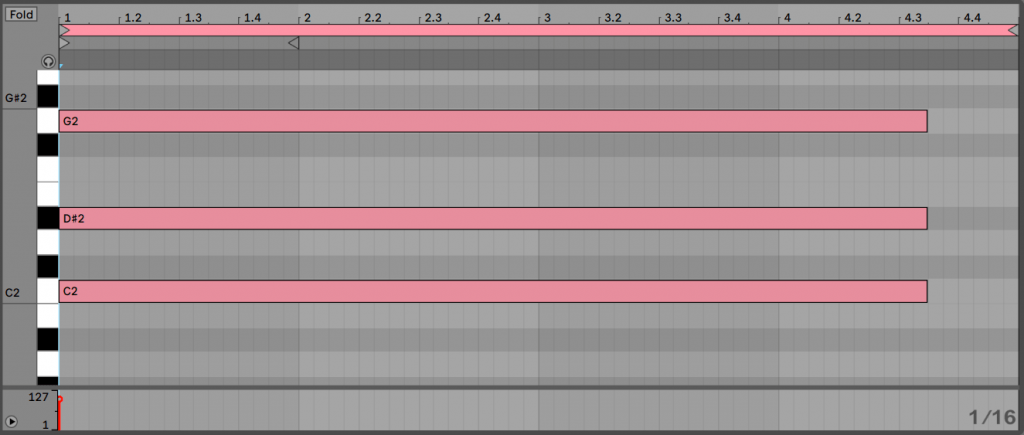
- And make a midi clip to play a long note for the length of a bar (i.e. C3)
- Press play and you can hear a sine wave playing – the default patch.
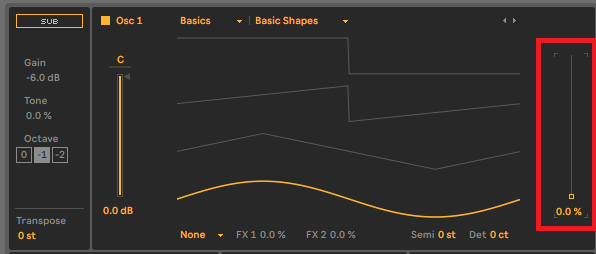
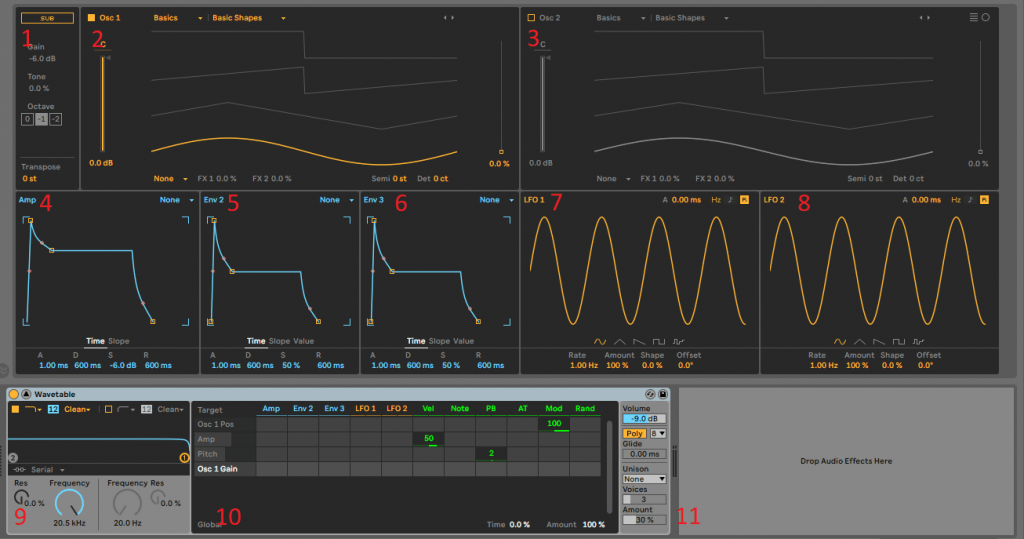
- Pop up the synth to make it bigger (with the arrow top-left) to get a good full screen view. Take a look at the screen, and the image shows the default wave table that starts on a sine wave (highlighted in yellow). Grab the slider on the right (circled in red in the image below) and move it up and down you can scroll through the wavetable to other waveforms that it is bundled with. Make sure the synth is playing when you do this and you can hear what is happening. They are highlighted as you move through them. This movement through them is what makes wavetable synthesis a great sound design tool…
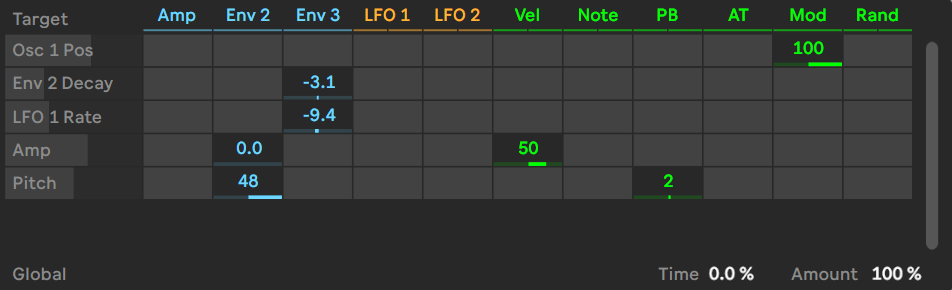
- Now assign Env 2 to do this movement… We’ll do this on the Matrix. Set the square that corresponds to ‘Env 2’ and ‘Osc 1 Pos’ as in the image….
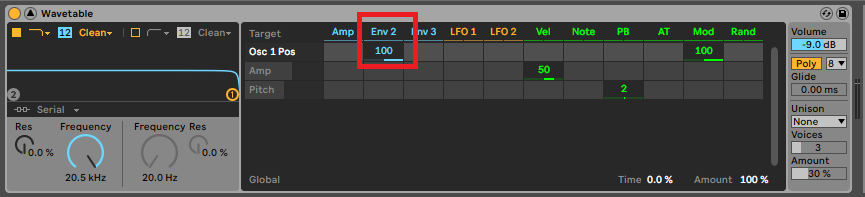
- Play a note and you’ll see the wave changing in the Osc1 Screen as Envelope 2 modulates scrolling through the Wavetable. This routing of a modulation source to a parameter via the matrix gives you some really creative sound design possibilities.
- Now turn the Sustain of Env 2 to 0 (it is the S in ADSR on the bottom of the envelope). This makes the envelope close quickly and when you play a note you’ll see and hear the wavetable movement happen quicker than before.
- Loop a note and play with the Env 2 envelope and you’ll get the idea of what can be done. This shows the basic principle of Wavetable synthesis.
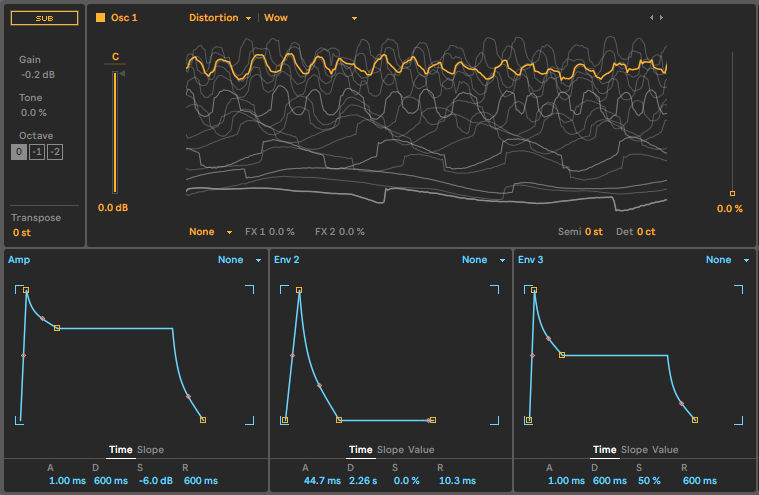
- Try changing the wave table now – at the top of the Oscillator display there are two drop down selectors that say ‘Basics’ and ‘Basic Shapes’. Change them to other types for example ‘Distortion’ and ‘Wow’. And play a low note like C1 and you’ll get nasty growling bass. Add some Attack (the ‘A’) to Envelope 2 (see the image below for the settings) and you can start to see what this synth might be capable of, it should sound like this…..
Wavetable’s Sections
Here is a quick guide to the various parts of Wavetable and how they work/what they do… We’ll make some presets along the way…
1. Sub Oscillator and Transpose
This adds a sine wave for a sub bass under the main oscillators. Toggle it on and off by clicking ‘Sub‘. There is a Gain control for this oscillator’s volume. The Tone knob adds some harmonic content – turn it up and you can hear the effect. You can also select the octave. This section is really simply but also very useful for bass design when paired with the other Oscillators.
To tune/transpose the whole instrument – use the Transpose tuner at the bottom of this section.
2. Oscillator 1
Turn on and off by clicking on the square next to the Osc1 name at the top.
Under the Osc1 name is the Level/volume for the Oscillator. The ‘C‘ above it means Centre – it is the pan setting for the Oscillator. You can drag it up and down to pan the oscillator to the left or right speaker.
Above the display are the waveform selectors. There are loads to choose from. The last one is ‘User‘ where you can drop you own wavetable samples into the synth to use.
Over to the top-right of this Oscillator section there are some small arrow selectors – with these you can scroll through the wavetables.
The screen in the middle shows the wave table position. The slider to the right of the screen is used to adjust this position.
Under the screen is the Oscillator Effects drop-down selector. These are a great sound design tool. Select them and hear what they do when you change the amounts next to them…
FM: Applies frequency modulation to the Oscillators. You can set ‘Tune‘ and ‘Amount‘ – change these values while playing a note (loop a note on c3 for instance and hear the changes as you tweak). You can see the difference too on the screen.
Classic: here you can add pulse width and sync effects to the oscillators. I love these to be honest, we’ll make a patch with these later in this tutorial (the ‘Pulse Width Bass’ below).
Modern: These have a Warp and Fold effect (the latter is wave-fold distortion) – try modifying these with an envelope. They distort the waveform further.
These are great controls to add to the Mod Matrix and modulate the sound.
Note when you click on a parameter that it comes up as the last row in the Modulation Matrix at the bottom. This is really handy for modulating a parameter quickly.
Lets make a preset to show these in action….. we’re going make a heavy hardcore/rave bass so get your bomber jacket and rave whistle ready…

Making a Pulse Width Bass in Wavetable:
- Load up a default Wavetable with a long note playing at C1. Use the default Basic Shapes Oscillator.
- Turn up the position slider on the right of Oscillator 1’s display to 70.
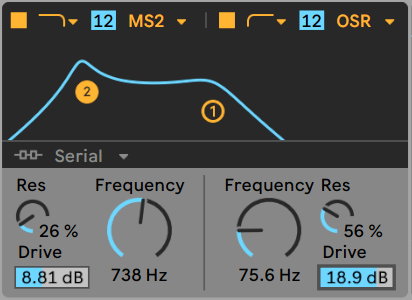
- Change the Oscillator Effects from None to ‘Classic’. And turn the PW up to 60% and then turn the Sync up to 15% for some buzz and you can hear a really buzzing sounding bass when you play a note.
- Click on the PW and it will show in the Matrix Modulation. Turn up the LFO1 to modulate Osc 1 PW to 10. You’ll immediately get a nice moving bass tone. Set the LFO1 to about 4 hz.
- Add in the sub bass oscillator, then in the filter section, add the OSR distortion and turn up the Drive to 10 (with the filter open) to add some distortion and bass weight.
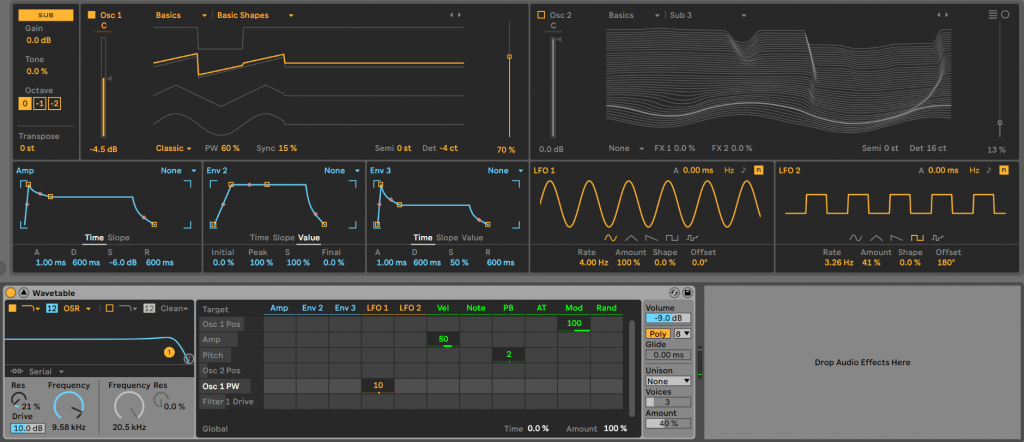
- You get a really heavy, moving PW rave bass, here is what the patch we made sounds like….
It should look like this….
3. OSCILLATOR 2
Very similar to Oscillator 1 – see the section above, except at the top right there is an icon for changing the visuals on the screen to a circular view.
4,5,6: Amp Envelope, ENVELOPE 2 and 3
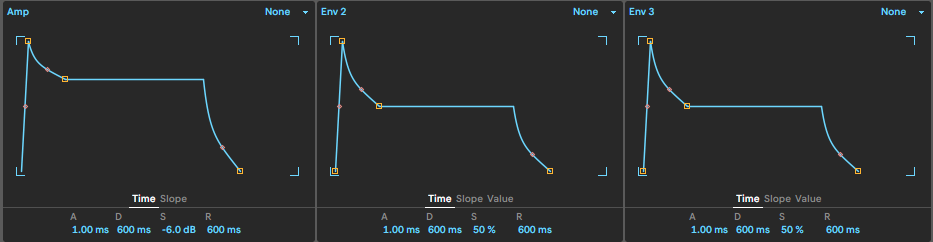
We have 3 envelopes in Wavetable the Amp Envelope has Time and Slope parameters and the other 2 also have Value. Time is the standard ADSR envelope settings, Slope is the bend of the envelope between the points, and Value is to set the position of the points. The good thing is that all of this can be done with the mouse by clicking and dragging so it is really quick to sculpt the sound with these envelopes – try it out by clicking on any of the points or lines in an envelope. The envelopes can be assigned to parameters using the Mod Matrix.
What do the Wavetable Filter modes do? The drop down menus at the top of each envelope have 3 modes: None, Trigger and Loop.
None is regular ADSR envelope behaviour.
Trigger is like None but it ignores now long I play a note – it just goes their the envelope and does not sustain more even if I’m holding down a note.
Loop will repeat the envelope, and it best explained with an example… Let’s make a preset to show this…
Sinewave Wub Bass in Wavetable…
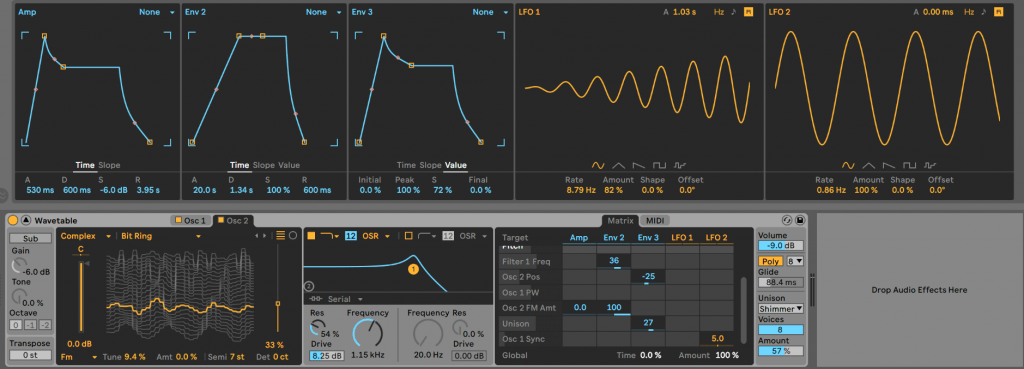
- Load up a new Wavetable with a long note playing C1.
- On Osc 1 – change the Oscillator Effects to FM, the Tune to 50% and the Amt to 25%.
- Amt will come up in the Modulation Matrix as the last one touched – set to 100 for Envelope 2.
- You should just hear a nice sine wave with some harmonics.
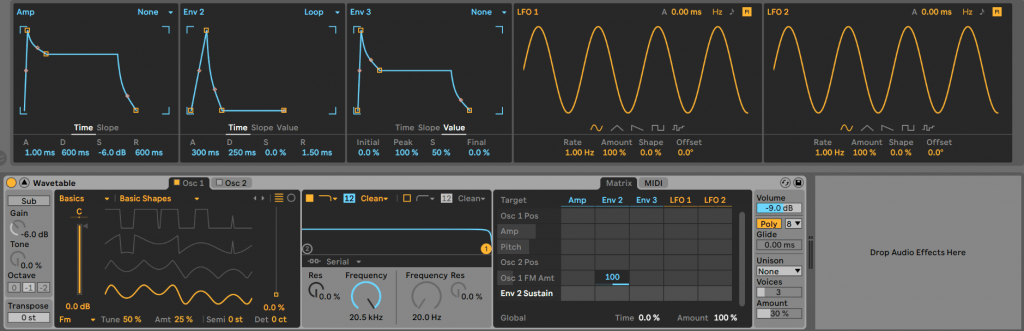
- Change Env2 to Loop. Then turn the Sustain (S) to 0, and the Decay (D) to really short, like 250ms. You should hear it’s effect like an LFO (as the envelope is looped) on the sine wave. Add some Attack to Env 2 – like 300ms and you should get a really nice wubbing sinewave like this….
For more sounds like this see also: UK Garage Drum Pattern.
You can play with the envelope settings and sculpt the sound in more details. Here is what it looks like…….
7,8. LFO1 and LFO2

The LFO section is really interesting, particularly the Shape feature – try dragging it up and down on a sinewave for example.
Along the top of the display… A is the attack time, the Hz/notes knob changes the timing from Hertz to synced to the BPM/bar, and the R button is for re-trigger – switch it on and off to trigger if the LFO restarts on each note or is free running.
Under the display you can set the waveforms, and under that the Rate (speed), Amount, Shape and Offset (where the wave starts).
9. Filter
The filter section on Wavetable is great…
It is like the standard built-in Abelton Auto filter, but instead there are 2 filters (switch them on and off with the small squares).
They both have the Ableton filter distortions (OSR, MS2, SMP, PRD) which model analogue synths’ filter distortions. You can select different filter types from the drop downs too. Lowpass, Highpass, Notch and Morph. Morph can sweep between the mods of the other 3 – if you select it, then a mix control appears at the bottom of the unit – which can be really useful to modulate wildly between all the filter types.
You can change the slopes from 12db to 24db by click on the ’12’ blocks for each filter.
You’ll probably want the default serial set up (as in the below image where filter 1 does it’s job then filter 2 does it’s job after that – like having 2 filter units one after the other in an effects chain). But under display you can change the filter settings to Parallel (both Oscillators into Filter 1 and Filter 2) and Split (Osc1 goes to Filter1 and Osc2 to Filter2).
10. Mod Matrix
In the Mod Matrix you can quickly assign the Envelopes, LFOs and some midi functions (like velocity and note) to the synth’s parameters (like the pitch of an Oscillator). If you click on a parameter it will show up as a possible modulation target in the matrix…..
11. Global Settings
There is global Volume, and a Poly/Mono switch (to make the synth act as a monosynth – so if you play 2 overlapping notes, it will only play one of them), a drop down to select voices.
Glide (and amount) – so when you play overlapping notes in Mono mode the pitch slides between notes.
The Unison section has a lot of options to be honest, it has sliders for Voices and Amount. And a selector for types which are….. Classic – normal unison. Shimmer – the unison pitches are in random intervals (great for pads). Noise – Fast and random pitch intervals – great for glitchy drones. Phase Sync – unison with phase sync, for sync-style tones. Position Spread – the wavetable positions are spread out like unison. Random Note – both the wavetable and detune are spread out and start randomly.
The two patches ‘Evolving Pad‘ and ‘Dark Drone‘ below show different unison settings.
Ableton Wavetable Presets
Here’s a few more free Ableton Wavetable Presets to download below….
You can find more wavetable presets to download here: Ableton Wavetable Presets.
Evolving pad
Making a pad in Wavetable…
- Play a chord, like this (we played it for 4 bars on loop)…
- On a fresh Wavetable instance we put both Oscillators on and set them both to Complex>Bit Ring. On Osc 1 I set the Position to 75%, The Effects to ‘Classic’, and Sync to 10. On Osc 2 I set the Position to 33%, The Effects to ‘FM’, Tune to 9.4% and Amt to 0% (we’ll modulate it later). And Semi-tone tuning to 7st for nice 5th chord sound.
- The filter is set with OSR type and Drive set to 8-ish with the filter mostly open – just to give the pad some nice distortion.
- Amp envelope – we want the pad to slowly come in and then fade out over a long time, so set slow attack on the amp envelope and long release
- Shimmer! A really good effect for pads is the Shimmer setting for unison.
- Matrix mod – this is really important for an evolving pad sound – a lot of modulation sources and targets, but subtle use of them…. you can see on the image below we make Env 2 have a slow attack and set it to modulate Filter 1 Freq and Osc 2 FM amount – so that slowly as the pad plays the filter opens and it get slightly more detuned due to the FM setting on Osc2.
- Env 3 is set with a shorter attack and Decay / Sustain and this is set to change the Unison amount and and Osc2 Pos – so that the pad’s unison and Wavetable position change slightly (they are set to relatively low values) as the note is played. Also Oscillator Sync on Osc 1 is set to wobble a really small amount with LFO2 to make the pad shimmer more.
- The key to a pad like this is subtle shimmer and slow movement – and the mod matrix really helps with this in Wavetable.
- This is what our pad sounds like…
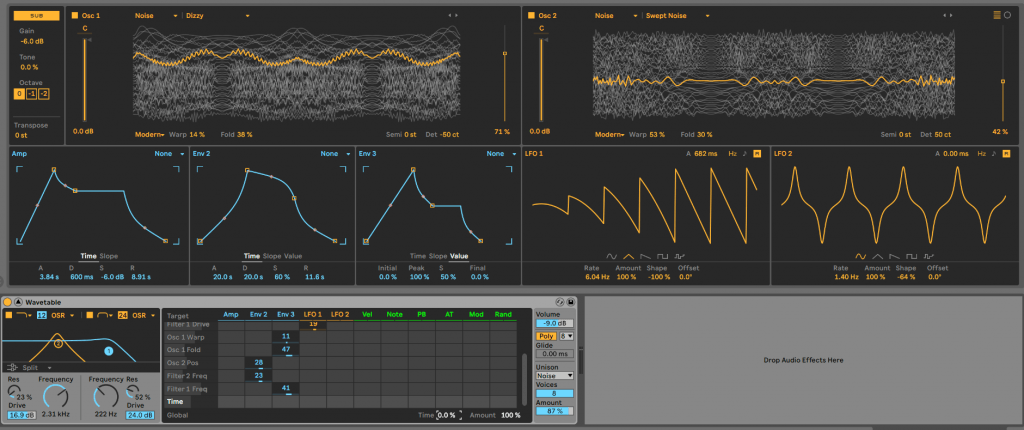
Dark Drone
Hear the drone we are making here….
- Play a long note on C1. (just one note, not a chord)
- We set up 2 Oscillators on different Noise waveforms.
- Both are detuned and both with ‘Modern’ Oscillator Effects with Warp and fold turned up.
- Plus a Sub Oscillator for bigger bass.
- Filters split with lots of drive.
- We add lots of modulation to keep the sound moving a generating over time… Slow attach Envelopes modulation Oscillator 1 Position, Warp, and Fold, Oscillator 2 Position, Filter Frequencies. And Filter 1 Drive is pulsating from being modulated by an LFO.
FAQs
Ableton Wavetable Vs Serum
They are both synths that modulate wavetables, and sound great. Serum can do more, Wavetable is easier to use and does less, and can use less CPU.
Ableton Wavetable Vs Operator
They are both different tools that make and process sound in different ways. Wavetable is based around modulating the scrolling of wavetables and Operator is FM synth where oscillators can frequency modulate each other with envelopes.
Summary
Hope you found this Ableton Wavetable Tutorial interesting – if you have any questions or suggestions, please let us know.
Here’s a few of our other articles you might like… Ableton Operator Tutorial and Ableton Analog Tutorial as well as our Wavetable Presets.
Before You Go…
- Get on the email list for free kick drum samples every week, plus you get all the past ones as soon as you subscribe: you can do that HERE.
- You can find our paid packs at our Shopify store HERE ( use this code for 60% off anything or everything: SBCOM60STWD ) .
- Follow us on Youtube for hardware workouts and Ableton tutorials… Studio Brootle Youtube.
- If you’re looking for 1 to 1 online Ableton lessons get in contact to get the most out of your studio time, email: studiobrootle@gmail.com.