Ableton Vocoder Tutorial
The Ableton vocoder is a versatile effects unit cable of doing the famous vocoder fx of old like the Kraftwerk / Daft Punk-esque ‘robot-voice’, and much more.
You can find our paid packs at our Shopify store, use this code for 60% off: SBCOM60STWD
Subscribe / Free Kick Drums
Subscribe to our email list to get a pack of kick drum samples now, and 5 new kicks each week, every week. All made in our studio. Plus other free samples from time to time…
See also: House Drum Patterns, Ableton Sampler.
How A Vocoder Works
A vocoder has two signals, a modulator and a carrier. They are sent through a filter bank. The modulator (lets say it’s a vocal from a microphone) is split into bands on the filter bank. Then another signal, the carrier (lets say it’s a synth) is passed through the bands. So the vocal is filtered in a harmonic way by the synth and you get that typical robot voice vocoder sound.
A vocoder has many uses besides the robot voice by the way – you can process basslines and drums in harmonic ways using a vocoder.
Lets start with an example of how to get those robot vocals…
How Do You Vocoder Vocals?
To get the classic robot vocoder sound you need a synth playing a square wave, a vocal track and a vocoder.
We will do this step by step using modules that come with Ableton Live Suite and we’ll use a sample that comes with Ableton called ‘Vox Check It Out’. So start off by adding this sample to a Sampler or Simpler in a new channel.
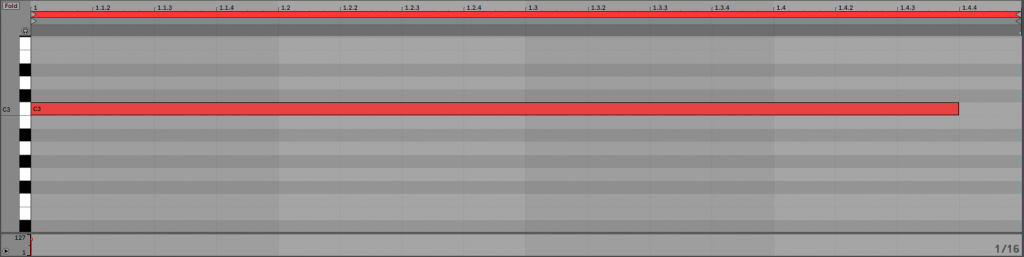
Then make a midi not to play almost a whole bar at c3 (as in the image). Play it and listen to the vocal, it should sound like this (this is with no effects on it):
Then add the Vocoder after the Sampler. And play it again. The vocal is being vocoded with a Noise signal. It sounds demonic and awesome! It will sound like this (this is just the vocal being vocoded with white noise)…
This effect is great, it is used a lot on techno vocals, especially pitched down. It starts to show you what a vocoder can do. Now we’re going to use a synth as a carrier in a more traditional way so you can see how the robot voice used by everyone from Kraftwerk to Daft Punk is created.
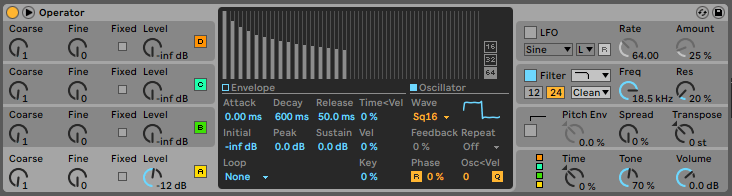
We will add a new channel with an Operator, playing a long C3 note too, a one bar loop, similar to the midi clip as the sampler is playing – you can copy it over.
Then make the Operator plays a Square wave. Play both channels and make sure they are both looping on 1 bar so the sound keeps playing and you can then hear your changes).
Mute the Operator channel by clicking on it’s channel number (we want it to play and affect the vocoder but we don’t want to hear it’s audio output directly . You should now just hear the vocal with the vocoder on it.

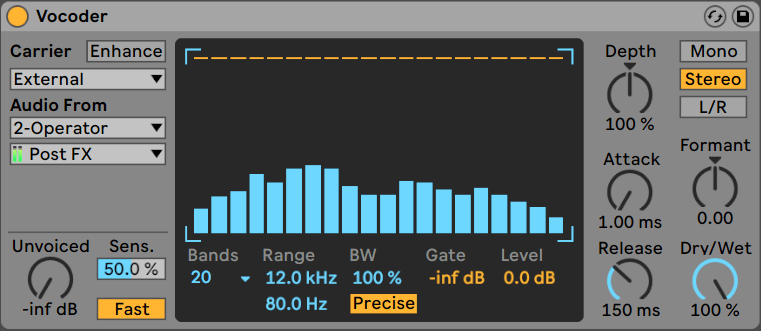
Then go back to the vocoder unit and set the Carrier drop down to External. Then set the second drop down to Operator. You should hear the robot voice!!!
Now change the Operator midi note to c1 which is much lower (2 octaves down) and you’ll hear the vocal change too).
Now play a few different notes or a melody on the operator while the vocal is playing and you’ll hear what it does.
These are some examples of the famous robot voice – making changes to the operator settings – changing the wave types and the pitch and you’ll hear dramatic changes.
I hope this gives a good introduction to the Ableton Vocoder. There is plenty more it can do, next we’ll go through each control and what it does…
How Do You Use The Ableton Vocoder?
The Different Carrier types
Noise: uses an internal white noise source. When Noise is selected you get a X-Y box that changes the down sampling and density of the noise – give it a try and move the circle in the box to tweak the sound.
External: You can use the audio output of another channel in Ableton as the Carrier. You can then select if you want it pre-fx, post-fx or post-mixer.
Modulator: The same sound source that is used for the modulator is used as the carrier.
Pitch tracking: This uses an automatically pitched internal oscillator. This is like the infamous Autotune processing which is used in RnB and hip hop a lot. It can be a useful tool for tuning vocals, aswell as pushing the settings to get that Autotune effect.
Controls to the left of the main display
The Enhance button compensates for lost of high end that you sometimes bet in vocoding.
The Unvoiced knob adds a slight noise signal and can be useful to bring out some elements of the Modulator that can get lost when vocoding due to having much pitch information to them.
Sens is how sensitive this is. And Fast/Slow switches between two different algorithms for this detection. Tweak them and see how they sound.
The main display
You can adjust each frequency band by clicking on it here. Play some audio and click on some bands and you’ll see and hear this.
Under the display – you can set the bands resolution under Bands. You can set the min and max frequencies of the bands and cut out some top and bottom end processing using the Range settings. BW sets the bandwidth of the filters, cutting it low for some thin bands cab get some really interesting results for ‘robot vocals’, you can also boost the BW to over 100% for overlapping bands.
The Precise/Retro button switches between precise mode where the filters have the same gains and bw as each other, but switching to Retro mode can make the bands be thinners but louder at higher frequencies.
Gate is a minimum threshold that bands need to be at, or they will be silent. Raise it slowly with audio playing and you can hear it kicking in and some bands drop out – I find it good for processing glitchy drums.
The Level is the volume of the output.
Controls to the right of the main display
Depth this how much vocoding happens basically – how much the signals are processed.
There are 3 settings for stereo width of the vocoder:
Mono – carrier and modulator signals are mono’d. Stereo uses a stereo carrier, but mono’s the modulator. In L/R mode the carrier and modulator are stereo.
Attack and Release set the attack and release of the modulator signal. turn up release and you can here the signal play for longer.
Formant shifts the filter bank frequencies up or down.
Dry/Wet is the global amount of the effect, as you would expect.
Some patch ideas:
Techno Vocals Using Noise
An effect you hear used in techno a lot is vocoding vocals with noise.
I’m going to take this sample from a Grandmaster Flash acapella:
Then I loop it, vocode it with noise and stick a kick and sub under it and speed it up:
You’ve probably heard something similar, you can try pitching the vocals down, processing them with some chorus before the vocoder and experiment with different vocoder settings too.
Phattening Hats And Snares By Vocoding With Noise
You can quickly phatten up it snares or hi hats by adding noise to them. In the example below I take a 606 hat and snare loop, then halfway through I chuck on the Ableton Vocoder with a default setting, fully wet and vocoding them with noise. You can try this yourself with various other settings too
More things to try
Try vocoding a drum beat – adding harmonic content to it, or noise. Tweaking the Gate and BW settings can be interesting here. Vocoding vocals and synths together is a really nice one, so that they become one element.
For techno and industrial music you can vocode almost anything with noise to make it nastier and more aggressive. Even kick drums and sub basses.
Summary
I hope you found this useful – the Ableton vocoder is a brilliant effect that can be applied to almost any sound to add harmonic content or even for distortion type fx by using noise. Please send us any music you make after reading this tutorial, or any ideas you have.
For more Ableton tutorials, see our other articles https://www.studiobrootle.com/category/ableton-tutorials/
Before You Go…
- Get on the email list for free kick drum samples every week, plus you get all the past ones as soon as you subscribe: you can do that HERE.
- You can find our paid packs at our Shopify store HERE ( use this code for 60% off anything or everything: SBCOM60STWD ) .
- Follow us on Youtube for hardware workouts and Ableton tutorials… Studio Brootle Youtube.
- If you’re looking for 1 to 1 online Ableton lessons get in contact to get the most out of your studio time, email: studiobrootle@gmail.com.