Ableton Simpler comes with all versions of Live. It is a great little sampler. We’ll go into all it’s features here so you can utilize this instrument to it’s fullest. We’ll make some sounds along the way to get to grips with it’s sound design tools.
See also: Ableton Sampler, Studio Brootle 909 Sample Pack, House Drum Patterns, VCV Rack Tutorial.
You can find our paid packs at our Shopify store, use this code for 60% off: SBCOM60STWD
Subscribe / Free Kick Drums
Subscribe to our email list to get a pack of kick drum samples now, and 5 new kicks each week, every week. All made in our studio. Plus other free samples from time to time…
Ableton Simpler
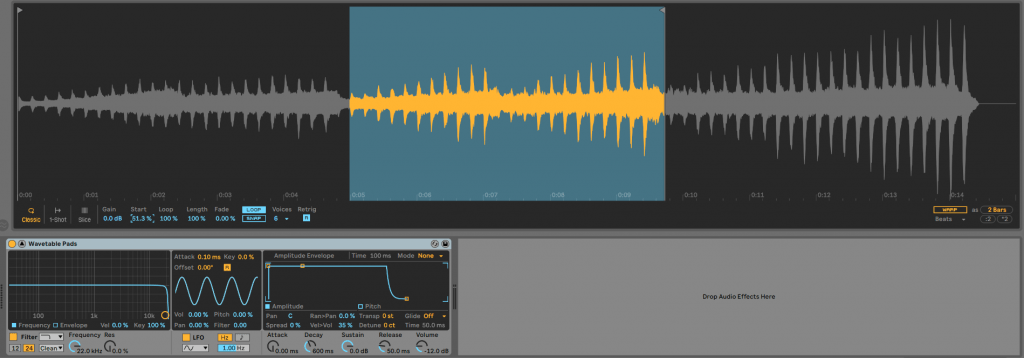
Tip: use pop up mode for a better view- click the arrow at the top left of Simpler (next to the on/off button). It also means you don’t have to switch tabs on the Simpler to get to the LFOs and Envelopes too.
We offer online Ableton lessons, get in contact to get the most out of your studio time: Ableton Lessons.
A Quick Ableton Simpler Patch To Get Started…
Ok, firstly we’ll make a patch to show some of Simpler’s sound design tools, using a lot of the parts of the instrument…
We’ll turn a 909 kick into a bass patch by manipulating it with Simpler.
Here’s what the kick sounds like without and looping or processing by Simpler, it’s just a 909 kick.
And here’s what it sounds like with some parameters tweaked, turning it into a bass line/ bass patch……
Here’s how you can make it, and you’ll get to grips with a lot of Samplers features (don’t worry if you don’t understand them all, we’ll explain them in more detail later)…
- Start a new channel and load up a new Simpler.
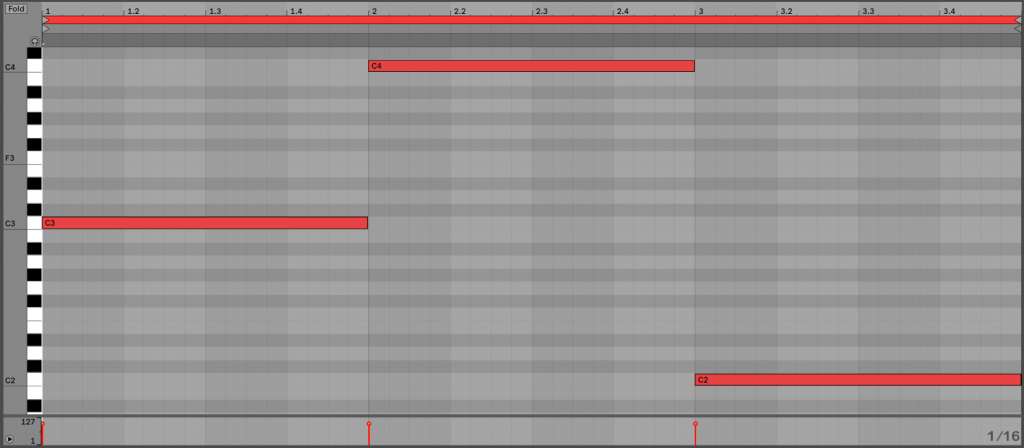
- Play a note at C3 the length of a bar and loop it and press play. This way you can hear the tweaks as you make them.
- Load up the sample “Kick-909” that comes with Live (or use any 909 kick sample you can find).
- Stay in the default Classic mode, Switch the LOOP button on and make a tight loop.
- Turn up Fade to 100% (to keep the loop smooth). This will loop the tail end of the kick into a long note. You can copy the settings from the screen shot or download the patch below if you like…

- Set the Filter to 12db (not 24) set it to low pass (the first one in the Filter drop down box)
- Set filter frequency at 244 Hz, Res high at 90% or so, and set the distortion drop down to OSR and turn the Drive knob u to 20db or so. This is to filter down the kick and remove the top frequencies and also add some great drive distortion.
- Then click ‘Envelope’ on the filter section and set the amount to 65 and make the decay longer to 8s. This means that the filter will sweep for each note, starting off high and then falling. You can hear this if you play the note.
- In the LFO section We set Pitch to 100 and Filter to 24, change the wave to square and adjust the frequency to 8 hz. This adds a massive amount of character to the tone by modulating the filter and pitch. Make sure you have the loop playing while you make these changes so you can hear it.
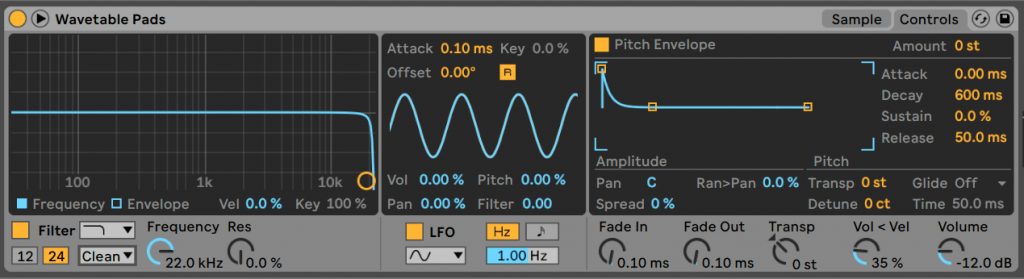
- Then you can add a pitch envelope to modulate a pitch dive effect for each note – I access the pitch envelope by clicking ‘Pitch’ under the Amplitude Envelope. Then set the amount to 35 and the Decay to 1.15s
- You should get phat modulating bass tone something like this….
Ableton Simpler Use Cases:
Slicing And Editing Breakbeats In Simpler
Here’s an example in the video of how to slice break beats, follow these steps (or watch the video for more detail).
- Add Bouncy-117bpm from Core Library to the Simpler.
- Click on slice mode and make sure ‘slice by transient’ is selected, you want to do it by transients for drum breaks (so you get each sample on a different note and can play it individually).
- Right click on the main Simpler screen and click ‘slice to midi’, it will make a new channel. You can copy the midi file from the new channel back to the original Simpler to play it in one Simpler (or you keep it in the drum racks so you get a Simpler PER SLICE TO USE, and can process the drums individually).
- You can then take the midi and re-edit it in the piano roll view easily.
Reverse Ride Cymbal Riser
Here’s how to make an easy riser or build in a track, follow these steps (or watch the video for more detail):
- Add a 707 crash or a 909 ride cymbal to Simpler.
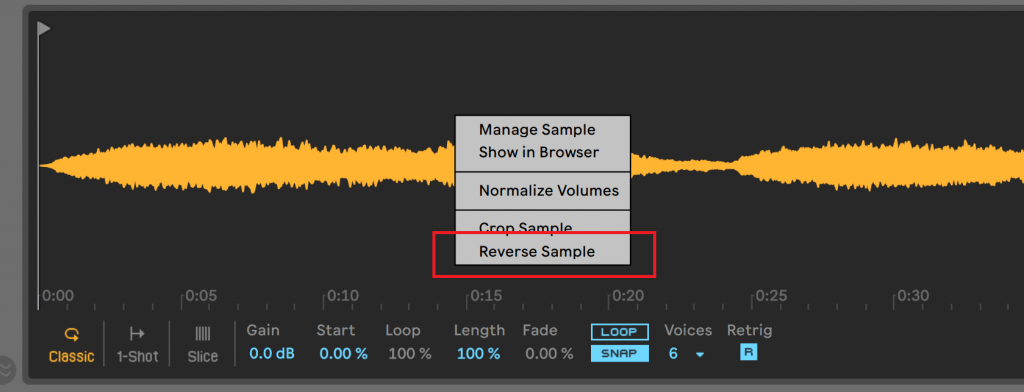
- Right click on the sample waveform
- Click Reverse.
- Play a long note just before a drop.
Ableton Simpler Tutorial
Ok, here’s a run down of each feature in Simpler, starting with the all important modes…
Ableton Simpler Modes: Classic, One-Shot, Slice
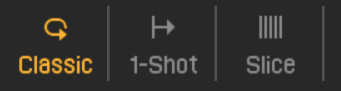
Ableton’s Simpler has 3 modes that are used for different types of sampling.:
3 modes:
Classic: normal sampling mode – if you load a chord sample in here for example it will be playable across the whole keyboard and will pitch up and down as you play up and down the keyboard, like a piano.
1-Shot: for percussion – it plays back the entire sample
Slice: This slices the sample and is great on sampled drums.
We’ll go into all these modes below as they all have different controls…
Simpler’s Classic Mode
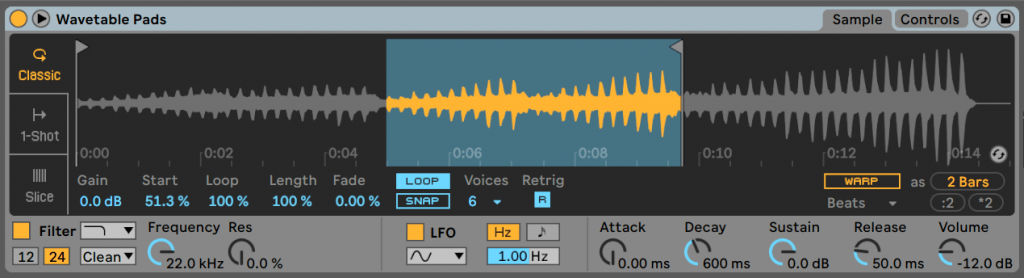
Under the display you have a few controls…. Gain is the volume of the sample. Start is the Start point of the sample.
Loop this is the start point of the loop, if you are using Loop mode (it will be disabled and greyed out if the Loop button is off). Length is how long the loop is. Fade allows for smoother looping by crossfading at the loop points – turn it up and you get a less ‘jerky’ loop. The Loop and Snap Mode buttons – Loops switches on looping and Snap make the loop end points move to the nearest point at which volume is zero, which helps to stop clicking which can sometimes happen if a sample is cut in the middle of waveform. These settings can really help change a short sample into a much longer, useable one.
Voices sets the amount of sounds that will play at once.
Retrig on will mean that a notes that is playing will stop playing if the same note is played again.
Warp controls – we’ll go into these later
Simpler’s 1-Shot Mode

This is a monophonic one-shot mode. It has Gain which is volume, Trigger and Gate mode – trigger means you play a note and the sample plays in it’s entirety even if you only play a short note. Gate is a more normal play back mode. Snap – moves the start and end points to the nearest zero crossing (where there is no volume, which reduces clicking).
It’s controls Fade In and Fade Out that do exactly what you would expect – Fade In is like the attack of an amp envelope – it’s how long the volume will take to go from zero to 100%. And Fade Out is like the release part – it controls how long the sample will fade to nothing.
Also on this mode you have Transpose (Transp) to change pitch of the same, the ability to set velocity to modulate volume (Vol<Vel). And global Volume.
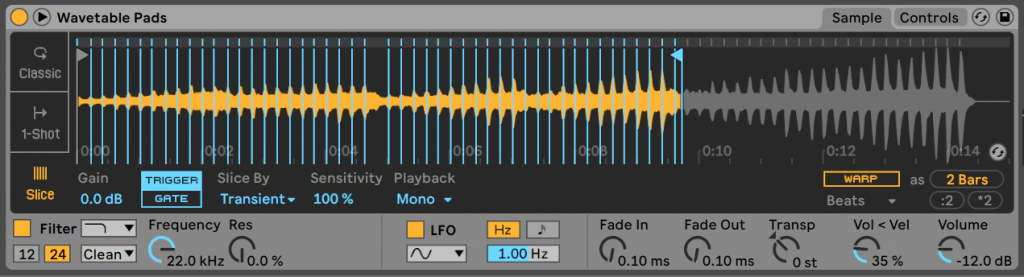
Simpler’s Slice Mode
Drum loop slicing has been at the heart of electronic music from the early days. Hip-hop, since it’s inception, has sampled drum from jazz and funk. Jungle and hardcore too. Recycling and re-sampling other music has always gone hand in hand with dance music production.
Ableton Simpler’s Slice mode follows where MPCs and other beat slicing samplers have gone… it can slice drum beats into separate hits and map them across the keyboard, ready to be replayed and re-edited.
The first three settings – Gain, Trigger and Gate – are the same as in 1-Shot mode.
The Slice By drop down menu chooses the algorithm that will slice up the sample, they all have different advantages depending on the type of sample used…
Transient – the biggest transients/peaks are picked out and sliced just before. This is the most sensible way for clean/clean drum loops. The Sensitivity setting is how strongly the algorithm works.
Beat – this slices on the musical count (Set by the Division setting).
Region – the beat is sliced in equal measures (Regions) the amount is set by the Regions setting.
Manual – double click on the Simpler display to manually set a slice. Use the better/bigger pop-up view for more accuracy.
The Playback setting is sort of like ‘voices’ – here you can set it to Mono (monophonic – one slice at a time) or Poly (multiple samples possible at the same time – with additional settings). Thru means that after a slice is triggered, the rest of the sample will continue to play in full if you want that.
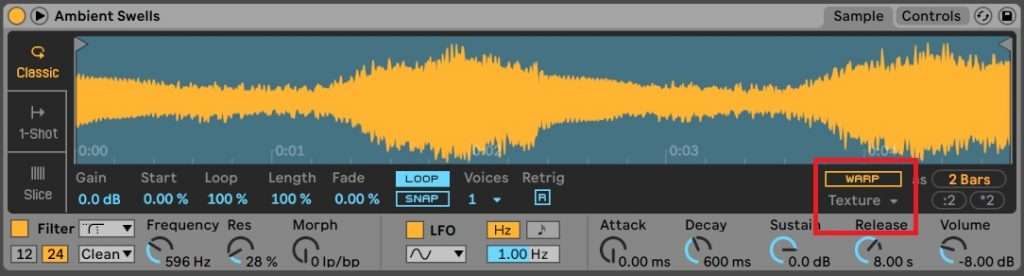
Warping in Simpler
Warping is how Ableton Live time stretches it’s samples and audio content. You’ll be familiar with this if you’ve used Live to DJ. Ableton can take a track and put markers on the beat and then sync it – so if you increase or decrease the BPM, the track stays in time.
Ableton Simpler contains this technology, using the Warp controls at the bottom right of the display.
This is great as normally if you speed up the bpm a drum loop will play faster, and if you pitch it up it will play a higher pitch. But with Simpler you can lower a drum sample but keep the bpm the same for example.
This is probably best explained with an example… Here is a drum beat played at c3 (normal pitch) then the same beat played an octave up, and then an octave down….
You can hear that ALL the beats are the same sample, at the same length and the same BPM (they’re all at 120bpm). But the pitch is changed. I love using this for pitching down sampled drums slower EBM tracks to be honest.
Warping can also be good for sampling arpeggios and sequences – as they can be synced to the bpm, and pitch changed independently of tempo. I.e. if you put a 303 acid sequence in a sampler it will speed it up and slow it down as you play different notes and it won’t fit the beat, but you can use Simpler to sync it by warping and then change the pitch as you like.
A quick run down of the controls: switch on the WARP button and then to the right of that you can select the length of the loop. Also you have :2 and *2 buttons to double up or halve the timing if the warping algorithm gets it wrong.
You get different setting for each type of Warping algorithm. With Beats you get Preserve which warps on the transients (peaks) by default or ou can set to a musical time division.
The Mode decides what to do if the sampler runs out of sample between transients. I.e. i you have a 120bpm loop that is just a kick and snare, and slow it down to 100bpm there will be extra space between the kick and snare, the loop mode decides if you want to leave the space, or loop the audio of the previous beat (forward or reverse). You can try it out on a slowed down loop. I always use the first one-shot mode for beats, but if I’m sampling a chord or sequence, the looping can be a great tool to stop gaps in the audio.
Env is how quickly a beat or warped section fade out leave it at 100 for no fade or turn down to zero for a quick fade out.
Tones mode is for stretching simple harmonic content like a pad. Grain Size is the size of the grains obviously.
Texture mode for more complex sounds that are more difficult to pitch. The is Grain Size, and Flux makes the algorithm more random.
Re-Pitch pitches a sample up and down without time stretching it.
Complex mode is an algorithm for whole songs or samples that mix drums and synths etc.
Complex Pro is like the above Complex mode but it has a Formants setting and Envelope which both help with stretching complex sounds.

Here’s an example of times stretching using Warp. I use the sample ‘Vox Yeah Ironman’ that comes with Ableton. By clicking on the *2 button until it maxes out, so I can stretch the vocal quite nicely for that old school vocal effect.
Controls Tab
The Filter, LFO, and Envelope sections of Ableton’s Simpler are located in the Controls tab (top right) along with some global parameters. Or if you’re using the pop-up view this tab is always shown at the bottom.
Simpler’s Filter
Simpler comes with a the standard Ableton filter (which is great) and it includes the Morph mode too (the filter morphs between other filter types – when you select this a new Morph dial pops up next to the Res).
The filter has 2 different slopes: 12 db and 24 db. Plus the really nice analogue-modelling Drive distortion algorithms OSR, MS2, SMP, and PRD that can be selected from the drop down menu, once selected a Drive knob appears.
If you click the Envelope square under the display (next to Frequency) you can access the filter Filter Envelope. Which has an Amount setting to the top right which obviously sets how much the envelope will affect the filter.
Under the display you can set the filter open more with higher velocity or pitches using the Vel and Key settings.
LFO
The LFO in Simpler has at the top Attack (a fade in to the LFO) Key (the LFO will play quicker if the higher the note played), Offset (the starting point of the wave) and R (set the LFO to restart for each note played) controls.
The LFO can be assigned to Volume (Vol), Pitch, Pan and Filter in varying amounts or all at the same time if you like.
It can be set to free running or BPM synced with the Hz and note buttons, the speed of the LFO is set below them.
You can change the wave from the drop down selector too.
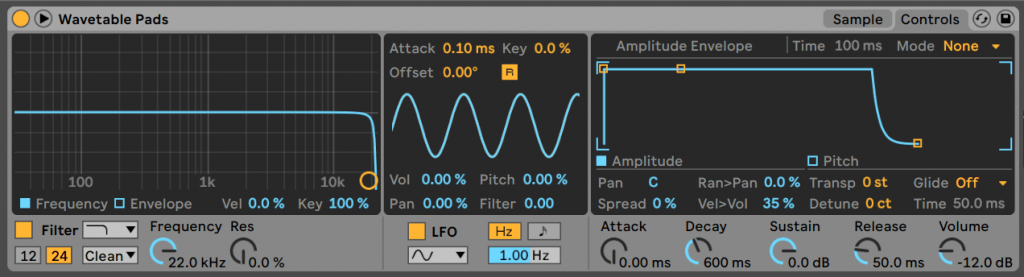
Simpler’s Amplitude and Pitch Envelopes
Over on the right of the Controls tab you have the Amplitude Envelope as default. You can switch between the Pitch Envelope and the Amplitude Envelope. This obviously sets the fade in, hold and fade out of volume for each note played. You can click on the points to drag them and move them. The Attack, Decay, Sustain, Release knobs at the bottom do this too. At the top right of the display you can loop the envelope – so it retriggers and plays the sample again repeatedly. Loop mode is where if you play a long note, the envelope restarts once the decay is finished, Beat and Sync are similar, but in time with the beat/bpm, which can be really useful for rhythmic looping of samples. The Rate or Time is setting to the left of the dropdown is the length of the loop.
If you click on the Pitch (under the display and next to Amplitude) the display will show the Pitch Envelope. Here is a simple envelope and the Amount at the top-right controls it’s affect on the pitch of the sound.
Global Parameters
Pan sets how centered the sample is on the stereo field. Ran>Pan can make this Random which can be useful. Plus you have global Transpose (Transp for semtones and Detune below it for finer tuning). Glide (and it’s Time control underneath) has a monophonic (Glide) and polyphonic mode (Portamento) which will bend the notes from the pitch of the last note played.
Spread plays 2 copies of a sound, one in the left speaker and one in the right and a detunes them slightly for a nice wide chorus-type effect.
Vel>Vol affects the volume of the samples based on midi velocity.
Frequently Asked Questions…
How To Reverse A Sample In Simpler
Ableton’s Simpler does not have a dedicated reverse button, but you can right-click (ctrl-click on a Mac) in the display and reverse a sample from there.
How To Change The Pitch Of A Sample But Not Speed
To change the itch of a sample but keep it same speed or length, use the WARP MODE:
Summary
That’s it for our guide to Ableton’s Simpler, hope you get some good results from this in your music. If you make any interesting patches or have anything to add, please get in touch and let us know.
Good luck 🙂
Here’s a few of our other articles you might like… Ableton Wavetable Tutorial, Ableton Operator Tutorial, and Ableton Analog Tutorial.
Before You Go…
- Get on the email list for free kick drum samples every week, plus you get all the past ones as soon as you subscribe: you can do that HERE.
- You can find our paid packs at our Shopify store HERE ( use this code for 60% off anything or everything: SBCOM60STWD ) .
- Follow us on Youtube for hardware workouts and Ableton tutorials… Studio Brootle Youtube.
- If you’re looking for 1 to 1 online Ableton lessons get in contact to get the most out of your studio time, email: studiobrootle@gmail.com.