Ableton Analog Tutorial…
In this Ableton Analog Tutorial we’ll run the down the main features of Analog in detail, with screenshots and examples. It has some great features, include filter drive, and the ability to chain the filters to get both drives. Then I’ll be deconstructing some presets at the end to get to grips with this instrument as quickly as possible and use it to design the sounds you want. If you just want the free presets now, scroll to the bottom!
See also: Ableton Operator Tutorial, Ableton Wavetable Tutorial, Studio Brootle 909 Sample Pack, House Drum Patterns, VCV Rack Tutorial.
You can find our paid packs at our Shopify store, use this code for 60% off: SBCOM60STWD
Subscribe / Free Kick Drums
Subscribe to our email list to get a pack of kick drum samples now, and 5 new kicks each week, every week. All made in our studio. Plus other free samples from time to time…
Ableton Analog Synth
What is Ableton’s Analog? It’s an instrument that models parts of classic analogue synths and combines them into one synth in Ableton Live. It has oscillators, sub oscillators, a noise oscillator, dual LFOs, unison, out-of-box vibrato and filters with nice distortion settings that mimic the drive of real filters on legendary analogue synths.
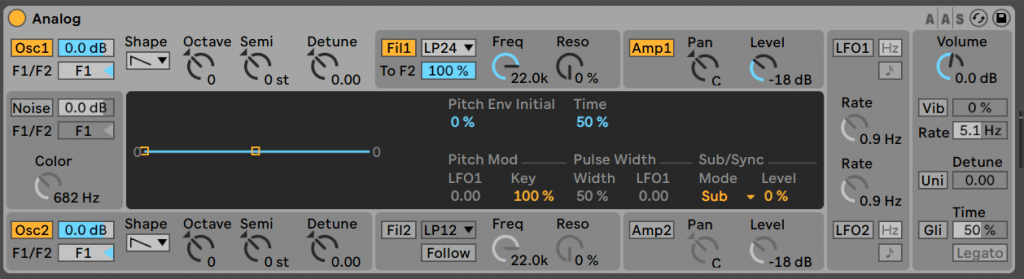
All the main sections of Analog are around the outside (the Oscillators, Filters, Amp Envelopes, LFOs, and Global settings). Then it has a central Display that changes depending on which outer section you click on, it contains extra settings relating to that section. For example if you click on an Oscillator the Display includes a pitch envelope for that oscillator and LFO routing, Pulse Width and Sub/Sync options for that Oscillator.
Here is a run down of what everything does so you can start using them in your sound design (we’ll make some presets to demonstrate along the way too)…
Oscillators
OSC 1 AND 2
Click on the Osc1 or Osc2 buttons to toggle the oscillators on or off. next to this is the level (0db by default).
Filter routing – the F1/F2 button is actually a slider that goes from just F1 to just F2 and in the middle some mix of both filters. i.e. you can set it to 60/40 and send the signal from the oscillator to both filters, but 60% to F1 and 40% to F2. There’s quite a few settings in between.
Shape – the waveform of the oscillator.
Tuning – (Octave, Semi, Detune) detune is like fine tuning.
Display:
The Envelope… Here you can see a pitch envelope with 2 points on it you can drag and move it – or manually enter the values in Pitch Env Initial and Time. There is a separate envelope for Osc 1 and Osc 2 independently – clicking on each oscillator brings up their envelope and other settings in the display.
Pitch Mod – you can set an LFO to pitch (the LFO has to be switched on for this to work). Key should normally be set to 100% – this just means that playing midi notes or the keyboard effects pitch (as normal on any synth).
Pulse Width – This is where a square wave’s pulse width can be changed so it is a rectangle (a higher pulse width) or a thin bar (lower pulse width setting). You can set an LFO to modulate this – the famous Pulse Width Modulation (PWM) effect you can hear on a Roland SH-101 or the Junos/Jupiters.
Ableton Analog Use Case: Pulse Width Modulation
Let’s make a patch to demonstrate pulse width…..
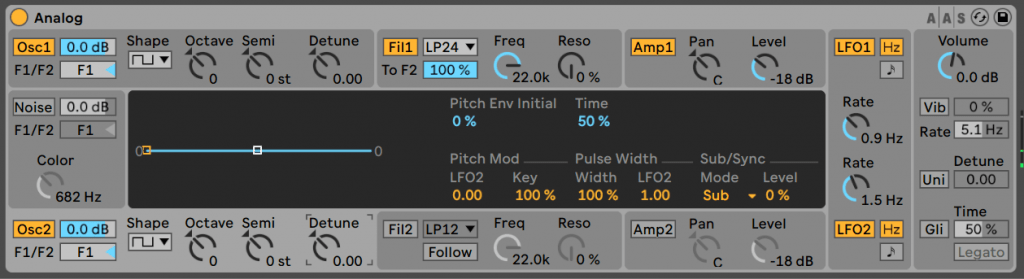
- Load a fresh Analog. Switch LFO1 on by clicking on it’ name ‘LFO1‘
- Then on Osc1 select the Sqaure Wave, and in the middle of the screen turn up the Pulse Width to 100% and LFO1 to 1.00 and you’ll hear that nice pulse width sound.
- Then do the same with Osc2 – set a square wave with Pulse Width to 100% and LFO2 to 1.00
- Then change LFO2‘s Rate to 1.5 Hz and you should get a nice PWM bass..
- This is playing a note at C1, it should sound like this….
Sub/Sync – here you can choose between adding a Sub Oscillator or Oscillator sync. The Sub Oscillator is another oscillator basically an actave down to add some real bass weight. Sync is a feature used on many classic synth where one Oscillator can be set to retrigger with the pitch of another. It is a classic sound used in a lot of dance music, especially when you sweep it, and is a feature of some famous synths like the Pro-One. Analog uses a third internal oscillator for this.
Ableton Analog Use Case: Oscillator Sync
Let’s make a simple patch to demonstrate this classic hard Sync effect.
- Start a fresh instance of Analog and play a note C3 for the length of a bar.
- You can’t modulate sync in Analog but you can use clip envelopes and automation to do this. So click on Osc1, and then under Sub/Sync set the Mode to Sync, and the Ratio to 100%. Right-click on the Ratio and click and select ‘Show Moduation’ and draw in an envelope from low to high and press play.
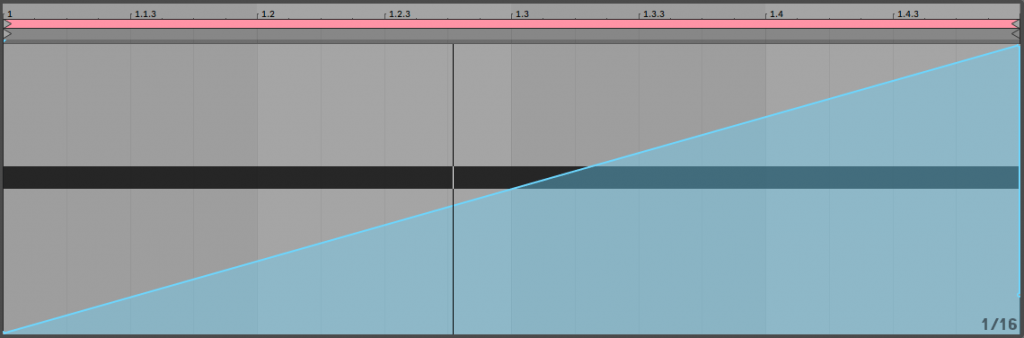
- You can hear the sync sweep effect.
- It should sound like this…
Some other things to try: you can try using it on both Oscillators at the same time maybe with different Sync settings, and you can use an external LFO or envelope tool to modulate the parameters.
Noise Oscillator
It can be handy to add some noise to synth sound of an old grainy wooly synth sound. This noise can be routed to either filter or a mix off the 2 with the filter mix, it has a volume knob and a low pass filter (the Color control).
Filters – Fil1 and Fil2
Toggle on an off with the Fil1 and Fil2 buttons.
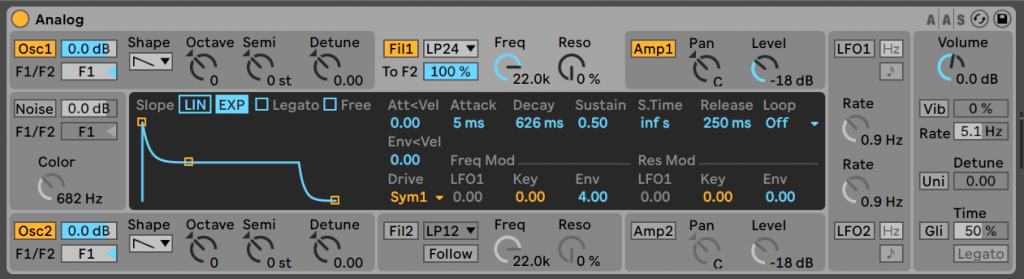
The Envelope settings are seen in the central display. There is an ADSR envelope that can be edited with the mouse. It has both LIN and EXP modes that affect it’s shape – click on them both to see the effect on the envelopes. The Legato mode as standard means that if the previous note is held down still, the new note’s envelope does not trigger, the previous note’s envelope continues. Free mode means the envelope basically becomes a trigger and can be used on drums/percussion – ignoring note sustain.
The top row is mainly the ADSR amounts. But is also has (Att<Vel) which means Attack can be controlled by Velocity which can be great for bass wubs! Also at the end on the right you can set the envelope to Loop so it re-triggers and then the envelope can be used like an LFO.
There are 2 types of filter drive – Sym and Asym. There is not a drive amount knob unfortunately but there are 3 different levels of drive for each one – Sym1 is slight drive, Sym2 is medium and Sym3 is high amounts of drive. The same for the Asym drive type which also goes 1-3.
Key tracking on the filter – the higher the note the higher the filter (like you get on Juno-106 for example).
On Fil the ‘to F2‘ is how much of F1’s output goes to F2 to be filtered again there.
On Fil2 the ‘Follow‘ button means that the cutoff of Fil2 will follow that of Fil1 – if it is switched on then the difference between the 2 cut-offs is set by Fil2’s Cutoff Freq.
You can modify both cutoff and resonance. They can be modulated by an LFO, the note played (as Key) and sent to the Filter Envelope
Filter types include a nice formant filter for vowel sounds, lets make a preset to demonstrate it…
Here’s what it will sound like – the filter gives it a human vowel sound quality….
We put both Oscillators on and routed them to Filter1, which we set to the Formant 6db setting. The filter envelope is in EXP mode to make a more rounded attack for more of ‘wow’ sound.
Tweak the resonance knob to taste – note that in this filter setting the resonance knob is not controlling resonance, but it changes to shape the vowel sound.
Distortion is added with the Sym1 setting.
Amp
Analog has a fairly standard Ableton amp envelope. It can be modified by LFO (you can get some gating effects by . Pan can be modified here too. Envelopes are the same as the filter ones with LIN/EXP Legato/free settings etc.
LFOs
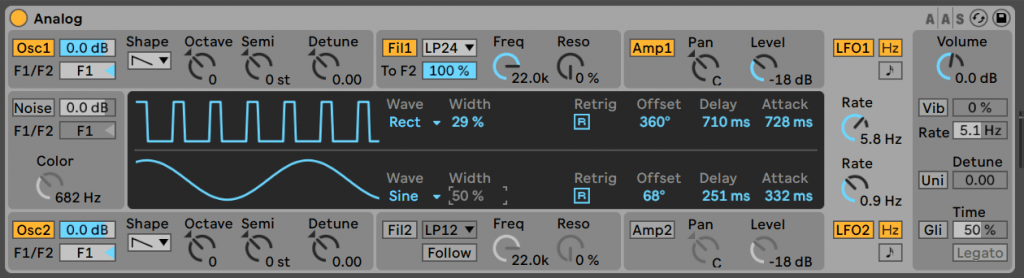
Analog has 2 great assignable LFOs with choice of Wave, with Width control for the Rect (square wave). Retrig selects if the LFO restarts for each note or runs continuously. Offset is the wave start position, Delay and Attack are how delayed or slowly the LFO fades in from 0.
Global settings
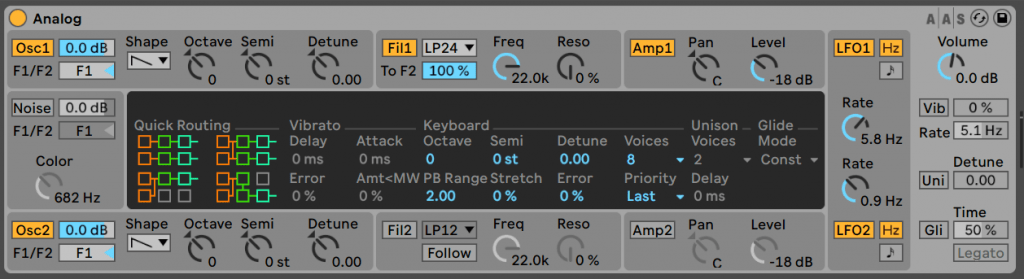
Quick Routing – this is great – you can quickly change which oscillator goes to which filter and so on. For example the top left one means the output for Osc1 goes to Filter1 then Amp1. And Osc2 goes to Filter2 then Amp2. If you click on the one bottom right you can see that is will route both Oscillators to Filter1 and then Amp1.
Vib – vibrato – This is an LFO that effects global pitch, it can be nice to use low values for a really slight pitch wobble on a pad for example.
Uni – Unison – it multiplies the oscillator and detunes each one by the amount set. The Delay setting moves the voices by time (not pitch).
Here’s a preset to demonstrate…. unison on bass….
This is basically two saw waves, one detuned up 6 semitones. And then the Unison whacked up for a buzzing detuned synth ! Plus a filter envelope.
Glide – use it in mono mode and hear the notes glide between each other if you overlap them or play them at the same time.
Error – to add some slight pitch variation to simulate oscillator drift on old synths – where they sometimes drifted slightly in and out of tune.
Ableton Analog Presets
Moog Style Mono Bass
Here’s a nice Moog-ish bass, it sounds like this….
Here are two detuned oscs, plus some slight noise to dirty it up a bit. I set Analog to mono mode (in voices), and put Legato on envelope settings so that pitch bends when notes overlap. I make the filter ‘key follow’ cut off by setting Freq Mod Key for Fil1 10 1.28 and I give a slight negative key follow on res (higher resonance on lower notes), this keeps the filter moving and changing on a sequence. The second filter is open, so no filtering, but adds some distortion.
303/Acid
Here we made a 303/acid stab, it sounds like this…..
I set the synth to mono mode (in Voices) and only one oscillator so it is similar to a real 303. There are tight Amp and Filter envelopes. Filter 2 open but adding distortion.
For the midi – it is important that notes are short and don’t touch each other, but then only make them overlap when you want a slide (to make use of the legato in filter envelope).
303/ Acid 2
Here I use one saw oscillator similar to the above, but slightly different sounding due to having different filter and filter envelope settings. It uses a saw wave shaped at the filter with drive and filter envelope.
Techno 5th bass stab
Here is a nice bassy stab….
I made a chord on the oscillators, Osc2 is 7 semi tones up. Osc1 has a sub bass oscillator added for some weightier bass. Distortion on both filters. Pulse width modulations on both oscillators for a thicker detuned sound. And a low filter with a tight envelope for a low plucky stab.
Brootle Sub Bass
Here is a big heavy sub bass preset for Analog….
There is a pitch envelope on both oscs for that jungle-style pitch diving sound.
Osc 1 and 2 are sinewaves and detuned against each other, with both having sub oscillators on for a thick and heavy bass sound. There is some glide on it too.
Ableton Analog Dub Techno Preset
I made a dub techno rack with Ableton Analog at it’s heart, you can get that in a separate guide here.
FAQs
Ableton Analog vs Diva
Analog is a great instrument for Ableton. Diva has a lot more features though and a lot of different oscillators modelling more analogue synths, and the same with the filter section too.
Ableton Analog Limitations
Analog is a great synth for classic analogue sounds including unison, pwm etc too, it is really easy and simple to use. But it is limited compared to some VSTs like Diva. For me, the main issue is that you cannot mix in the filter drive, it is either on or off. So what I do is I do not use the Analog filter section, but I add a Ableton Filter unit after Analog, as this give me much more control over the analogue/style filter distortion.
Also I often put 2 Analog units in parallel in a group to make a 4 oscillator beast.
Summary
I hope you found this Ableton Analog Tutorial a useful guide for sound design. The presets should be a great starting point for your own. Please send us anything good you make, good luck!
Here’s a few of our other articles you might like… Ableton Wavetable Tutorial, and Ableton Operator Tutorial.
Before You Go…
- Get on the email list for free kick drum samples every week, plus you get all the past ones as soon as you subscribe: you can do that HERE.
- You can find our paid packs at our Shopify store HERE ( use this code for 60% off anything or everything: SBCOM60STWD ) .
- Follow us on Youtube for hardware workouts and Ableton tutorials… Studio Brootle Youtube.
- If you’re looking for 1 to 1 online Ableton lessons get in contact to get the most out of your studio time, email: studiobrootle@gmail.com.